Sunday, July 30, 2023

PowerApps Component Framework (PCF)

Q. What is PowerApps Component Framework (PCF) and how to use the PCF in Power Apps?

Follow the below video to see the implementation, advantages, etc in detail-

  • PowerApps Component Framework (PCF) is a development framework provided by Microsoft for building custom components in Power Apps

  • With PCF, developers can create reusable and fully customizable UI components that can be used in canvas apps, model-driven apps, and even in Dynamics 365 applications. These components can be integrated seamlessly into the app's interface, providing enhanced functionalities and user experiences.

  • PCF is a powerful tool for extending the capabilities of Power Apps and helps us in delivering more specific business requirements

  • Code components are a type of solution component, which means they can be included in a solution file and imported into different environments.

https://learn.microsoft.com/en-us/power-apps/developer/component-framework/custom-controls-overview


  • You can include code components in a solution and then import the solution into an environment. Once the solution containing code components is imported, system administrators and system customizers can configure columns, subgrids, views, and dashboard subgrids to use in place of default components. You can add these code components to both model-driven and canvas apps.

How is it different from web resources?

Unlike HTML web resources, code components are rendered as part of the same context and loaded at the same time as any other components, providing a seamless experience for the user.

You can create code components that can be used across the full breadth of Power Apps capabilities, and reuse these components many times across different tables and forms.

Developers can bundle all the HTML, CSS, and TypeScript files into a single solution package file and move across environments, and also make it available via AppSource

Advantages of PowerApps Component Framework:

  • Customization: PCF allows developers to create highly customized components tailored to specific business needs. This level of customization is not easily achievable with out-of- the-box controls.

  • Reusability: PCF components can be built once and reused across multiple apps and even by other developers. This promotes code sharing and reduces development time.

  • Seamless Integration: PCF components integrate smoothly with the overall app experience, making them appear native and consistent with other elements in the application.

  • Improved Performance: PCF components are lightweight and efficient, resulting in better app performance compared to some third-party controls.

  • Enhanced User Experience: By creating purpose-built components, developers can improve the user experience, leading to increased user engagement and productivity.

  • Cross-platform Compatibility: PCF components can be used in both web and mobile apps, making them versatile and suitable for various devices.

  • Cross-platform Compatibility: PCF components can be used in both web and mobile apps, making them versatile and suitable for various devices.

  • Extensibility: PCF allows developers to extend the capabilities of Power Apps by adding functionalities not available in the default controls.


Prerequisites for developing code component 

  • Visual Studio code 

  • node.js 

  • Power Platform CLI 

  • dotnet build tools

1. VS Code Terminal

  1. Pac- it’spower platformm CLI command to configure the PCF as well
    You can see the PCF in the list

  2. pac PCF init --namespace GlowingText --name GlowingText --template field

PCF- creating a component, init- initializing and giving the name as GlowingText and component name as GlowingText too

  1. npm install- it’ll take time so let me show you the structure meanwhile.

We have the 'index.ts file, where we write the code for our PCF component. This TypeScript file includes methods like 'init,' 'update view,' 'get outputs,' and 'destroy' that handle various aspects of the component's lifecycle.

The Manifest file includes metadata, properties, resources, and usage information. It defines parameters, such as sample properties and types. It also specifies feature usage, like utility and web API.

We will create  css folder to make the text glow later

we have the 'CSS' folder, containing the 'glow.css' file. This file holds the CSS code responsible for creating the glowing effect on the text. The animation class 'glow' is applied to the 'glow' element, and the colors are defined to create the desired animation effect.


  1. npm run build-  to build the project

  2. npm start watch - The 'npm start watch' command helps us test the component in the browser, rendering our PCF control with the properties defined in the 'Manifest file.'

Now PCF page should open in the browser after this command


Step 1----Open index.ts -Save -Name should show on the page 

add to 3 line- Will create an HTMLElement  variable 

public glowingKervtext :HTMLElement;

Let’s initialize it in init method- add below line in public init 23 

// Add control initialization code

this.glowingKervtext = document.createElement("div"); -initializing element

this.glowingKervtext.innerHTML = "Kerv Digital"; - setting the inner text of the element

container.appendChild(this.glowingKervtext); - appending to main container to reflect name of page
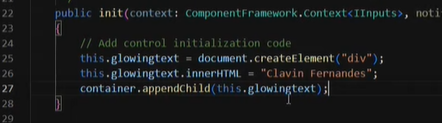
Dynamix Power name should show on the screen.

Now on the property, it’s showing a sample property

Let’s change the name to glowingKervtext. We can configure this in the Manifest file

Open the Manifest file and change the property name to to 

<property name="glowingKervtext" display-name-key="Property_GlowKervText" description-key="Property_GlowKervText" of-type="SingleLine.Text" usage="bound" required="true" />

Now the property name is showing as glowingKervtext on the page
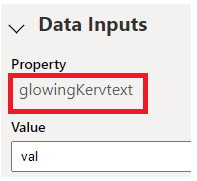
But if you change the value, the name is not getting updated. In order to update the name, we need to write the code for updating the name inside the index file

if(context.parameters.glowingKervtext.raw){  - Getting the property from Manifest file

this.glowingKervtext.innerHTML = context.parameters.glowingKervtext.raw;  - showing the value dynamically from textbox

}
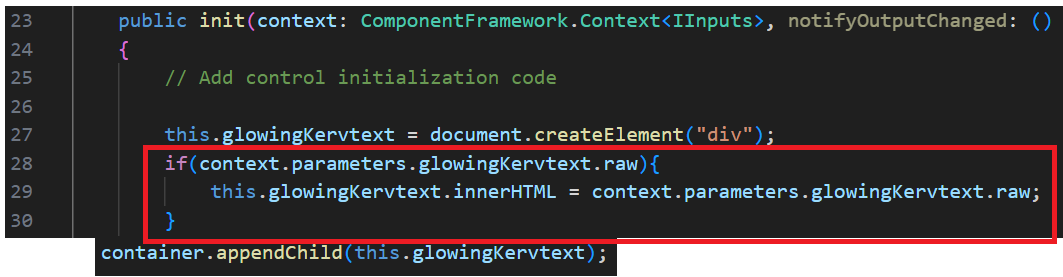
Now different name is showing on the page when the page load but not exactly when the value is changed, right. It’s showing when the page is refreshed

Let’s update the value immediately when the text value changes

Copy the above code and paste in the update method. Name should change instantly


Now whenever we’re writing any text, we want to set some other properties also- Size, color, and weight. etc. (Below image is from the Canvas app)
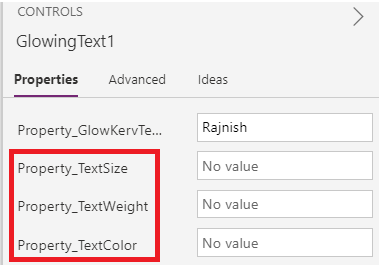
 We need to repeat the step which we did while setting text property in the Manifest file so let’s set that again

    <property name="glowingKervtext" display-name-key="Property_GlowKervText" description-key="Property_GlowKervText" of-type="SingleLine.Text" usage="bound" required="true" />

    <property name="TextSize" display-name-key="Property_TextSize" description-key="Property_TextSize" of-type="SingleLine.Text" usage="input" required="true" />

    <property name="TextWeight" display-name-key="Property_TextWeight" description-key="Property_TextWeight" of-type="SingleLine.Text" usage="input" required="true" />

    <property name="TextColor" display-name-key="Property_TextColor" description-key="Property_TextColor" of-type="SingleLine.Text" usage="input" required="true" />

Check the page, these properties should be visible on screen

Let’s set the property for them in the index file for 

Copy the above line and paste it again and again, and change the property name
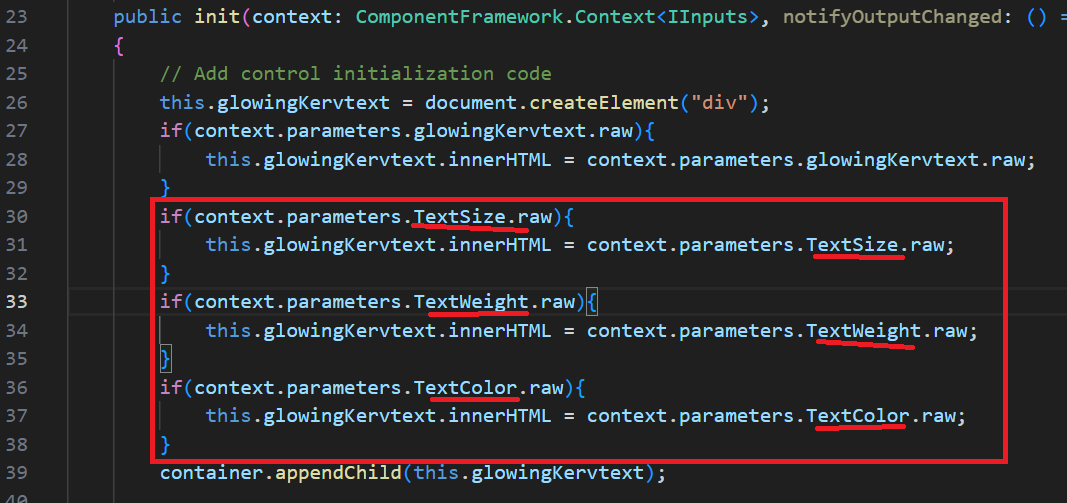
Update view

similarly, I can take this whole bunch and I want I can copy it in the update view because I want these properties to be updated whenever something changes

Save- Now go to the browser and enter text size 70, and text weight bold.


Let's make the text glow now using CSS

goto Manifest..under resources 
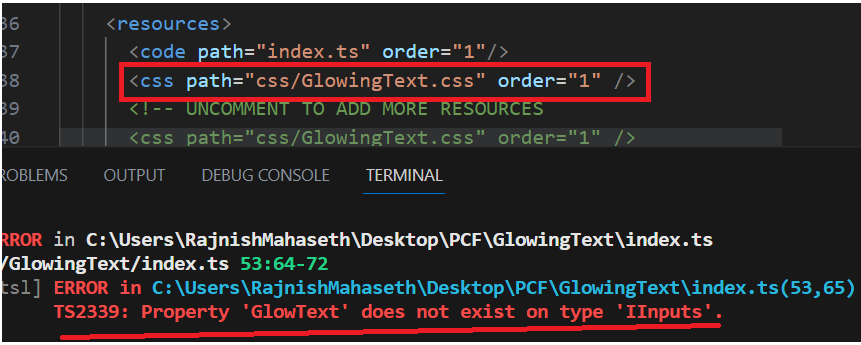
Css folder doesn't exist so it'll throw an error.

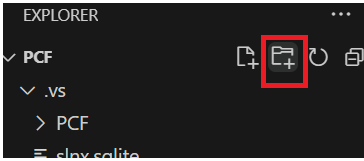
Add a new folder and give name css
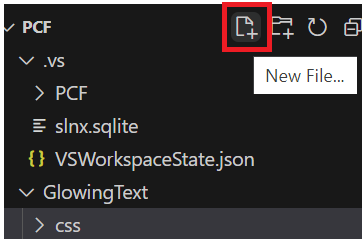
Add a file for css and give name as GlowingText.css
Add below code to GlowText.css

.glow {

    -webkit-animation: glow 1s ease-in-out infinite alternate;

    -moz-animation: glow 1s ease-in-out infinite alternate;

    animation: glow 1s ease-in-out infinite alternate;

  }


  @keyframes glow {

    from {

      text-shadow: 0 0 10px #fff, 0 0 20px #fff, 0 0 30px #e60073, 0 0 40px #e60073, 0 0 50px #e60073, 0 0 60px #e60073, 0 0 70px #e60073;

    }

    to {

      text-shadow: 0 0 20px #fff, 0 0 30px #4d68ff, 0 0 40px #ff4da6, 0 0 50px #ff4da6, 0 0 60px #ff4da6, 0 0 70px #ff4da6, 0 0 80px #ff4da6;

    }

  }

(IT MAY NOT REFLECT SO LET'S BUILD THE NPM AGAIN)

in terminal--> ctrl+C then Y

npm run build

npm start watch


still it's not rendering the CSS

So we need to add the CSS element to index.ts above and append in the init method

this.glowingKervtext.classList.add("glow");

Text should glow now


Our code component is now ready. We can make a package of this code component and keep it in a solution.

In terminal– ctrl+C


Create a folder - mkdir Solutions

cd .\Solutions\


Let's initialize the solution now (PCF control actually is a solution it is packaged in a solution that's why it's easy to manage all the CSS all the JavaScript all the node packages will be in a solution)


In terminal-pac

pac solution init –publisher–name developer –publisher-prefix dev


If it’s showing error then execute the same in cmd prompt

The solution is initialized now

Let’s add the reference to this project now

pac solution add-reference --path "C:\Users\RajnishMahaseth\Desktop\PCF"

ms build /t:build /restore  (for the first, next time just ms build)

(In case of error-'msbuild' is not recognized as an internal or external command, operable program or batch file.

Now, it will take some time, and the build success message should appear on the cmd prompt

Check-in VS code, solution zip should have been added now. Our PCF solution is ready now. Let's import this solution to CRM env
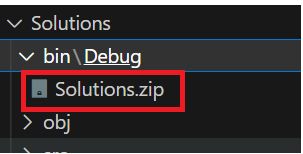
Our PCF solution is ready now. Let's import this solution to CRM env.

(select below path while importing)
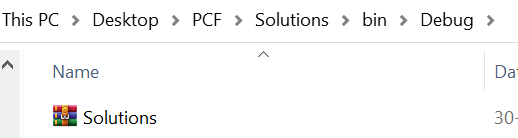

We will see the implementation of this PCF in both the Canvas app and model-driven app.

By default, PCF is enabled in MDA but we need to enable it manually for the canvas app.

Gp to admin center→ Go to env→ Select env and click on settings→ Product→ Features

Check power app component on the right side and enable it–Save

Publish all customization after solution import. Now anyone can use this PCF in that env


Create canvas app

Click on + to create a new control

Click on Get more components, click on code and select your PCF code component


References-

https://learn.microsoft.com/en-us/power-apps/developer/component-framework/code-components-best-practices

https://learn.microsoft.com/en-us/power-apps/developer/component-framework/custom-controls-overview


Sunday, July 16, 2023

Power Platform Pipelines

Q. How to deploy the solution using Power Pipeline in Power Platform or Dynamics 365?

Follow the below video to see the implementation-


Wednesday, July 5, 2023

Show and Hide Tabs in Power App using JavaScript | Dynamics 365

 Q. How to show and hide tabs using Javascript in Dynamics 365?

Follow the below video to see the implementation-


Introduction:
Dynamics 365 is a robust and versatile customer relationship management (CRM) platform developed by Microsoft. One of the key strengths of Dynamics 365 is its flexibility in customization. In this blog post, we will explore a powerful customization technique using JavaScript to show and hide tabs within Dynamics 365. This technique allows you to tailor the user interface to display relevant information based on user actions or specific conditions, enhancing the overall user experience and productivity.

Prerequisites:
Before diving into the implementation, ensure you have the necessary access and permissions to customize forms within Dynamics 365. Additionally, a basic understanding of JavaScript and Dynamics 365 customization concepts will be beneficial.

Step 1: Identify the Target Form
The first step is to identify the form on which you want to implement the show/hide tabs functionality. Navigate to the Dynamics 365 customization area and open the form customization editor for the desired entity.

Step 2: Create a Web Resource
To encapsulate the JavaScript code, we need to create a web resource within Dynamics 365. This resource will store the JavaScript code and can be referenced within the form customization. Create a new web resource and specify the appropriate name and type (JavaScript).

Step 3: Add JavaScript Code
Inside the web resource, add the JavaScript code responsible for showing and hiding tabs. The code will typically use the Xrm.Page object model to interact with the form and its components. Here's an example code snippet to get you started:

// Function to show or hide tabs based on the visit type field 

function showHideTabsBasedOnVisitType(executionContext) {
  var formContext = executionContext.getFormContext();
  // Get the visit type field value
  var visitType = formContext.getAttribute("cbt_visittype").getValue();
  // Get the tab controls
  var Tab1 = formContext.ui.tabs.get("tab_tab1name");
  var Tab2 = formContext.ui.tabs.get("tab_tab2name");
  var Tab3 = formContext.ui.tabs.get("tab_tab3name");
  var Tab4 = formContext.ui.tabs.get("tab_tab4name");
  // Show or hide tabs based on the visit type
  if (visitType == 1) { //Instructor Standards Checks
    Tab1.setVisible(true);
    Tab2.setVisible(false);
    Tab3.setVisible(false);
Tab4.setVisible(false);
  } else if (visitType == 2) { //ComplianceChecks
    Tab1.setVisible(false);
    Tab2.setVisible(true);
    Tab3.setVisible(false);
Tab4.setVisible(false);
  } else if (visitType == 3) { //Educational PR-Visits
    Tab1.setVisible(false);
    Tab2.setVisible(false);
    Tab3.setVisible(true);
Tab4.setVisible(false);
  } else if (visitType == 4) { //Site Inspections
    Tab1.setVisible(false);
    Tab2.setVisible(false);
    Tab3.setVisible(false);
Tab4.setVisible(true);
  } else {
    // If the visit type is not set or doesn't match any condition, hide all tabs
    Tab1.setVisible(false);
    Tab2.setVisible(false);
    Tab3.setVisible(false);
Tab4.setVisible(false);
  }
}

The above code assumes that you want to show or hide a tab based on the value of a specific field on the form. Modify the tabName variable to match the name of the target tab, and update the condition variable to reference the field name and its desired value.

Step 4: Add the JavaScript Code to the Form
After saving the web resource, go back to the form customization editor. Add a new form event handler to invoke the showHideTabs function whenever the form loads or a specific event occurs (e.g., field value change). Specify the appropriate event and add a reference to the web resource containing the JavaScript code.

Step 5: Publish and Test
Save the changes to the form customization, publish the form, and navigate to the entity's record to test the show/hide tabs functionality. Verify that the tabs are displayed or hidden based on the specified condition and user interactions.

Conclusion:
Customizing Dynamics 365 forms using JavaScript provides immense power and flexibility to tailor the user experience to specific business requirements. By leveraging the show/hide tabs technique outlined in this blog post, you can enhance the usability and relevance of your Dynamics 365 forms, ultimately improving user productivity and satisfaction. Experiment with this technique, explore other customization possibilities, and unlock the full potential of Dynamics 365 to meet your organization's unique needs.

Sunday, July 2, 2023

Copilot in Power App

 Q. How to create a Power app with Co-Pilot?

Follow the below video to know What is Copilot, how it works, what can Copilot do, and how to use Copilot Practical example- Create an app with CoPilot

In this blog, we delve into the world of Copilot in Power Apps, a powerful tool that revolutionizes app development. Discover what Copilot is and gain insights into its functionality, as we explore how it works and what it can do for your app development process. Learn how to effectively utilize Copilot, leveraging its capabilities to streamline your workflow and create feature-rich applications with ease. Uncover the numerous benefits of incorporating Copilot into your app development journey, empowering you to build robust and efficient applications. Join us for a practical guide on creating an app with Copilot, as we showcase the practical application of this cutting-edge tool.

See the above video(link here) to know how to create an App with Copilot and insert Copilot in the app


Thursday, June 29, 2023

Power Automate: Record Creation and Lookup Field Mapping

Q. How does Power Automate support record creation and lookup field mapping?

Follow the below video to see how the automation is done in power automate:

Power Automate, also known as Microsoft Flow, is a cloud-based service provided by Microsoft that allows you to create automated workflows between different applications and services. With Power Automate, you can automate various tasks and processes in Dynamics 365, including record creation.

Record creation involves automatically generating new records in a designated system or application. With Power Automate, you can define triggers and conditions to initiate the creation of records based on specific events or data changes.
Lookup field mapping refers to the process of populating lookup fields in a record with relevant information from other sources. Power Automate enables you to fetch data from various systems or services and map it to the appropriate lookup fields in your target system.
By leveraging Power Automate for record creation and lookup field mapping, organizations can automate repetitive tasks, ensure data consistency across systems, and improve overall efficiency. It simplifies the process of creating new records and ensures that relevant data is accurately mapped to the corresponding lookup fields, saving time and reducing manual effort.

To create a record in Dynamics 365 using Power Automate, follow these steps:

  1. Sign in to Power Automate (flow.microsoft.com) using your Microsoft account.
  2. Click on "My Flows" in the left navigation menu and then click on "+ New" to create a new flow.
  3. Choose a trigger for your flow. For example, you can select "When a new email arrives" if you want to create a record in Dynamics 365 whenever a new email arrives.
  4. Configure the trigger settings based on your requirements. For the email trigger, you may need to connect your email account and specify filter conditions.
  5. Add an action by clicking on the "+" icon below the trigger. In the search box, type "Dynamics 365" and select the relevant action from the list. For example, you can choose "Create a new record" or "Create a new Common Data Service record."
  6. Connect to your Dynamics 365 environment by providing the necessary authentication and connection details.
  7. Configure the record creation action by specifying the entity (e.g., Account, Contact) and mapping the field values. You can use dynamic content to fetch values from the trigger or previous actions.
  8. Save the flow and give it an appropriate name.
  9. Test the flow by triggering the defined event (e.g., sending an email) and verifying if the record is created in Dynamics 365.
  10. Once the flow is working correctly, you can enable it and it will run automatically based on the defined trigger conditions.

Features of Power Automate for Record Creation:

  • Custom Triggers: Power Automate provides a wide range of triggers to initiate the record creation process, including email arrival, form submission, scheduled intervals, or custom events.
  • Data Source Integration: Seamlessly connect with various data sources such as SharePoint, Dynamics 365, Excel, SQL databases, and third-party applications to retrieve or update data.
  • Conditional Logic: Apply conditions and business rules to determine when and how records should be created, allowing for more dynamic and customized automation.
  • Error Handling: Incorporate error handling mechanisms to capture and handle any potential errors during the record creation process, ensuring data integrity.
Limitations to Consider:
  • System Compatibility: Power Automate's capabilities for record creation depend on the compatibility and available connectors for the target application or system. Some systems may have limited or no integration options.
  • Data Validation: Power Automate lacks extensive data validation capabilities during record creation. Additional validation checks may need to be implemented separately.
  • Security Considerations: Ensure that appropriate security measures are in place to protect sensitive data when automating record creation with Power Automate.
Conclusion:
By leveraging the power of Power Automate for record creation, organizations can significantly improve workflow efficiencies and reduce manual effort. With its customizable triggers, seamless data integration, and automation capabilities, Power Automate empowers businesses to streamline processes and focus on higher-value tasks. While considering its limitations and security aspects, Power Automate remains a valuable tool for automating record creation and enhancing productivity across various applications and systems.

Sunday, June 18, 2023

Duplicate Detection Rule in Dynamics 365

How to create Duplicate detection rules to prevent records from saving in Dynamics 365?

Follow the below video to see how it's done:

Duplicate detection rules are used to identify and prevent the creation of duplicate records within the system. These rules are configured based on specific criteria and conditions to compare incoming data with existing records and determine if there is a potential match.

Advantages of Duplicate Detection Rules in Dynamics 365:
-Maintains data integrity by preventing duplicate records.
-Improves efficiency by streamlining data management processes.
-Enhances user experience by avoiding confusion and facilitating accurate data access.
-Offers customizable criteria to match specific business needs.

Limitations of Duplicate Detection Rules in Dynamics 365:
-Configuration complexity requires careful setup and testing.
-Possibility of false positives or false negatives.
-Can impact system performance with large data volumes and complex matching criteria.
-Limited ability to match duplicates across multiple entities.

Duplicate Detection Rules are customizable, allowing organizations to tailor them to their specific business needs. Businesses can define matching criteria based on relevant attributes and set the level of similarity required for a match. This flexibility ensures that the rules align with the unique data and industry requirements of each organization.
They offer advantages such as data integrity, improved efficiency, enhanced user experience, and customization options. However, their configuration complexity, potential for false positives/negatives, performance impact, and limitations in cross-entity matching should be taken into consideration for effective utilization.

Set up duplicate detection rules

  1. Sign in to the Power Platform admin center and select an environment.

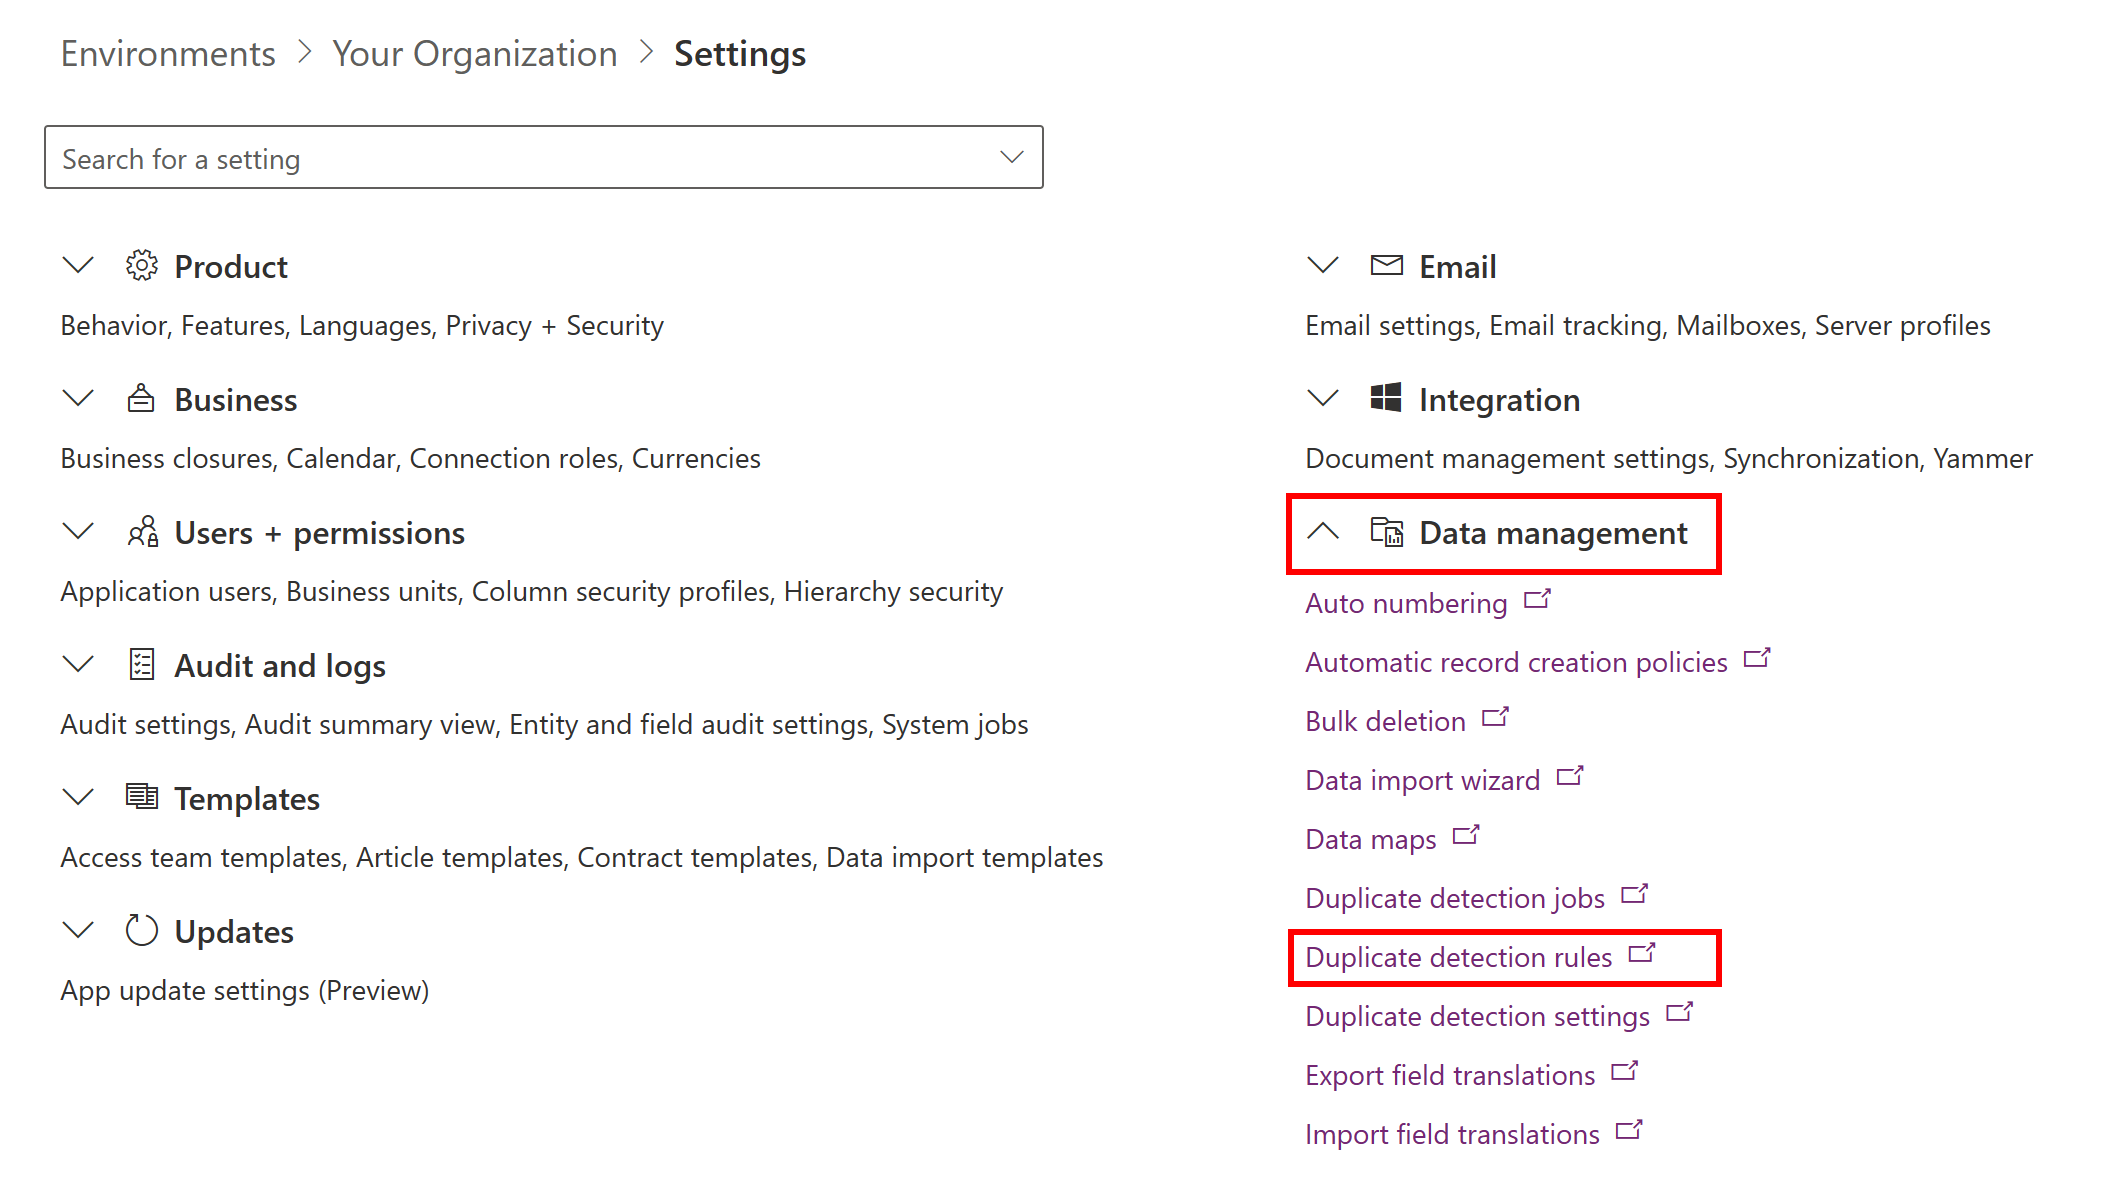
  2. Select Settings > Data management > Duplicate detection rules.

    Create or manage duplicate detection rule

  3. To create a new duplicate detection rule, select New. Type a name and description.

    –OR–

    To edit an unpublished existing duplicate detection rule, select the duplicate detection rule.

    –OR–

    To edit a published duplicate detection rule, select the rule. On the Actions menu, select Unpublish, and then select the rule.

  4. Select the criteria to be used to identify a record as a duplicate.

    1. If you're creating a new rule:

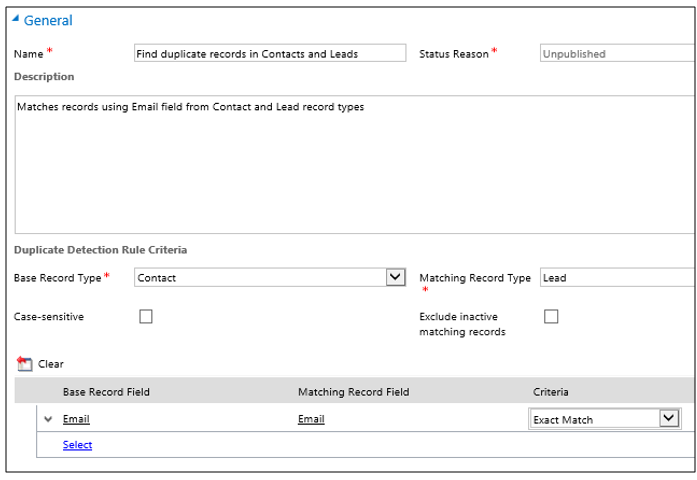
      • In the Duplicate Detection Rule Criteria section, in the Base Record Type list, select the type of record that this rule applies to. For example, select Contacts.

      • In the Matching Record Type box, select the type of record to compare. In most cases, you'll probably want to use the same record type for Base Record Type and Matching Record Type. It's also useful to be able to compare different record types. For example, you might want to compare the Email field in Contacts to the Email field in Leads.

    2. If you want the rule to consider only active records while detecting duplicates, select the Exclude inactive matching records check box. You should also select this check box if your duplicate detection rule criteria are based on a status field.

    3. If you want the rule to be case-sensitive, select the Case-sensitive check box.

    4. If you selected different record types for the base and matching record types, for each new criterion, in the Base Record Field column, select Select, and then select a field name. In the same row, in the Matching Record Field column, select Select, and then select a field name.

      - OR -

      If you selected the same record types for the base and matching record types, for each new criterion, in the Field column, select Select, and then select a field.

    5. In the same row, in the Criteria column, select Select, and then select an operator. For example, select Exact Match.

    6. If you specified Same First Characters or Same Last Characters, in the No. of Characters column, select Enter Value, and then enter the number of characters to compare.

    7. If you don't want the rule to consider blank fields (null values) as equal while identifying duplicates, select the Ignore Blank Values check box.

     Important

    If the duplicate detection rule contains only one condition, blank values are ignored during duplicate detection job and they do not work when the user is offline.

    The number of criteria that you can select is limited by the number of characters that can be stored in the matchcode for the record. As you add criteria, watch the Current matchcode length value shown at the bottom of the criteria list.

    Example duplicate detection rule.

  5. When you're finished adding criteria, select Save and Close.

  6. To make the new or changed duplicate detection rule usable, select the rule, and then select Publish.

Monday, June 12, 2023

Field Locking and Unlocking with Business Rules in Dynamics 365 | Power Platform

🔒🔓 Field Locking / Unlocking with Business Rules in Dynamics 365

Follow the below video to see how it's done:

Today, let's delve into the powerful feature of Field Locking and Unlocking with Business Rules. This functionality allows you to control the availability and editability of fields based on specific business rules, providing a dynamic and tailored user experience within your Dynamics 365 environment. Let's unlock the potential!

Business rule is a feature that allows you to define and apply logic to the data and behavior of forms without the need for writing code. It provides a user-friendly interface for configuring and managing rules that control how data is validated, calculated, displayed, or hidden on forms. or creating plug-ins. Business rules provide a simple interface to implement and maintain fast-changing and commonly used rules. They can be applied to Main and Quick Create forms, and they work in Dynamics 365 Customer Engagement (on-premises), Dynamics 365 for Customer Engagement web apps, Dynamics 365 for tablets, and Dynamics 365 for Outlook (online or offline mode).

🔐 Field Locking:

Field Locking enables you to restrict the editing capability of fields based on predetermined conditions. With this feature, you can ensure data integrity and prevent unauthorized modifications. Imagine a scenario where you want to lock the "Opportunity Amount" field for a specific stage in your sales process. By setting up a business rule, you can automatically lock the field when the opportunity reaches that stage, ensuring data consistency and minimizing errors.

🔓 Field Unlocking:

On the flip side, Field Unlocking empowers you to release the restrictions on fields when certain conditions are met. This flexibility enables you to provide users with the necessary data entry options at the right moment. For instance, let's say you have a custom field called "Service Approval" that should only be editable for managers. By configuring a business rule, you can automatically unlock the field when the user's role is "Manager," granting them the ability to make changes.

📜 Business Rules:

Business Rules in Dynamics 365 are a visual and intuitive way to define field locking and unlocking logic without the need for complex coding. With a simple point-and-click interface, you can create rule sets based on conditions, actions, and dependencies, aligning with your organization's unique business processes. Business Rules are highly customizable and provide a user-friendly way to enforce data governance rules and improve data quality.

With business rules in Dynamics 365, you can set up conditions and actions to enforce specific behaviors or apply recommendations within the application. For example, you can define rules that show or hide fields based on certain conditions, set field values automatically, validate data entry, or display error messages. 
These rules can be applied to various forms in Dynamics 365 Customer Engagement, including Main forms, Quick Create forms, and forms accessed through different interfaces like web apps, tablets, and Outlook (online or offline mode). They help streamline and automate processes, improve data consistency, and enhance the user experience within the Dynamics 365 platform.

By combining conditions and actions, you can do any of the following with business rules:

  • Set field values
  • Clear field values
  • Set field requirement levels
  • Show or hide fields
  • Enable or disable fields
  • Validate data and show error messages
  • Create business recommendations based on business intelligence.

💡 Benefits of Field Locking and Unlocking with Business Rules:

1️⃣ Data Integrity: Ensure that critical fields remain protected and maintain data consistency throughout your Dynamics 365 system.

2️⃣ User Experience: Create a personalized and streamlined experience by dynamically presenting users with the right fields at the right time.

3️⃣ Agility: Adapt to changing business needs by easily configuring and modifying business rules to accommodate new requirements.

4️⃣ Reduced Errors: Prevent inadvertent modifications by locking fields when necessary, reducing data entry mistakes.

5️⃣ Improved Productivity: Optimize user efficiency by presenting only relevant fields, simplifying data entry and reducing clutter.

Unlock the potential of Field Locking and Unlocking with Business Rules in Dynamics 365, and take control of your data integrity and user experience. Empower your users, streamline processes, and enhance productivity!


Here are the steps to achieve Field Locking and Unlocking with Business Rules in Dynamics 365:

Step 1: Access the Dynamics 365 Customization Environment

Log in to your Dynamics 365 environment and navigate to the Customization section, usually accessible through the "Settings" or "Administration" area.

Step 2: Open the Entity Customization

Select the entity for which you want to define the field locking and unlocking rules. This could be a standard entity like "Opportunity" or a custom entity specific to your organization.

Step 3: Create a new Business Rule

Within the entity customization, locate the "Business Rules" section. Create a new business rule or select an existing one that you want to modify.

Step 4: Define Conditions

Add conditions to specify when the field locking or unlocking should occur. For example, you can set conditions based on the value of other fields, the user's role, or the stage of a business process flow.

Step 5: Specify Actions

Based on the conditions defined in the previous step, specify the actions to be performed. To lock a field, set the action to "Lock Field" and select the field(s) you want to lock. Similarly, for unlocking a field, set the action to "Unlock Field" and choose the field(s) to be unlocked.

Step 6: Configure Dependencies (if required)

If the field locking or unlocking is dependent on other fields, configure the necessary dependencies within the business rule. This ensures that the rules are triggered correctly based on the field values.

Step 7: Save and Publish the Business Rule

Once you have defined the conditions, actions, and dependencies, save the business rule and publish it. This will make the rule active and enforce the specified field locking and unlocking logic.

Step 8: Test and Refine

Test the business rule thoroughly to ensure it behaves as expected. Make any necessary adjustments or refinements to the conditions, actions, or dependencies if needed.

Step 9: Repeat for Other Entities (if required)

If you want to apply field locking and unlocking to other entities, repeat the above steps for each entity where you want to implement these rules.

Here are some key points about business rules in Dynamics 365:

Conditions:
Business rules are triggered based on conditions that you define. These conditions are typically based on field values or other criteria.
You can specify one or more conditions using logical operators such as AND and OR.
Conditions can compare field values, check if a field is empty or not, or evaluate other expressions.
For example, you can create a condition that triggers a business rule when the "Opportunity Status" field is set to "Closed Won."

Actions:
Once the conditions are met, business rules can perform actions to automate processes or enforce data integrity.
Actions can include setting field values, showing or hiding fields, enabling or disabling fields, locking or unlocking fields, calculating values, or displaying error messages.
For instance, you can define an action to set the value of the "Estimated Revenue" field as the product of the "Quantity" and "Unit Price" fields.

Scope:
Business rules can be defined at different levels in Dynamics 365.
Entity-level business rules apply to all records of a specific entity.
Form-level business rules are specific to individual forms and allow you to define rules that apply only to a particular form or set of forms.
This flexibility allows you to tailor business rules to different scenarios and requirements.

Execution order:
If multiple business rules are defined for an entity or form, you can specify the execution order to determine the sequence in which the rules are applied.
This ensures that rules are executed in a logical and desired sequence, especially when there are dependencies or interactions between rules.

Real-time validation:
Business rules can provide real-time validation to enforce data integrity and provide instant feedback to users.
As users interact with the system and enter data, the rules can validate the entered values against defined conditions and take actions accordingly.
This helps prevent data inconsistencies or errors by guiding users and ensuring that data meets specified criteria.

Limitations:
While business rules offer a lot of flexibility, there are some limitations to keep in mind.
Business rules may not support all data types, complex calculations, or complex conditions. In such cases, you may need to explore other customization options like JavaScript or plugins.
Additionally, business rules have some performance considerations, especially when dealing with large datasets or complex rule structures. It's important to test and optimize rules for efficiency.


Create a business rule or business recommendation

  1. Make sure that you have the System Administrator or System Customizer security role or equivalent permissions.

  2. Open solution explorer.

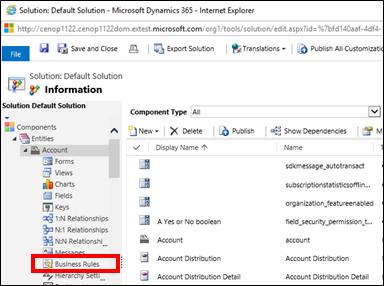
  3. Open the entity you want to create the business rule for (for example, open the Account entity), and then double-click Business Rules.

    Create a business rule in the default solution.

  4. Click New.

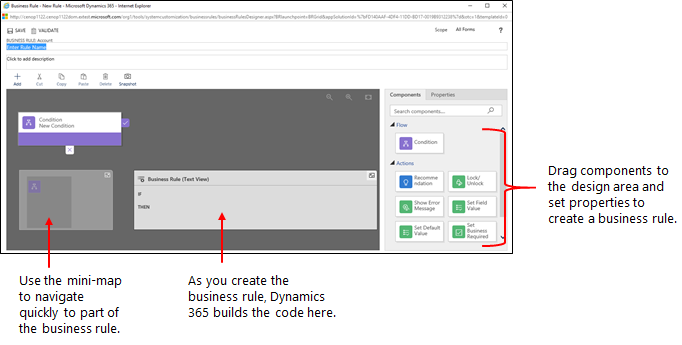
    The Business Rule designer window opens with a single condition already created for you. Every rule starts with a condition. The business rule takes one or more actions based on that condition.

    Business Rules design window.

     Tip

    If you want to modify an existing business rule, you must deactivate it before you can modify it.

  5. Add a description, if you want, in the description box in the upper-left corner of the window.

  6. Set the scope, according to the following:

    If you select this item...The scope is set to...
    EntityAll forms and server
    All FormsAll forms
    Specific form (Account form, for example)Just that form
  7. Add conditions. To add more conditions to your business rule:

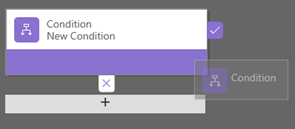
    1. Drag the Condition component from the Components tab to a plus sign in the designer.

      Add a condition in a business rule.

    2. To set properties for the condition, click the Condition component in the designer window, and then set the properties in the Properties tab on the right side of the screen. As you set properties, an expression is created at the bottom of the Properties tab.

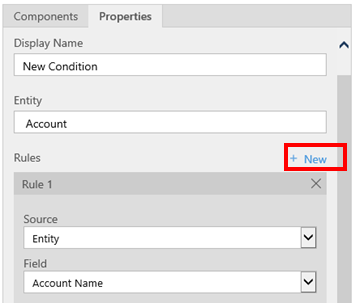
    3. To add an additional clause (an AND or OR) to the condition, click New in the Properties tab to create a new rule, and then set the properties for that rule. In the Rule Logic field, you can specify whether to add the new rule as an AND or an OR.

      Add a new rule to a condition.

    4. When you're done setting properties for the condition, click Apply.

  8. Add actions. To add an action:

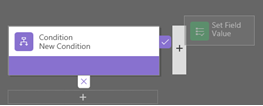
    1. Drag one of the action components from the Components tab to a plus sign next to Condition component. Drag the action to a plus sign next to a check mark if you want the business rule to take that action when the condition is met, or to a plus sign next to an x if you want the business rule to take that action if the condition is not met.

      Drag an action to a business rule.

    2. To set properties for the action, click the Action component in the designer window, and then set the properties in the Properties tab.

    3. When you're done setting properties, click Apply.

  9. Add a business recommendation. To add a business recommendation:

    1. Drag the Recommendation component from the Components tab to a plus sign next to a Condition component. Drag the Recommendation component to a plus sign next to a check mark if you want the business rule to take that action when the condition is met, or to a plus sign next to an x if you want the business rule to take that action if the condition is not met.

    2. To set properties for the recommendation, click the Recommendation component in the designer window, and then set the properties in the Properties tab.

    3. To add more actions to the recommendation, drag them from the Components tab, and then set properties for each action in the Properties tab.

       Note

      When you create a recommendation, a single action is added by default. To see all the actions in a recommendation, click Details on the Recommendation component.

    4. When you're done setting properties, click Apply.

  10. To validate the business rule, click Validate on the action bar.

  11. To save the business rule, click Save on the action bar.

  12. To activate the business rule, select it in the Solution Explorer window, and then click Activate. You can't activate the business rule from the designer window.

Followers

Power Dynamix YouTube Videos