How to publish power apps on Microsoft Appsource from scratch?
Once your package successfully clears all validations, it will be prepared to go live, and you should expect to see the following status in your Microsoft partner account.

There are five validation stages for publishing an app. Our package has successfully passed the critical automated validation phase, and it received confirmation that it meets expectations.
However, even if you've followed all the steps correctly, the Microsoft team may reject your app publication if it uses deprecated APIs or codes that are not recommended. In our case, Microsoft advised us that we used certain components like DOM and parent relationships, which are discouraged during the app development. They recommended replacing these with the supported Client API object model.
- Visual Studio 2019
- Power Platform tools in Visual Studio or
- Microsoft Power Platform CLI
- Managed solution of your app
There are total 5 steps involved in this (explained in detail below)
Step 1: Create a Microsoft Partner Center account
Step 2: Create a managed solution for your app
Step 3: Create an AppSource package for your app
- Create connection
- Create deployment package
- Create input and ContentTypes files in XML
- Add app logo (32x32 size in PNG/JPG format)
- Zip all the above fields to create a Final package
Step 4: Store your package on Azure Storage
Upload the package in Azure blob and get the URL
Step 5: Submit your app on Partner Center
Share the detail and blob URL for validation and wait for it.
Step 1: Create a Microsoft Partner Center account


You must request MPN admin access to view settings and publish the app.

Step 2: Create a managed solution for your app


Step 3: Create an AppSource package for your app


Execute Command 1 - cd C:\Users\RajnishMahaseth\Desktop\DynamixPower

Command 2 - pac auth create --name RajnishMahaseth --URL https://org44ad4e8e.crm.dynamics.com/


Command 5 - dotnet publish


To deploy using the CLI, use the pac package deploy command.
Command 6 -pac package deploy --package .\bin\Debug\DeploymentPackage.1.0.0.pdpkg.zip


In summary, we've created a folder named "DeploymentPackage," added the solution to this package, and then published the package.
Let's open the folder and go to bin→debug and copy the "DeploymentPackage.1.0.0.pdpkg" zip file.

Create an icon for your app source package. The size should be 32x32. Or download your company logo(size 32x32 and move it to this package location. Name it logo32x32. Valid file formats are PNG and JPG. Now let's create input and content types XML files
Creating [Content_Types].xml Open the folder(Package) we previously created. (Make content types and input files should be of only XML format and not be any other documents.) Right-click on mouse→New→Text Document. Now open that document in Notepad.

Go to this Microsoft page for copying code of [Content_Types].xml. Create an AppSource package for your app. Click on copy and paste code in Notepad.

[Content_Types].xml file that provides MIME type information of the file type extensions included in your package. This is separate from the one that will be included again in the AppSource package. The naming convention should be the same as in the document. We need to save it in XML format. Click on File→Save as


Creating input.xml Go to this Microsoft page. Create an AppSource package for your app, and copy the input.xml.
Navigate to the folder. The same document has been opened previously. Just open it. Paste it.


We need to make specific adjustments to the information in the input file to align it with our package details. Let's begin by editing the input.xml file.
- Here, you will find the provider's name, which can be your company's name or any other designation you prefer.
<ProviderName>PowerDynamix</ProviderName> - Next, focus on the package file, which originates from the CLI command. Simply copy this dpkg file and rename it if desired. When you rename it, paste the new name, along with the extension, into a notepad. Remember that extensions are mandatory.
<PackageFile>DeploymentPackage.1.0.0.pdpkg.zip</PackageFile> - Now, let's address the solution anchor name. This name should differ from your managed solution's name. Since it's already in the notepad, copy and paste it along with the extension.
<SolutionAnchorName>AugustSolution_1_0_0_1_managed.zip</SolutionAnchorName> - The start date should be formatted as MMDDYY and set to two days before the current date. Additionally, the end date can be any date, but it must be at least one month from today's date, and it should also follow the MMDDYY format.
<StartDate>20/09/2023</StartDate>
<EndDate>01/01/2031</EndDate> - Moving on to supported countries, consult the document for the list of countries. Decide which regions you want to publish your app, then copy and paste these regions into the notepad. You can edit them as needed, but ensure no spaces or new lines between the country codes. For clarity, separate the country codes with commas and ensure that supported countries remain on the same line, including the ending tag.
<SupportedCountries>US, CA,AD,AE,AF,AG</SupportedCountries> - Regarding the "Learn More" link, you can use your company's website link.
<LearnMoreLink>https://powerdynamixx.blogspot.com/</LearnMoreLink> - As for the package's local code, the default is 1033 for English. If you plan to publish your app in different regions, refer to the document for the appropriate local codes.
- Additionally, ensure that the package's local code matches the solution.xml file. Open the solution.xml file located within the pdpkg folder. If multiple languages exist in the solution.xml file, ensure that the input.xml file contains the corresponding language codes. Both the solution.xml file's local codes and language codes should match those in the input.xml file.
- Regarding the logo, follow the naming convention mentioned in the folder. If the logo is 32x32, use the same naming convention and extension in the input.xml file.
<Logo>logo32x32.png</Logo> - The same naming convention and extension should also be applied to the terms of use in the user.html file. (I will show how to create an HTML file in the next Step.)
<PackageTerm File="TermsOfUse.html" />
If you have any data files, incorporate them into the input config files by referencing the document and adding the necessary attributes.
Once details are modified, click save as and save the file name as Input.xml and save it.

Now, let's delete this text document from the package folder. The next is to create an HTML file for the license. It should be in .html. Your terms and conditions can be created by the HTML file.
Creating TermsOfUse.html Create an HTML file containing your license terms. If your app supports multiple languages, you can have an HTML file per language to display the license terms in the user-selected language. The HTML file is mandatory. Open Notepad or Notepad++. Create an HTML file containing your company's terms and conditions, then save it in HTML format.


Step 4: Store your AppSource Package on Azure Storage & generate a URL with the SAS key
To maintain the security of your files, we need to store the AppSource package file in a Microsoft Azure Blob storage account and use a Shared Access Signature (SAS) key to share the package file. Your package file is retrieved from your Azure Storage location for certification and then for AppSource trials.Here are the steps in the process:
- Begin by logging into azure.microsoft.com and signing in to portal.azure.com.
- Once signed in, navigate to the storage section and create a container from there.
- For more comprehensive instructions on creating containers, refer to the provided documentation below.
- Set the start date two days before, as specified in the input.xml, and ensure that the expiry time is set to at least one month.
- After you've completed these steps, proceed to generate the SAS URL.
- Copy the generated SAS URL and paste it into the partner center to upload the package.
Here are the steps from the Microsoft page: Store a package in Azure Storage
To upload your package to Azure Blob storage:
Create a free trial or pay-as-you-go Azure account at https://azure.microsoft.com.
Sign in to the Azure Management portal at https://portal.azure.com.
Create a new Storage account by clicking > Storage > Storage account - blob, file, table, queue.
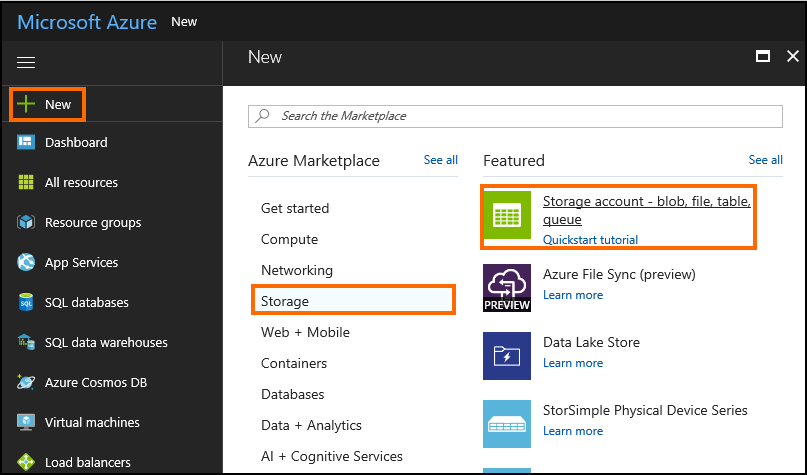
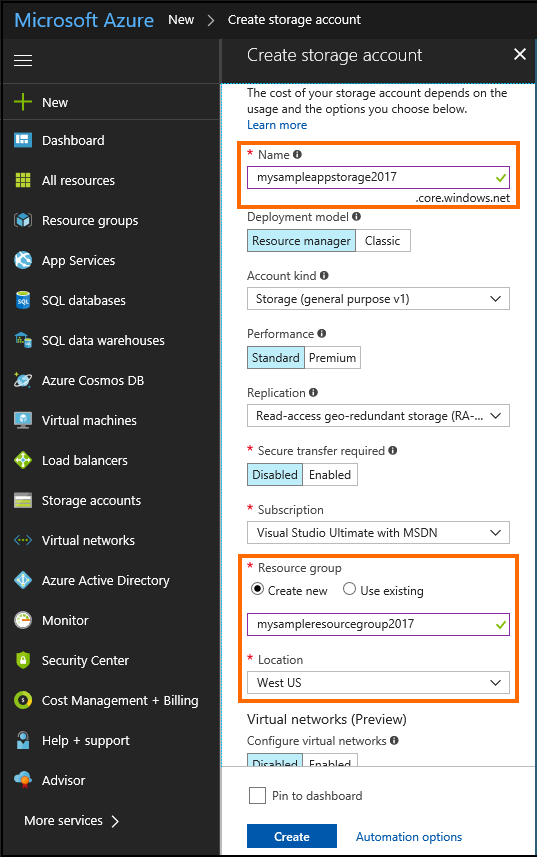
On the Create storage account page, specify the Name, Resource group, and Location for your storage account. Leave the rest of the columns with the default options. Click Create.
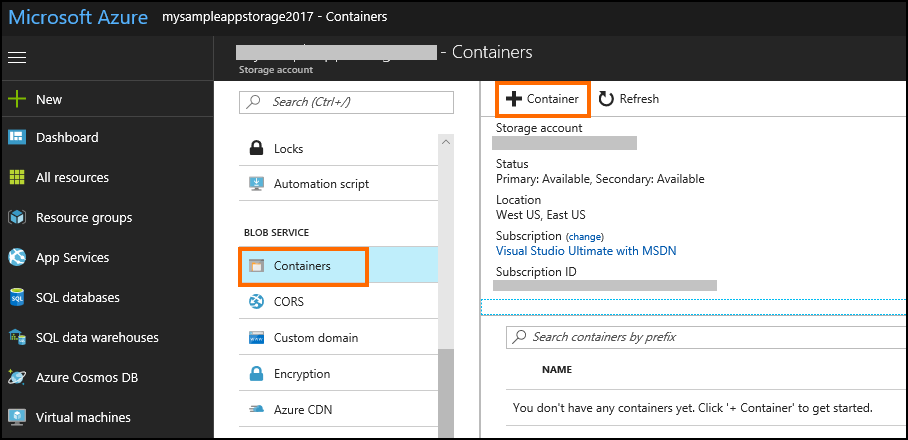
After your storage account is created, navigate to the newly created resource group, and create a new Blob container. Under Blob Service, select Containers, and then + Container.
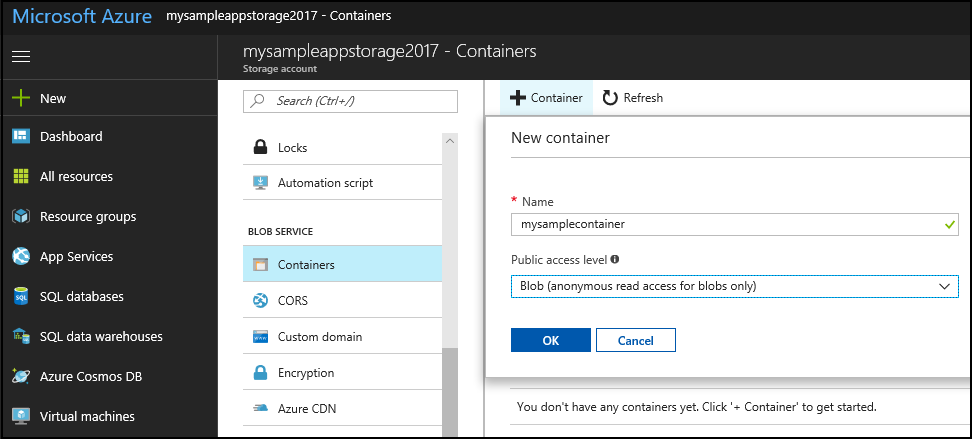
Specify a name for your container, and select the Public access level as Blob. Click OK.
Start Azure Storage Explorer on your computer, and connect to your Azure Storage account by signing in using the same account with which you created your Azure Storage account.
In Azure Storage Explorer, select the newly created container, and then select Upload > Upload Files to upload the app source package that you created in Step 4: Create an AppSource package for your app.
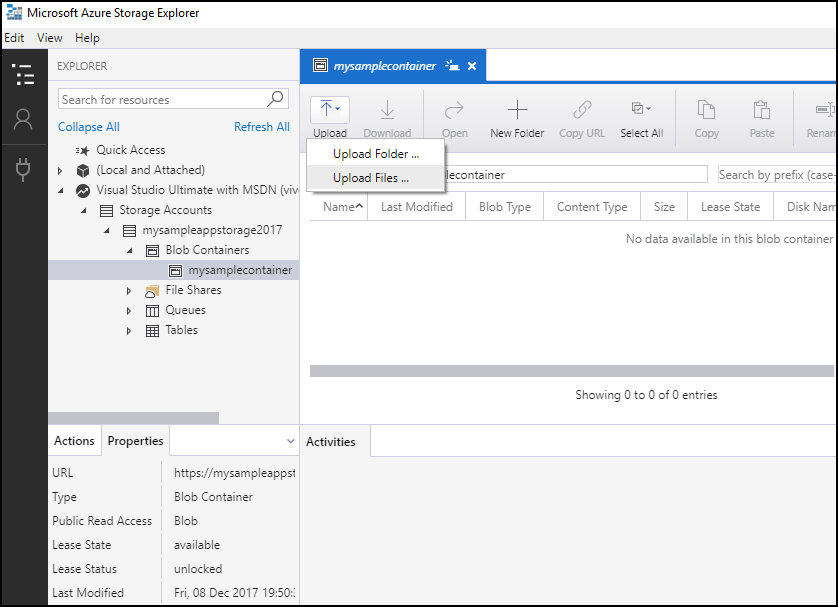
Browse to the AppSource package file on your computer, and select to upload it.
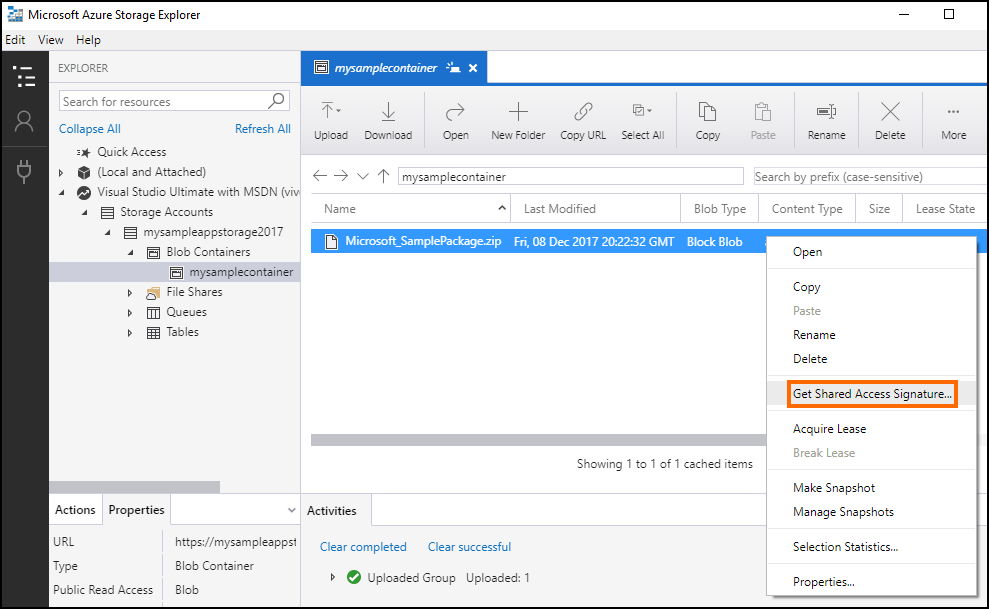
Right-click on the uploaded AppSource package file, and select Get Shared Access Signature.
On the Shared Access Signature page, modify the Expiry time value to make the Shared Access Signature (SAS) active for a month from the Start time. Click Create.
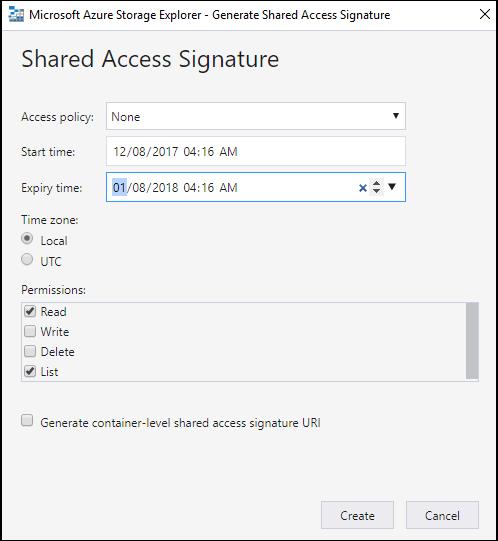
The next page displays information about the generated SAS information. Copy the URL value and save it for later. You will need to specify this URL while creating an offer in the Partner Center.

Create a free trial or pay-as-you-go Azure account at https://azure.microsoft.com.
Sign in to the Azure Management portal at https://portal.azure.com.
Create a new Storage account by clicking > Storage > Storage account - blob, file, table, queue.
On the Create storage account page, specify the Name, Resource group, and Location for your storage account. Leave the rest of the columns with the default options. Click Create.
After your storage account is created, navigate to the newly created resource group, and create a new Blob container. Under Blob Service, select Containers, and then + Container.
Specify a name for your container, and select the Public access level as Blob. Click OK.
Start Azure Storage Explorer on your computer, and connect to your Azure Storage account by signing in using the same account with which you created your Azure Storage account.
In Azure Storage Explorer, select the newly created container, and then select Upload > Upload Files to upload the app source package that you created in Step 4: Create an AppSource package for your app.
Browse to the AppSource package file on your computer, and select to upload it.
Right-click on the uploaded AppSource package file, and select Get Shared Access Signature.
On the Shared Access Signature page, modify the Expiry time value to make the Shared Access Signature (SAS) active for a month from the Start time. Click Create.
The next page displays information about the generated SAS information. Copy the URL value and save it for later. You will need to specify this URL while creating an offer in the Partner Center.
Submit your app on Partner Center
Snap of a user having access

Once your package successfully clears all validations, it will be prepared to go live, and you should expect to see the following status in your Microsoft partner account.

Errors during the package sharing process for publication and the package creation.

Solution- To resolve this issue, you should renew your blob URL and then update the new URL within the Partner Center. After making this adjustment, you can proceed to publish your package once again. When generating the SAS token, ensure you set the start date to the current date minus one day and the end date to the current date plus ten days. For more information and guidance, you can refer to the reference - link here
Error 2- This XML file does not appear to have any style information associated with it. The document is shown below. Authentication failed. The server fails to authenticate the request.

Solution- check how you are constructing the authorization header in your application. Ensure that it includes all the required components, such as the Shared Key Signature, and that it is correctly formatted.
Error 3 - Folder structure issue: The folder structure that you mentioned inside the BLOB package was incorrect. Please refer to the below guideline URL for proper package structure.

Solution- Ensure that all the necessary files and components of your app are in the correct locations within the package. This includes any metadata files, icons, images, configuration files, and the main application files.
Error 4 - Syntax Error in Input.xml file - two times zip.zip

Solution- Ensure that you include the extensions of all files in the input.xml file. Avoid duplication or omission when copying and pasting.
Error 5 - Syntax Error in Input.xml file - missing header for <LearnMoreLink>
 Solution- Ensure to place the end header of all files in the input.xml file.
The next error you may encounter occurs only after successfully passing all automation validation stages. This error arises during manual validation checks and may be attributed to the use of certain components, such as DOM elements and parent relationships, which were employed during the app's development but are not recommended.
Error 6 - Code Issues in Canvas App:
Check for usage of DOM in the form
Check if the parent relationship is used

Solution- We need to review and update the code of our Canvas app and re-submit your package
Here are some recommended references by Microsoft to follow (with link):
- do-not-make-parent-assumption
- avoid-dom-form
- https://developer.mozilla.org/en-US/docs/Web/JavaScript/Reference/Strict_mode
- https://learn.microsoft.com/power-apps/maker/data-platform/powerapps-checker/rules/web/use-cached-webresource
- https://developer.mozilla.org/docs/Web/JavaScript/Equality_comparisons_and_sameness
- https://learn.microsoft.com/en-us/power-apps/maker/canvas-apps/accessibility-checker#types-of-issues
- https://www.w3.org/WAI/tutorials/forms/labels/


when client downloads the app source app(powerapps solution( is source code visible to them?
ReplyDeleteWhen you publish any power app after packing it as managed solution then the source code will be hidden from users and cannot be edited.
DeleteIt is great article. I am having PowerApp with SharePoint as backend, is it possible to deploy this kind of app?
ReplyDeleteThanks for your kind words.
DeleteYes, it is absolutely possible to deploy a PowerApp that uses SharePoint as a backend.