SSRS Report from Scratch for Dynamics 365 |Power Platform | SQL
Q. How to create SSRS Reports using SSDT, Visual Studio for Dynamics 365 | Power platform?
In this blog/video, we are going to see how to create a report using SSRS (SQL Server Reporting Services) for Dynamics 365.
SQL Server Reporting Services (SSRS) is a powerful reporting tool developed by Microsoft. It is a server-based solution that allows users to create, deploy, and manage reports. SSRS can be used to create reports from various data sources, including SQL Server, Oracle, and Excel.
Microsoft SQL Server Reporting Services. (Download fromhere)
Dynamics 365 also provides a reporting wizard, which is a tool that helps you create and modify reports quickly and easily. The reporting wizard can be used with both system and custom entities in Dynamics 365. It is especially helpful for users who are not familiar with SQL Server Reporting Services or other reporting tools. Here's the blog link for creating an out-of-the-box report in Dynamics 365- Report Wizard - Out of the box
Dynamics 365 provides several reporting tools to help you analyze and visualize your data like Power BI, Dynamics 365 Reporting Extensions, Advanced Find, Charts and Dashboards, and Excel Templates but here we are only going to talk about SSRS reports.
The out-of-the-box reports offered by Dynamics 365 are not often used and in most cases, there is a need for custom reports for complex data and external data sources. In such a situation, SQL Server Reporting Service reports offer much flexibility as compared to Dynamics 365 Report Wizard, and creating SSRS reports does not warrant any particular development skill.
The Dynamics 365 Reporting Wizard and SQL Server Reporting Services (SSRS) are both tools used for creating reports in Dynamics 365. Here are some differences between the two:
Feature
Dynamics 365 Reporting Wizard
SQL Server Reporting Services
Ease of use
User-friendly and easy to use
Requires technical knowledge
Customization
Limited customization options
Offers advanced customization
Deployment
Only available in the cloud
Can be deployed on-premises or in the cloud
Integration
Can be integrated with other Dynamics 365 features
Can be integrated with other Microsoft technologies, such as SharePoint and Power BI
To create an SSRS report, follow these steps. Scroll down to see the steps in detail with snapshots.
Launch SQL Server Data Tools (SSDT) and create a new SQL Server Reporting Services project.
Create a new report using the Report Wizard, or design the report from scratch using the Report Designer.
Define the data source for the report by specifying the connection string and the credentials.
Define the dataset for the report by writing a SQL query or selecting an existing stored procedure.
Design the report layout by adding report items such as tables, matrices, charts, and images.
Customize the report properties such as page size, orientation, margins, and header/footer.
Apply formatting to the report items such as font, color, alignment, and borders.
Group and sort the data in the report by adding groupings and sort expressions.
Add calculated fields to the report by writing expressions using the report functions.
Preview the report to check for errors and formatting issues.
Deploy the report to the report server by specifying the target folder and settings.
Configure the report server security by setting up roles and permissions.
Schedule the report for automatic delivery by creating a subscription and specifying the recipients. By following these steps, you can create an SSRS report that meets your specific requirements and provides valuable insights into your data.
Here are some key features and capabilities of SQL Server Reporting Services:
Report authoring: SSRS provides a rich set of tools for report authoring, including a Report Designer and a Report Builder. These tools allow users to create custom reports with various data visualization elements, such as charts, tables, and graphs. Users can also add custom code to reports to create advanced functionality.
Data source support: SSRS supports a wide range of data sources, including SQL Server, Oracle, Excel, and SharePoint. Users can create reports that combine data from multiple sources and use parameters to filter data.
Report Delivery: SSRS supports various delivery options, including email, file share, and SharePoint. Users can also schedule reports to run automatically at specified intervals.
Security: SSRS provides robust security features to ensure that reports are only accessible to authorized users. Users can set up role-based security to control access to reports and data sources.
Integration: SSRS integrates with other Microsoft technologies, such as SharePoint, Power BI, and Dynamics 365. Reports can be embedded in SharePoint sites or Power BI dashboards, and data can be refreshed automatically.
Overall, SQL Server Reporting Services is a powerful reporting tool that provides advanced customization and functionality. It is ideal for users who need to create complex reports or integrate reports with other Microsoft technologies. However, it may require technical expertise in report development and deployment.
Before you can create SSRS reports, you'll need to meet certain prerequisites. Here are the key prerequisites for making SSRS reports:
SQL Server: You'll need to have a SQL Server instance installed and configured. This can be either the full version of SQL Server or the free SQL Server Express Edition. You'll also need to make sure that the SQL Server instance has the necessary permissions to create and manage reports.
SQL Server Data Tools (SSDT): SSDT is a free tool that provides a development environment for creating SSRS reports. You'll need to download and install SSDT before you can start creating accounts.
Data source: You'll need to have a data source that you want to use for your report. This can be a SQL Server database, an Oracle database, or any other supported data source.
Report server: You'll need to have a report server installed and configured. The report server is a component of SSRS that allows you to deploy and manage your reports. You can either install the report server locally or use a remote report server.
Permissions: You'll need to have the necessary permissions to create and manage reports. This may include permissions to access the data source, permissions to create and deploy reports on the report server, and permissions to manage security for reports.
Once you have met these prerequisites, you can start creating SSRS reports using SSDT. The process typically involves creating a new report project, defining a data source, designing the report layout, and deploying the report to the report server.
Environment Setup: I used Visual Studio 2019 for creating the report. However, you can use the 2015/17/19 versions as well. Make sure that the SQL Server Data Tools are installed. We also need to install the Dynamics 365 Report Authoring Extension. You can download it from below link. The environment for which I am creating the report is 9+
Scroll down to see how to install SQL Server Data Tools (SSDT) and Report Authoring Extension
Step 1. Open SQL Server Data Tools
Step 2. Click on Files, go to New, and then Project and create a new Project.
Step 3. Click on "Reporting Services" on the left pane and select "Report Server Project". Give the name and click on the Ok button to create the report.
Note- .Net Framework should be 4.5.2 or above as shown below.
Step 4. SSRS report files should have been created and you can see them under solution explorer as shown below.
Right Click on the Report folder and click on Add and New Item
Step 5. Click on Report Project on the left pane and select Report from the options and give the report name. Click on Add button
Step 6. Now a blank report is created and you can see the components like Data Sources, Datasets, etc under Report Data on the left pane. We need to add data sources and datasets in our blank report.
Step 7. Right-click on Data Source and click on Add Data Source
Step 8. We need to give a connection string in the data source so go to the CRM and copy the URL as shown below.
Step 9. In the data source, give the name, Type should be "Microsoft Dynamics 365 Fetch" in the embedded connection, and paste the link in the connection string which we copied in the above step. Click on the Ok button
Step 10. We have added the data source to our report and now we need to add the dataset to our blank report.
Right-click on Datasets and click on Add Dataset
Step 11. Do the followings for dataset details
Give the Dataset name
and select the "use a dataset embedded in my report" option
Select the data source which we created in Step 9
Query type - Text
Query- Here we need to provide the fetch XML code from CRM for the report. Follow steps 12 -14 to get the query.
Step 12. Go to CRM, click on Accounts and click on Advance Find, select your entity (Account), and click on the Continue button
Note - I want to create a report for the Account so I'll get a query for the Account entity. You can select any entity according to your requirement.
Step 13. Click on the "Download FetchXML" button to download the query. Save the file on your system.
Note- We can add conditions here like if you want to show only active accounts in the report or want to have any particular owners then you can do that by clicking on Add button.
Step 14. Open the FetchXML file and copy the query.
Step 15. Paste the copied query in the Query box and click on the Ok button.
Step 16. Once you click on Ok, the SSDT data set will get connected with your Dynamics CRM. Enter the credentials and help SSDT will establishing the connection.
Note- If you have more environments then click on the "Display list of available organizations" checkbox and select your env in the next step
Step 17. Select your environment and click on Login
Step 18. Now, you can see the data set is successfully created in the form of tables as shown below.
We need to create the table for the report and insert data. Click on Toolbox from the left pane.
Step 19. Select “Table” and drag it into the designer part as highlighted below.
Step 20. You can add multiple rows and columns by right-clicking on the table and selecting Insert Column. Drag the fields from the dataset and put them inside the table.
Step 21. You can add the data to the table by right-clicking on the row and selecting “Expressions” as done in the above step for inserting the column. Here, you can give your field name.
Note- When you drag and drop the field from dataset to table then by default the field value will be mapped as shown in step 20.
Step 22. Right-click on the Table and click on Tablix Properties
Step 23. Five names and select the data set which was created above then click on Ok.
Step 24. You can see the preview of your report in the preview section near Design, just click on Preview and you should be able to see the report.
Note - You may be required to give login credentials again here.
Step 25. Our report is created, let's build the report. Click on Build and then build the solution
Step 26. If everything is correct in the report then the build should be successful like below.
Step 27. We need to get the file location of our report. Right-click on the solution and slick on Open
Folder in File Explorer as shown below.
Step 28. Open the SSRS report which is created.
Step 29. Open the bin folder and then open the debug folder.
Step 30. Copy the path.
Step 31. Now we need to create the report.
Log in to Dynamics 365 and click on ‘Reports’ from the left pane and click on the “New” button to create a new report.
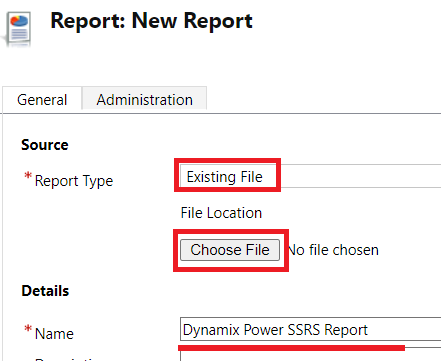
Step 32. Select "Existing File" from the report type, give the report name, and click on choose the file to upload the report which we have created and copied the path in step 30.
Step 33. After clicking on Choose file, paste the copied path (step 30) and select the report and click Open.
Step 34. Scroll down and give Categorization details like the below. Check step 35 to know how to insert data in the Categorization fields.
Click on the Save button to save the report
Step 35. Click on 3 dots of the categorization fields >>select the field from the left side>>click on the arrow button and click ok to insert the value
Step 36. The report is created and saved in CRM. Click on Run Report to view the report.
Step 37.Your report will be shown once you’ve clicked on Run Report like below
Step 38. You can download the report by clicking on the Save button. We can download the report in different formats like- pdf, word, PowerPoint, excel, etc. Your SSRS report creation part is done
Steps to download and install SQL Server Data Tool
Step 1. Go to the below link and scroll down for SSDT


No comments:
Post a Comment