Follow the below video to know What is Copilot, how it works, what can Copilot do, and how to use Copilot Practical example- Create an app with CoPilot
In this blog, we delve into the world of Copilot in Power Apps, a powerful tool that revolutionizes app development. Discover what Copilot is and gain insights into its functionality, as we explore how it works and what it can do for your app development process. Learn how to effectively utilize Copilot, leveraging its capabilities to streamline your workflow and create feature-rich applications with ease. Uncover the numerous benefits of incorporating Copilot into your app development journey, empowering you to build robust and efficient applications. Join us for a practical guide on creating an app with Copilot, as we showcase the practical application of this cutting-edge tool.
See the above video(link here) to know how to create an App with Copilot and insert Copilot in the app
Q. How does Power Automate support record creation and lookup field mapping?
Follow the below video to see how the automation is done in power automate:
Power Automate, also known as Microsoft Flow, is a cloud-based service provided by Microsoft that allows you to create automated workflows between different applications and services. With Power Automate, you can automate various tasks and processes in Dynamics 365, including record creation.
Record creation involves automatically generating new records in a designated system or application. With Power Automate, you can define triggers and conditions to initiate the creation of records based on specific events or data changes. Lookup field mapping refers to the process of populating lookup fields in a record with relevant information from other sources. Power Automate enables you to fetch data from various systems or services and map it to the appropriate lookup fields in your target system. By leveraging Power Automate for record creation and lookup field mapping, organizations can automate repetitive tasks, ensure data consistency across systems, and improve overall efficiency. It simplifies the process of creating new records and ensures that relevant data is accurately mapped to the corresponding lookup fields, saving time and reducing manual effort.
To create a record in Dynamics 365 using Power Automate, follow these steps:
Sign in to Power Automate (flow.microsoft.com) using your Microsoft account.
Click on "My Flows" in the left navigation menu and then click on "+ New" to create a new flow.
Choose a trigger for your flow. For example, you can select "When a new email arrives" if you want to create a record in Dynamics 365 whenever a new email arrives.
Configure the trigger settings based on your requirements. For the email trigger, you may need to connect your email account and specify filter conditions.
Add an action by clicking on the "+" icon below the trigger. In the search box, type "Dynamics 365" and select the relevant action from the list. For example, you can choose "Create a new record" or "Create a new Common Data Service record."
Connect to your Dynamics 365 environment by providing the necessary authentication and connection details.
Configure the record creation action by specifying the entity (e.g., Account, Contact) and mapping the field values. You can use dynamic content to fetch values from the trigger or previous actions.
Save the flow and give it an appropriate name.
Test the flow by triggering the defined event (e.g., sending an email) and verifying if the record is created in Dynamics 365.
Once the flow is working correctly, you can enable it and it will run automatically based on the defined trigger conditions.
Features of Power Automate for Record Creation:
Custom Triggers: Power Automate provides a wide range of triggers to initiate the record creation process, including email arrival, form submission, scheduled intervals, or custom events.
Data Source Integration: Seamlessly connect with various data sources such as SharePoint, Dynamics 365, Excel, SQL databases, and third-party applications to retrieve or update data.
Conditional Logic: Apply conditions and business rules to determine when and how records should be created, allowing for more dynamic and customized automation.
Error Handling: Incorporate error handling mechanisms to capture and handle any potential errors during the record creation process, ensuring data integrity.
Limitations to Consider:
System Compatibility: Power Automate's capabilities for record creation depend on the compatibility and available connectors for the target application or system. Some systems may have limited or no integration options.
Data Validation: Power Automate lacks extensive data validation capabilities during record creation. Additional validation checks may need to be implemented separately.
Security Considerations: Ensure that appropriate security measures are in place to protect sensitive data when automating record creation with Power Automate.
Conclusion: By leveraging the power of Power Automate for record creation, organizations can significantly improve workflow efficiencies and reduce manual effort. With its customizable triggers, seamless data integration, and automation capabilities, Power Automate empowers businesses to streamline processes and focus on higher-value tasks. While considering its limitations and security aspects, Power Automate remains a valuable tool for automating record creation and enhancing productivity across various applications and systems.
How to create Duplicate detection rules to prevent records from saving in Dynamics 365?
Follow the below video to see how it's done:
Duplicate detection rules are used to identify and prevent the creation of duplicate records within the system. These rules are configured based on specific criteria and conditions to compare incoming data with existing records and determine if there is a potential match.
Advantages of Duplicate Detection Rules in Dynamics 365: -Maintains data integrity by preventing duplicate records. -Improves efficiency by streamlining data management processes. -Enhances user experience by avoiding confusion and facilitating accurate data access. -Offers customizable criteria to match specific business needs.
Limitations of Duplicate Detection Rules in Dynamics 365: -Configuration complexity requires careful setup and testing. -Possibility of false positives or false negatives. -Can impact system performance with large data volumes and complex matching criteria. -Limited ability to match duplicates across multiple entities.
Duplicate Detection Rules are customizable, allowing organizations to tailor them to their specific business needs. Businesses can define matching criteria based on relevant attributes and set the level of similarity required for a match. This flexibility ensures that the rules align with the unique data and industry requirements of each organization. They offer advantages such as data integrity, improved efficiency, enhanced user experience, and customization options. However, their configuration complexity, potential for false positives/negatives, performance impact, and limitations in cross-entity matching should be taken into consideration for effective utilization.
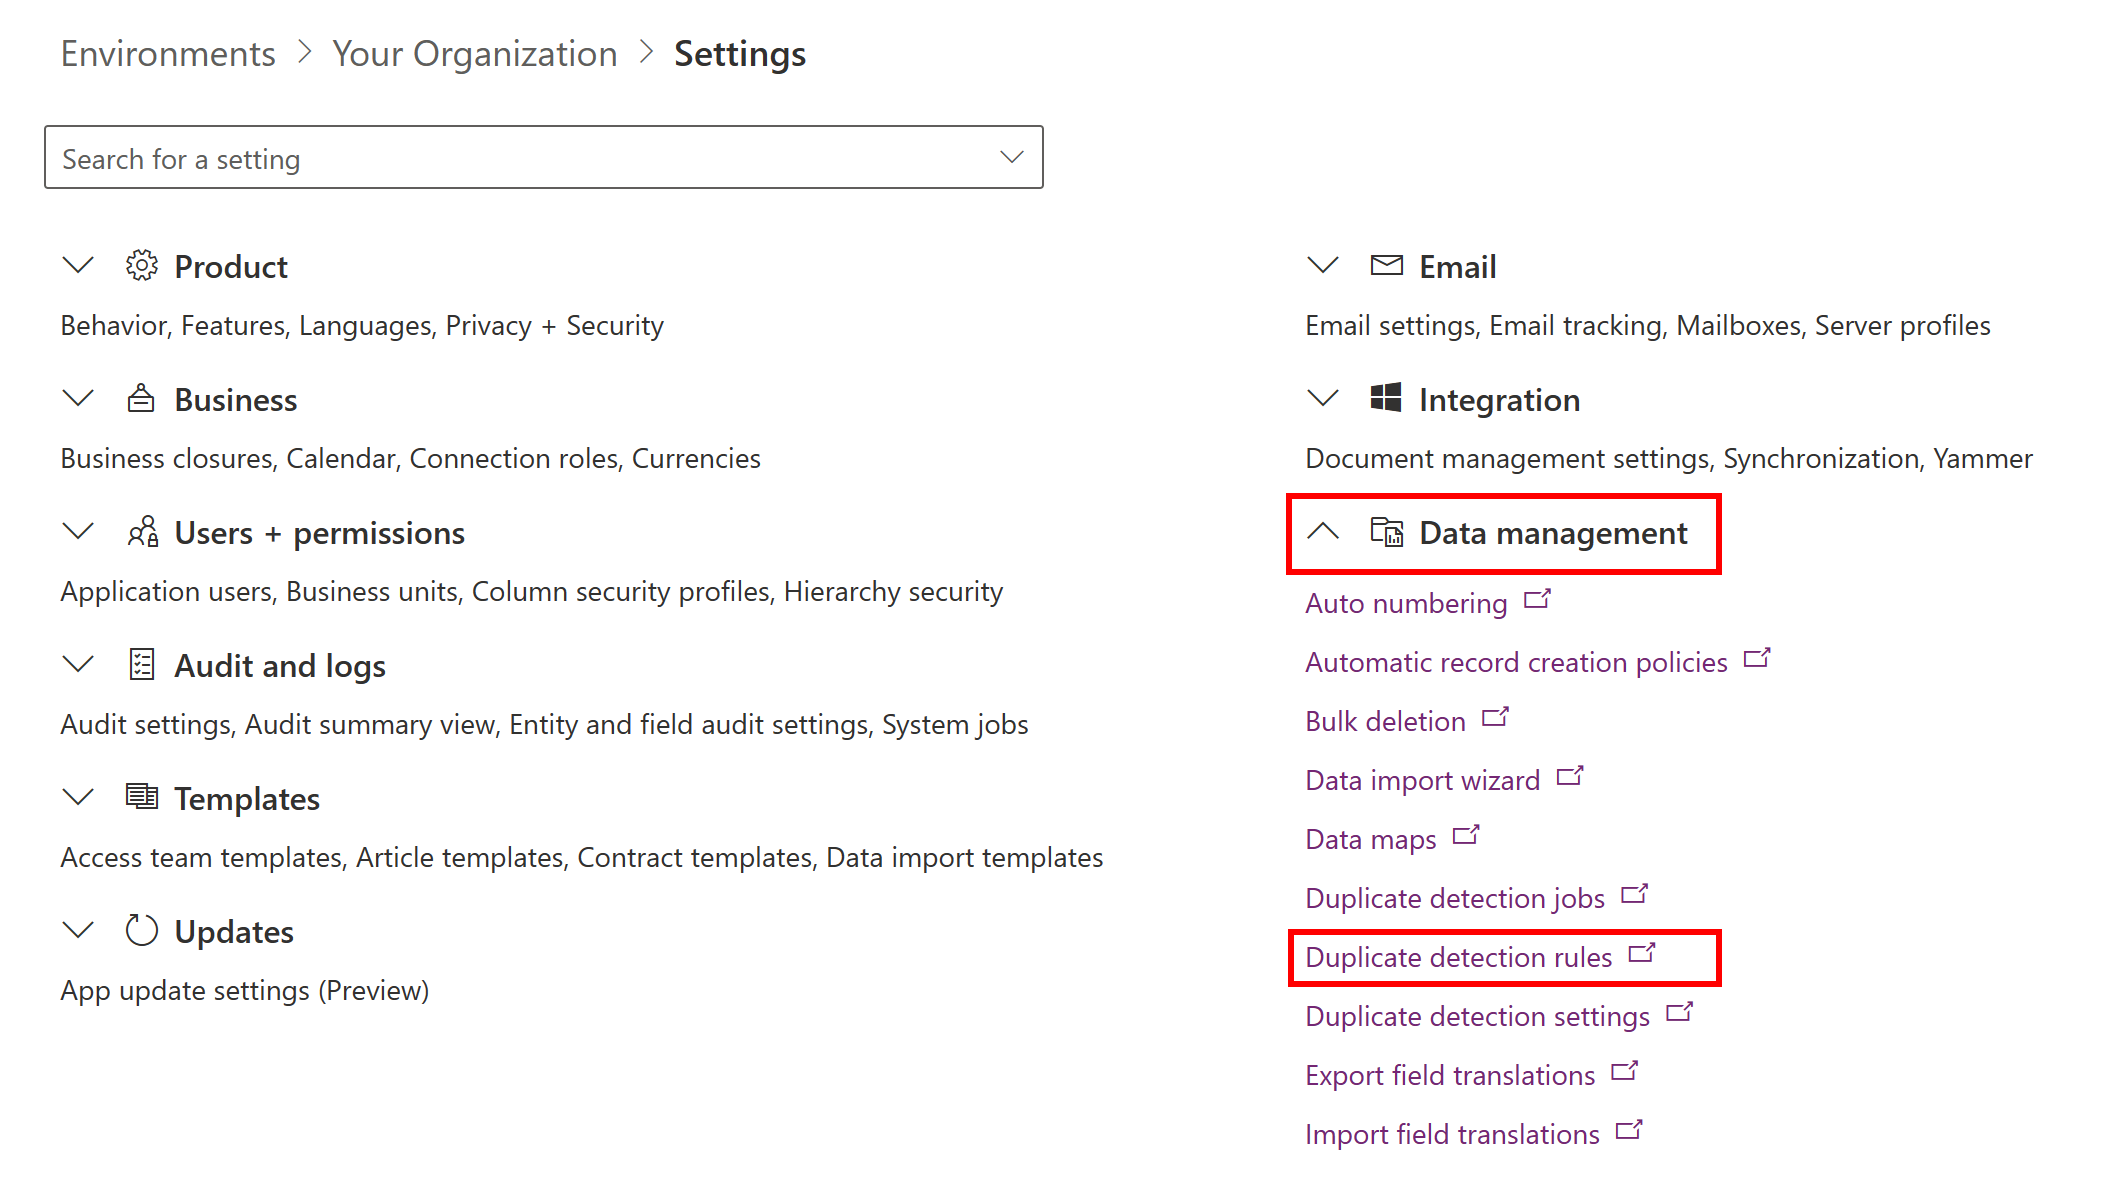
Select Settings > Data management > Duplicate detection rules.
To create a new duplicate detection rule, select New. Type a name and description.
–OR–
To edit an unpublished existing duplicate detection rule, select the duplicate detection rule.
–OR–
To edit a published duplicate detection rule, select the rule. On the Actions menu, select Unpublish, and then select the rule.
Select the criteria to be used to identify a record as a duplicate.
If you're creating a new rule:
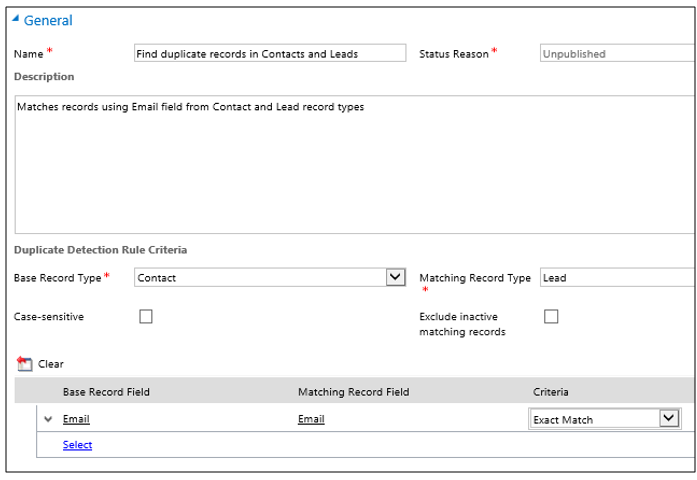
In the Duplicate Detection Rule Criteria section, in the Base Record Type list, select the type of record that this rule applies to. For example, select Contacts.
In the Matching Record Type box, select the type of record to compare. In most cases, you'll probably want to use the same record type for Base Record Type and Matching Record Type. It's also useful to be able to compare different record types. For example, you might want to compare the Email field in Contacts to the Email field in Leads.
If you want the rule to consider only active records while detecting duplicates, select the Exclude inactive matching records check box. You should also select this check box if your duplicate detection rule criteria are based on a status field.
If you want the rule to be case-sensitive, select the Case-sensitive check box.
If you selected different record types for the base and matching record types, for each new criterion, in the Base Record Field column, select Select, and then select a field name. In the same row, in the Matching Record Field column, select Select, and then select a field name.
- OR -
If you selected the same record types for the base and matching record types, for each new criterion, in the Field column, select Select, and then select a field.
In the same row, in the Criteria column, select Select, and then select an operator. For example, select Exact Match.
If you specified Same First Characters or Same Last Characters, in the No. of Characters column, select Enter Value, and then enter the number of characters to compare.
If you don't want the rule to consider blank fields (null values) as equal while identifying duplicates, select the Ignore Blank Values check box.
Important
If the duplicate detection rule contains only one condition, blank values are ignored during duplicate detection job and they do not work when the user is offline.
The number of criteria that you can select is limited by the number of characters that can be stored in the matchcode for the record. As you add criteria, watch the Current matchcode length value shown at the bottom of the criteria list.
When you're finished adding criteria, select Save and Close.
To make the new or changed duplicate detection rule usable, select the rule, and then select Publish.
🔒🔓 Field Locking / Unlocking with Business Rules in Dynamics 365
Follow the below video to see how it's done:
Today, let's delve into the powerful feature of Field Locking and Unlocking with Business Rules. This functionality allows you to control the availability and editability of fields based on specific business rules, providing a dynamic and tailored user experience within your Dynamics 365 environment. Let's unlock the potential!
Business rule is a feature that allows you to define and apply logic to the data and behavior of forms without the need for writing code. It provides a user-friendly interface for configuring and managing rules that control how data is validated, calculated, displayed, or hidden on forms. or creating plug-ins. Business rules provide a simple interface to implement and maintain fast-changing and commonly used rules. They can be applied to Main and Quick Create forms, and they work in Dynamics 365 Customer Engagement (on-premises), Dynamics 365 for Customer Engagement web apps, Dynamics 365 for tablets, and Dynamics 365 for Outlook (online or offline mode).
🔐 Field Locking:
Field Locking enables you to restrict the editing capability of fields based on predetermined conditions. With this feature, you can ensure data integrity and prevent unauthorized modifications. Imagine a scenario where you want to lock the "Opportunity Amount" field for a specific stage in your sales process. By setting up a business rule, you can automatically lock the field when the opportunity reaches that stage, ensuring data consistency and minimizing errors.
🔓 Field Unlocking:
On the flip side, Field Unlocking empowers you to release the restrictions on fields when certain conditions are met. This flexibility enables you to provide users with the necessary data entry options at the right moment. For instance, let's say you have a custom field called "Service Approval" that should only be editable for managers. By configuring a business rule, you can automatically unlock the field when the user's role is "Manager," granting them the ability to make changes.
📜 Business Rules:
Business Rules in Dynamics 365 are a visual and intuitive way to define field locking and unlocking logic without the need for complex coding. With a simple point-and-click interface, you can create rule sets based on conditions, actions, and dependencies, aligning with your organization's unique business processes. Business Rules are highly customizable and provide a user-friendly way to enforce data governance rules and improve data quality.
With business rules in Dynamics 365, you can set up conditions and actions to enforce specific behaviors or apply recommendations within the application. For example, you can define rules that show or hide fields based on certain conditions, set field values automatically, validate data entry, or display error messages. These rules can be applied to various forms in Dynamics 365 Customer Engagement, including Main forms, Quick Create forms, and forms accessed through different interfaces like web apps, tablets, and Outlook (online or offline mode). They help streamline and automate processes, improve data consistency, and enhance the user experience within the Dynamics 365 platform.
By combining conditions and actions, you can do any of the following with business rules:
Set field values
Clear field values
Set field requirement levels
Show or hide fields
Enable or disable fields
Validate data and show error messages
Create business recommendations based on business intelligence.
💡 Benefits of Field Locking and Unlocking with Business Rules:
1️⃣ Data Integrity: Ensure that critical fields remain protected and maintain data consistency throughout your Dynamics 365 system.
2️⃣ User Experience: Create a personalized and streamlined experience by dynamically presenting users with the right fields at the right time.
3️⃣ Agility: Adapt to changing business needs by easily configuring and modifying business rules to accommodate new requirements.
4️⃣ Reduced Errors: Prevent inadvertent modifications by locking fields when necessary, reducing data entry mistakes.
5️⃣ Improved Productivity: Optimize user efficiency by presenting only relevant fields, simplifying data entry and reducing clutter.
Unlock the potential of Field Locking and Unlocking with Business Rules in Dynamics 365, and take control of your data integrity and user experience. Empower your users, streamline processes, and enhance productivity!
Here are the steps to achieve Field Locking and Unlocking with Business Rules in Dynamics 365:
Step 1: Access the Dynamics 365 Customization Environment
Log in to your Dynamics 365 environment and navigate to the Customization section, usually accessible through the "Settings" or "Administration" area.
Step 2: Open the Entity Customization
Select the entity for which you want to define the field locking and unlocking rules. This could be a standard entity like "Opportunity" or a custom entity specific to your organization.
Step 3: Create a new Business Rule
Within the entity customization, locate the "Business Rules" section. Create a new business rule or select an existing one that you want to modify.
Step 4: Define Conditions
Add conditions to specify when the field locking or unlocking should occur. For example, you can set conditions based on the value of other fields, the user's role, or the stage of a business process flow.
Step 5: Specify Actions
Based on the conditions defined in the previous step, specify the actions to be performed. To lock a field, set the action to "Lock Field" and select the field(s) you want to lock. Similarly, for unlocking a field, set the action to "Unlock Field" and choose the field(s) to be unlocked.
Step 6: Configure Dependencies (if required)
If the field locking or unlocking is dependent on other fields, configure the necessary dependencies within the business rule. This ensures that the rules are triggered correctly based on the field values.
Step 7: Save and Publish the Business Rule
Once you have defined the conditions, actions, and dependencies, save the business rule and publish it. This will make the rule active and enforce the specified field locking and unlocking logic.
Step 8: Test and Refine
Test the business rule thoroughly to ensure it behaves as expected. Make any necessary adjustments or refinements to the conditions, actions, or dependencies if needed.
Step 9: Repeat for Other Entities (if required)
If you want to apply field locking and unlocking to other entities, repeat the above steps for each entity where you want to implement these rules.
Here are some key points about business rules in Dynamics 365:
Conditions: Business rules are triggered based on conditions that you define. These conditions are typically based on field values or other criteria. You can specify one or more conditions using logical operators such as AND and OR. Conditions can compare field values, check if a field is empty or not, or evaluate other expressions. For example, you can create a condition that triggers a business rule when the "Opportunity Status" field is set to "Closed Won."
Actions: Once the conditions are met, business rules can perform actions to automate processes or enforce data integrity. Actions can include setting field values, showing or hiding fields, enabling or disabling fields, locking or unlocking fields, calculating values, or displaying error messages. For instance, you can define an action to set the value of the "Estimated Revenue" field as the product of the "Quantity" and "Unit Price" fields.
Scope: Business rules can be defined at different levels in Dynamics 365. Entity-level business rules apply to all records of a specific entity. Form-level business rules are specific to individual forms and allow you to define rules that apply only to a particular form or set of forms. This flexibility allows you to tailor business rules to different scenarios and requirements.
Execution order: If multiple business rules are defined for an entity or form, you can specify the execution order to determine the sequence in which the rules are applied. This ensures that rules are executed in a logical and desired sequence, especially when there are dependencies or interactions between rules.
Real-time validation: Business rules can provide real-time validation to enforce data integrity and provide instant feedback to users. As users interact with the system and enter data, the rules can validate the entered values against defined conditions and take actions accordingly. This helps prevent data inconsistencies or errors by guiding users and ensuring that data meets specified criteria.
Limitations: While business rules offer a lot of flexibility, there are some limitations to keep in mind. Business rules may not support all data types, complex calculations, or complex conditions. In such cases, you may need to explore other customization options like JavaScript or plugins. Additionally, business rules have some performance considerations, especially when dealing with large datasets or complex rule structures. It's important to test and optimize rules for efficiency.
Create a business rule or business recommendation
Make sure that you have the System Administrator or System Customizer security role or equivalent permissions.
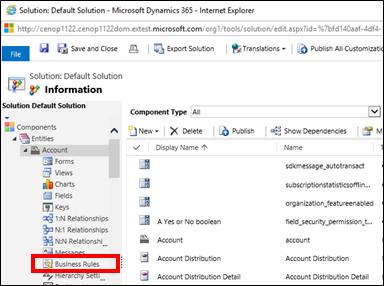
Open solution explorer.
Open the entity you want to create the business rule for (for example, open the Account entity), and then double-click Business Rules.
Click New.
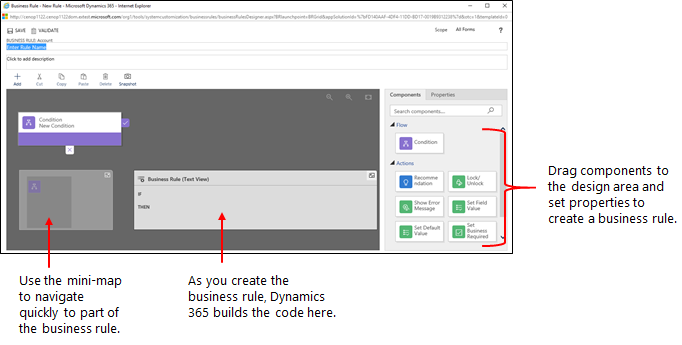
The Business Rule designer window opens with a single condition already created for you. Every rule starts with a condition. The business rule takes one or more actions based on that condition.
Tip
If you want to modify an existing business rule, you must deactivate it before you can modify it.
Add a description, if you want, in the description box in the upper-left corner of the window.
Set the scope, according to the following:
If you select this item...
The scope is set to...
Entity
All forms and server
All Forms
All forms
Specific form (Account form, for example)
Just that form
Add conditions. To add more conditions to your business rule:
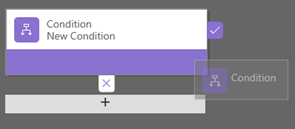
Drag the Condition component from the Components tab to a plus sign in the designer.
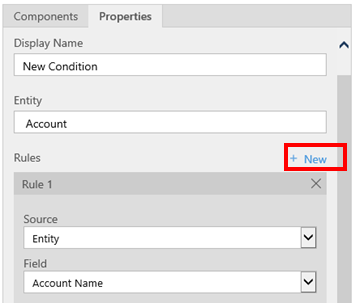
To set properties for the condition, click the Condition component in the designer window, and then set the properties in the Properties tab on the right side of the screen. As you set properties, an expression is created at the bottom of the Properties tab.
To add an additional clause (an AND or OR) to the condition, click New in the Properties tab to create a new rule, and then set the properties for that rule. In the Rule Logic field, you can specify whether to add the new rule as an AND or an OR.
When you're done setting properties for the condition, click Apply.
Add actions. To add an action:
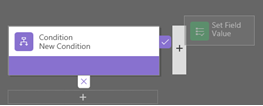
Drag one of the action components from the Components tab to a plus sign next to Condition component. Drag the action to a plus sign next to a check mark if you want the business rule to take that action when the condition is met, or to a plus sign next to an x if you want the business rule to take that action if the condition is not met.
To set properties for the action, click the Action component in the designer window, and then set the properties in the Properties tab.
When you're done setting properties, click Apply.
Add a business recommendation. To add a business recommendation:
Drag the Recommendation component from the Components tab to a plus sign next to a Condition component. Drag the Recommendation component to a plus sign next to a check mark if you want the business rule to take that action when the condition is met, or to a plus sign next to an x if you want the business rule to take that action if the condition is not met.
To set properties for the recommendation, click the Recommendation component in the designer window, and then set the properties in the Properties tab.
To add more actions to the recommendation, drag them from the Components tab, and then set properties for each action in the Properties tab.
Note
When you create a recommendation, a single action is added by default. To see all the actions in a recommendation, click Details on the Recommendation component.
When you're done setting properties, click Apply.
To validate the business rule, click Validate on the action bar.
To save the business rule, click Save on the action bar.
To activate the business rule, select it in the Solution Explorer window, and then click Activate. You can't activate the business rule from the designer window.
Q. How to automate birthday emails in Power Automate with Sharepoint List?
Follow the below video to see how the automation is done in power automate:
Here are the steps involved in automating employee birthday emails using Power Automate, and SharePoint. (Snapshots will be posted soon)
Prepare the SharePoint list: Create a SharePoint list containing employee details such as first name, last name, birthday, and email. Set the permissions to make the list private or public, depending on your requirements.
Create a scheduled cloud flow: In Power Automate, create a scheduled cloud flow called "birthday email" that will run every day at a specified time, such as 10 am.
Convert time zones: Set the start time of the flow in Eastern Standard Time (EST) by converting it from UTC. This ensures the flow runs at the desired time in the desired time zone.
Retrieve the current date: Use the "Compose" action in Power Automate to retrieve the current date in UTC format.
Convert UTC date to the desired format: Modify the compose statement to convert the UTC date to Eastern Time and format it as month and day. This ensures it aligns with the format needed for comparison with employee birthdays.
Get items from SharePoint list: Use the "Get items" action in Power Automate to retrieve all rows of data from the SharePoint list that contains employee details.
Compare dates: Set up a condition in Power Automate to compare the birthday dates from the SharePoint list with the current date. This condition is applied to each item in the retrieved data.
Format the SharePoint date: Format the SharePoint date using the "FormatDateTime" function to match the month and day format without the year. This ensures accurate comparison with the current date.
Send birthday emails: If the condition is true (an employee's birthday matches the current date), use the "Send an email" action to send a personalized birthday email to the employee's email address. Include a birthday greeting, the employee's first name, and a closing message from management.
No action if the condition is false: If the condition is false (no employee has a birthday on the current date), no email is sent.
Optional troubleshooting step: Add a compose statement to display the output of the condition expression for troubleshooting purposes.
Save and test the flow: Save the flow and manually test its functionality to ensure it runs as expected.
By following these steps, you can automate the process of sending birthday emails to employees using SharePoint and Power Automate.
Q. How to move Word Document Templates in Dynamics 365: XrmToolBox
In this blog/video, I'll cover how to move Word document templates from one environment to another via XrmToolBox in Dynamics 365
Pre-requisite- 1. Existing Document Templates Required - Learn low to create them here- here 2. XrmToolBox Installation Required - Click herefor Details, Features, and Installation
Word templates introduction Microsoft Word makes it easy to create nice-looking documents for your Dynamics 365 data. You can create templates with a consistent design and style, and share them with others. This means that all the documents you send to customers will have the same professional appearance that represents your organization. When you're ready to generate a document, you can do it with a single click, and the information from Dynamics 365 will automatically fill in the right places in the document.
XrmToolBox introduction XrmToolBox is a popular tool used in Dynamics 365 for various purposes like- customizations, data management, and administration tasks. Basically, it provides a collection of tools and plugins that can make our Dynamics 365 work easier and more efficient. We can perform activities like fetch XML queries, plugin development, data import/export, schema customization, and more, all within a user-friendly interface. It has more than 334 tools so far which makes our work tasks easier and less time-consuming For all Dynamics 365 professionals- It can be considered as a valuable resource to enhance their productivity and efficiency in working with the platform.
To upload a document template in Dynamics 365 via XrmToolBox, you can follow these steps:
Install XrmToolBox: If you haven't already, download and install XrmToolBox from the official website. Follow this blog here
Connect to Dynamics 365: Launch XrmToolBox and connect to your Dynamics 365 organization by selecting the appropriate connection in the "Connect" panel. Click on the "Connect" button and provide the necessary details such as the CRM URL, username, and password.
Note-check the checkbox for displaying the list of available organizations. By selecting this option, you will be able to choose an environment from your CRM instance.
Connect to Organization: In the Document Template Manager window, click on the "Connect" button to establish a connection with your Dynamics 365 organization.
Open Document Template Manager: Once connected to XrmToolBox, click on the "Tools Library" button in the toolbar. In the Tools Library window, search for "Document Template Manager" and install the plugin by clicking on the "Install" button.
Load Document Templates: After the installation, go back to the main XrmToolBox window and locate the "Document Template Manager" under the tools tab. Click on it to see all the tools and scroll down to find Document Template Manager.
Load Templates: Once connected, click on the "Load Templates" button. This action will retrieve the list of existing document templates from your Dynamics 365 organization.
Upload Template: To upload a new document template, click on the "Upload Template" button in the Document Template Manager window.
Select Template File: In the file selection dialog, browse and choose the document template file you want to upload. The template file should be in the appropriate format supported by Dynamics 365 (e.g., Word or Excel).
Upload Template: Once you have clicked on the "Open" button, a confirmation message will appear indicating the success of the upload process. If the template is uploaded then it will be shown under "create template" otherwise it will be shown under ignore template. Click "OK" to close the confirmation dialog.
Verify Uploaded Template in XrmToolBox: The newly uploaded document template should now be displayed in the Document Template Manager window. You can verify the template by selecting it from the list.
Verify Uploaded Template in Dynamics 365: The newly uploaded document template should now be displayed in the Document Template.
Test the Uploaded Template: Go to the CRM> Open any contact> Click on the 3 dot option on the command bar and then click on word templates. Your uploaded template should be visible under Word Templates >Click on the file to download.
Check the fields: The file will be exported to Word with all the contact details mapped into the Word document. Download the file, And open it.
The file will be exported to Word with all the contact details mapped into the Word document. Download the file, And open it.
That's it! By following these steps, you should be able to upload a document template in Dynamics 365 using XrmToolBox.
XrmToolBox is a popular tool used in Dynamics 365 for various purposes like- customizations, data management, and administration tasks. Basically, it provides a collection of tools and plugins that can make our Dynamics 365 work easier and more efficient. We can perform activities like fetch XML queries, plugin development, data import/export, schema customization, and more, all within a user-friendly interface. It has more than 334 tools so far which makes our work tasks easier and less time-consuming For all Dynamics 365 professionals- It can be considered as a valuable resource to enhance their productivity and efficiency in working with the platform.
This list shows all 334 tools available for XrmToolBox click here
Features/ Advantages
XrmToolBox has many great features and advantages. While I can only mention a few, here are some key benefits:
Wide Range of Tools: Provides many tools 334 tools for managing data, customizing solutions, and handling workflows.
User-Friendly Interface: Simple and easy to use interface.
Plugin Store: XrmToolBox has a built-in Plugin Store where you can browse and install various tools and plugins developed by the Dynamics 365 community. These plugins extend the functionality of XrmToolBox and provide additional capabilities for different tasks.
Bulk Data Operations: Makes it easy to handle large amounts of data, including importing, exporting, updating, and deleting.
Solution Management: You can use XrmToolBox to import and export solutions in Dynamics 365. This is useful for transferring customizations, configurations, and data between different environments.
Querying and Data Analysis: Tools for retrieving and analyzing data using FetchXML.
Extensibility: Very flexible and customizable with a plugin-based structure.
Security Management: You can manage security roles and permissions in Dynamics 365. You can create, modify, and assign security roles to users and teams, define privileges, and configure access levels.
Workflow and Process Automation: Tools for automating business processes and managing workflows.
Community Support: Active community of users and developers offering plugins, support, and knowledge sharing.
These are just a few examples of what XrmToolBox can do. It's a versatile tool that's popular in the Dynamics 365 community because it offers a wide range of features. It simplifies and improves tasks related to customization, administration, and development in Dynamics 365.
Step 2. - We need to unlock the zip file first and then extract it.
To unlock and extract the zip file, right-click on the file, select "Properties," check the "Unblock" checkbox, and click "OK."
Step 3. - After extracting the XrmToolBox zip file, open the folder and navigate to find multiple DLL files and other files. Scroll down until you locate the XrmToolBox application, then double-click on it to launch the XrmToolBox.
Step 4. - When you open the application, you will be greeted with an interface displaying various options such as "Connect," "Tools," and "Library." On the left side, you will find a list of recently used tools visible if you have previously connected to XrmToolBox and utilized any tools. On the right side, you will find options for accessing documentation and quick actions. If you wish to gain insights from a user's perspective, selecting the respective option will direct you to the relevant website.
Step 5. - In the "Tools" section- you will find a collection of all the tools you have downloaded or installed in your XrmToolbox.
Step 6. - In the "Tools Library" section- you can access a comprehensive list of available tools. If you wish to download and install any specific tool, simply select it, and once installed, it will appear under the "Tools" section.
Step 7. - Now, let's establish a connection with the Dynamics 365 environment. Click on the "Connect" button, then select "New Connection." Here, you will find various methods available for establishing the connection.
Step 8. - For the connection, I will choose the Microsoft Login Control method. (If you scroll down, you can explore detailed information about all six available connection methods.)
Step 9. - Select the "Use default Configuration" option and click on Open Microsoft Login Control
Step 10. - Here, you have two options: you can either log in through the on-premise version or the CRM online version. If you are using CRM online, select "Office 365" and then check the checkbox for displaying the list of available organizations. By selecting this option, you will be able to choose an environment from your CRM instance.
Step 11. - Select your environment and click on the Login button
Step 12. - Give the connection Name and click on Finish.
Step 13. - Connection with Dynamics 365 environment is successfully established.
At the bottom left, you can easily identify the environment to which you are currently connected, and all the logged-in connections will be visible here. You can select the desired action, such as editing or deleting, for the available connections.
Step 14. - Next, let's download and install a tool called FetchXML Builder and perform some actions.
Click on the "Tools Library" button, then type "XML" in the search box. Select the FetchXML Builder application from the results and click on "Install."
Step 15. - After the installation is complete, a green checkmark should appear. Click on "Close."
Step 16. - Now, the downloaded FetchXML Builder tool will be available under the "Tools" section. Scroll down to locate your tools, and you will find FetchXML Builder listed there. Double-click on that to open.
Step 17. - In the FetchXML Builder tool, you can generate XML queries for a specific entity.
Click on the entity dropdown and select your desired entity. Afterward, click on the "Execute" button, and the resulting report will be visible under the "Result View."
Step 18. - To view the queries, click "View" and select "FetchXML." The queries will be displayed below.
Step 19. - You can add additional filters and conditions to create more complex queries. Right-click on the "Contact" entity, go to "Add," and then click on "Attribute" to specify the fields you want to include in the query or display.
Step 20. - Once you have made your selections, click on the "Execute" button, and you can click on "FetchXML" to view the updated queries.
Connection
There are different ways to connect to Dynamics 365, such as Microsoft Login Tool, Connection String, Client ID, connection wizard, certificate, MFA To learn about connecting through all six methods, please refer to the blog attached here Different ways to connect to XrmToolBox are:
Microsoft Login Tool: Authenticate using Microsoft credentials.
Connection String: Connect using a specified string of connection parameters.
Client ID: Authenticate using an Azure Active Directory (AAD) application Client ID.
Connection Wizard: Guided step-by-step setup for selecting connection type and details.
Certificate: Connect using a certificate installed in the environment.
Multi-Factor Authentication (MFA): Support for additional security verification during connection
Five of the most useful tools in XrmToolBox:
FetchXML Builder: This tool allows you to create, test, and execute FetchXML queries against your Dynamics 365 or Power Platform data. It provides a visual interface for constructing queries, making it easier to retrieve specific data sets.
Plugin Registration: The Plugin Registration tool allows you to manage and deploy custom plugins in your Dynamics 365 or Power Platform environment. You can register, update, or delete plugins, as well as configure their execution pipeline.
Metadata Browser: The Metadata Browser provides a comprehensive view of the metadata in your Dynamics 365 or Power Platform instance. It allows you to explore and analyze the structure of entities, attributes, relationships, and other metadata components.
Solution Components Mover: This tool enables you to easily move components between different solutions in your Dynamics 365 or Power Platform environment. It simplifies the process of managing and organizing solution components, making it more efficient to deploy changes across environments.
SiteMap Editor: The SiteMap Editor tool allows you to customize the navigation menu in your Dynamics 365 or Power Platform instance. You can add, remove, or modify areas, groups, and subareas in the sitemap to tailor the navigation experience for users.
Conclusion
XrmToolBox is a popular and highly valuable tool in the Dynamics 365 community, offering a wide range of features and advantages. It simplifies tasks related to customization, data management, and administration in Dynamics 365. With over 334 tools available, it provides a user-friendly interface and supports activities like data import/export, schema customization, plugin development, and fetch XML queries. The tool's advantages include a wide range of tools, a built-in Plugin Store, bulk data operations, solution management, querying and data analysis, extensibility, security management, workflow and process automation, and active community support. XrmToolBox can be easily downloaded and installed from their website, and it offers various methods of connecting to organizations. It allows for the installation of useful plugins and provides additional features like an open environment, impersonation, and filtering tools. The documentation section provides resources for developers. Overall, XrmToolBox is an indispensable tool for enhancing productivity and efficiency in Dynamics 365.