Q. How to do field mapping via Power Automate in Dynamics 365?
You can see how the "Power Automate Mapping" is done by following my below video as well. Out-of-the-box field mapping is in this blog- Field Mapping- Out of the Box
Power Automate (formerly known as Microsoft Flow) is a cloud-based service provided by Microsoft that allows users to create automated workflows between different apps and services. It can be used to automate the creation of records, send notifications, integrate with other systems, Approve workflows, and so on. We are only going to focus on how to do field mapping via power automate here. We need to have a power automate license for this.
Field mapping in Dynamics 365 can be accomplished through both Power Automate and out-of-the-box features, and your chosen approach will depend on your specific needs and requirements. Power Automate offers more customization options for field mapping than the out-of-the-box features in Dynamics 365. With Power Automate, you can create complex field mapping workflows involving multiple fields and entities and apply custom logic and data transformations to the data. Power Automate may be the better option if you require complex field mapping workflows involving multiple systems or entities. If your needs are simpler and limited to mapping fields within Dynamics 365, then the out-of-the-box features may be sufficient.
Scenario: Field mapping for the option set with different values from Lead to Opportunity.

Prerequisite- an option set field should be there in Lead and another option set field should be there in the opportunity table. Keep this field on the form so that we can enter data while creating records and check on both lead and opportunity forms. (Check the above video for more clarification)
Step 1- Open Dynamics CRM, click on ‘Flows’ on the left pane and then click on ‘new flow’ and select ‘Automated Cloud Flow’

Step 2: Enter the flow name. Select the flow trigger as - ‘When a row is added, modified, or deleted’ and click on Create button

Step 3: Enter the value as below and click on the ‘New Step’ button

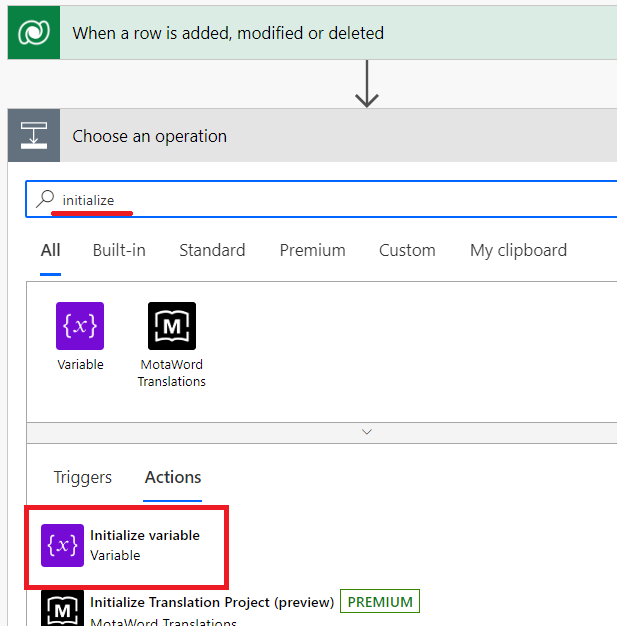
Step 4: Search Initialize in the search box and select ‘Initialize variable’ from the option
Step 5: Give any relevant Name, chose type as Integer as we are comparing int values of the option set and ‘value = -1’ for checking null value

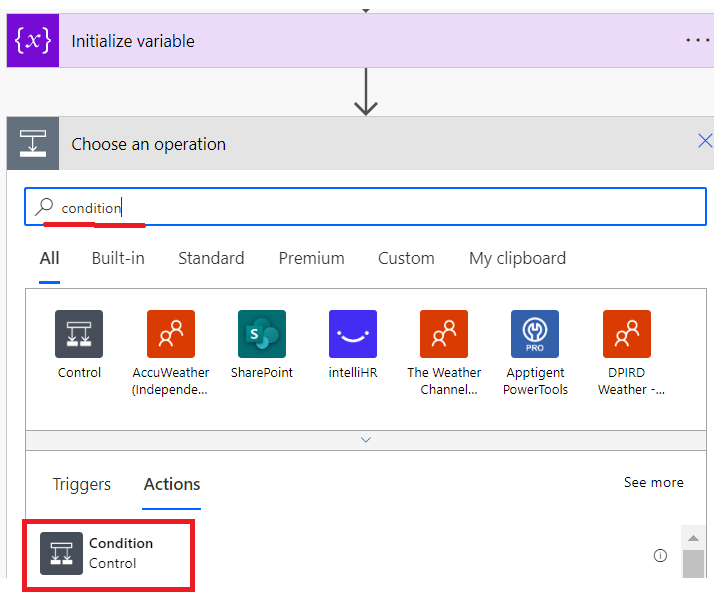
Step 6: Search Condition in the search box and select ‘Condition’ under the Actions
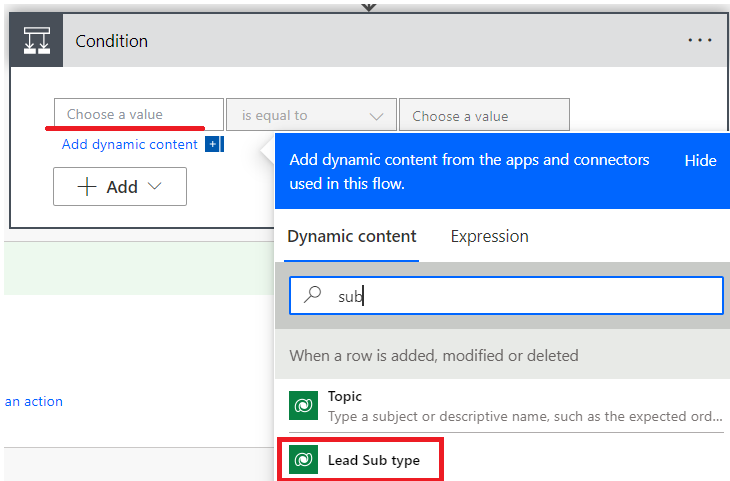
Step 7: Select your option set field ( e.g Lead Sub type) which you want to map to other table
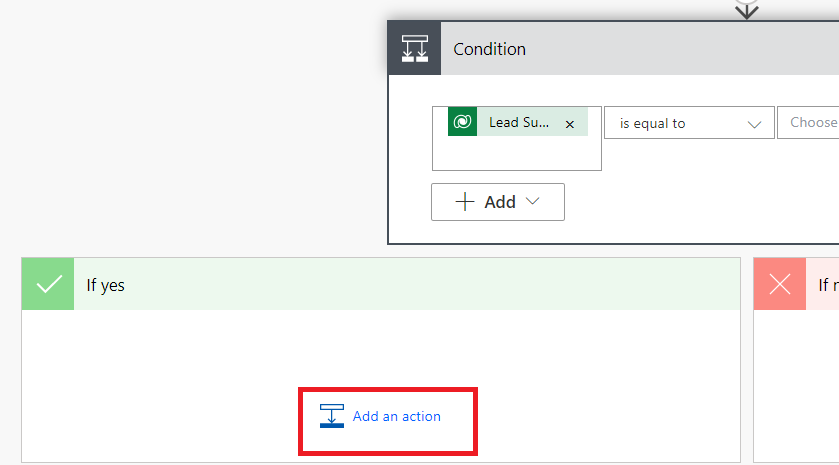
Step 8: Click on Add Action under Yes condition
Step 9: Search Switch in the search box and select ‘Switch’ under the Actions

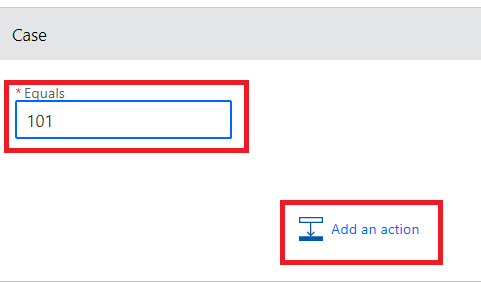
Step 10: Now here we will create a switch case for all optionset values which need to be mapped from Lead to Opportunity( e.g, values 101,102,103,104).
Enter the option set option value(check 1st snapshot above for this value) and click on Add Action
Step 11: Search Set variable in the search box and select ‘Set variable’ under the Actions
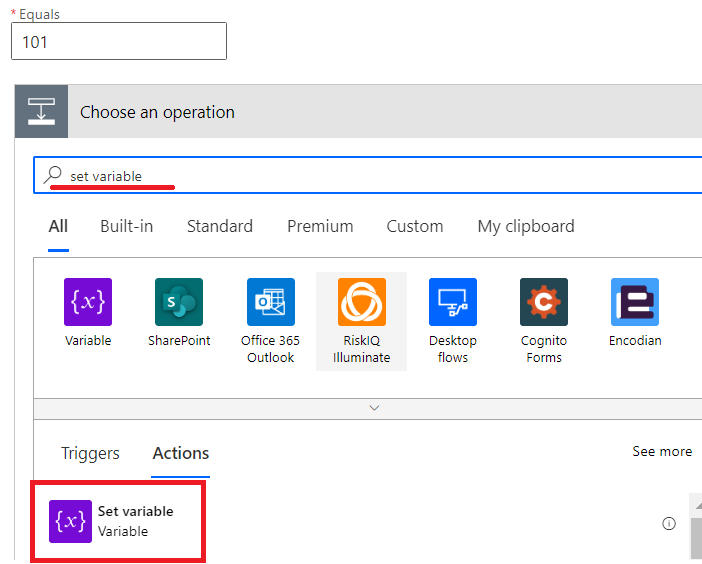
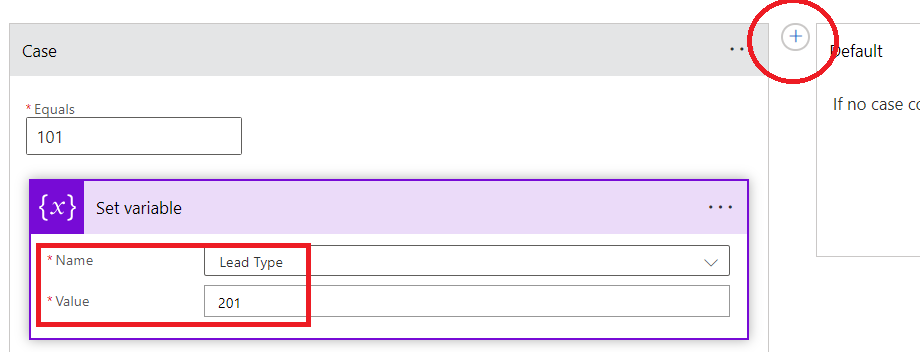
Step 12: Select the variable name which we created in step 5.
Enter the option set value (201) This value will be reflected in the opportunity record based on lead value 101. Click on the “+” button on the right side
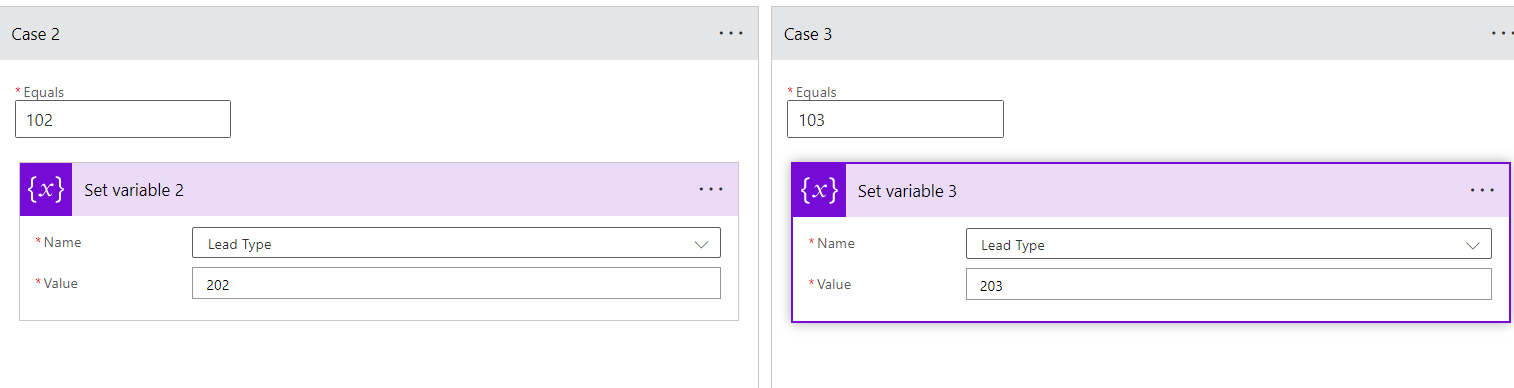
Step 13 : Follow the above step for covering all the cases of your option sets. You can create as many switch cases as you want to map the related fields.
Step 14: Once the switch case is done then click on the “New button” which will be just below the case

Step 16 : Search add a row in the search box and select ‘Add a new row’ under the Actions
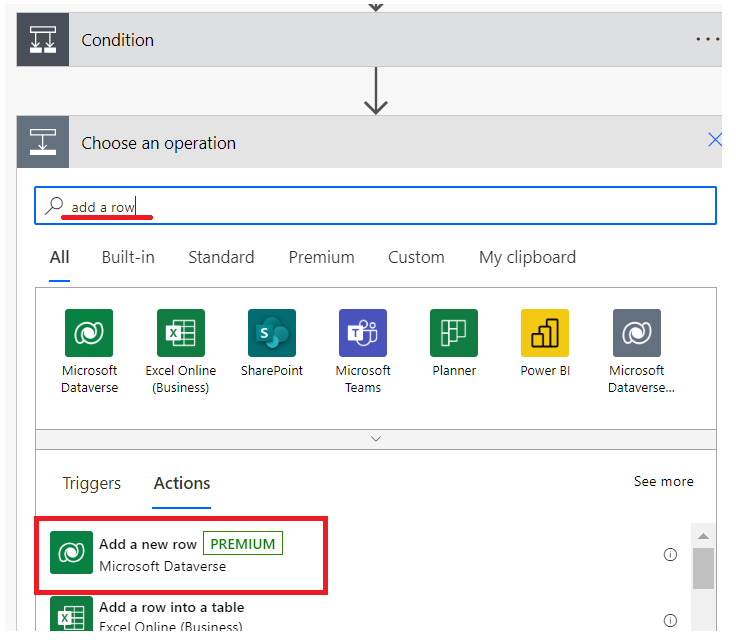
Step 17 : Select your table where you want the fields to be mapped. Click on the box for whichever fields you want to map and select the value as shown in step 7. Click on Show an advanced option for showing all fields and map your field.


Step 18 : Coming to the mapping option set field- Lead Sub type to Opport Sub type. Click on the dropdown button of the ‘Opport Sub type’ field and click on ‘Enter custom value’
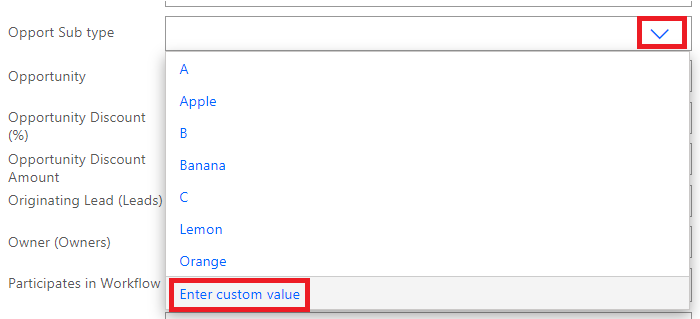
Step 19 : Click on expression and enter the below code in the fx box and click the ok button
Code- if(equals(variables('Event Type'), -1), null, variables('Event Type'))
Code explanation- If we’re selecting the option set value while creating lead then the same value will be populated to new opportunities after flow run. If there’s no value in the option set value then opportunity won’t be created.

Once you click Ok then Opport Sub type box should look like this

Step 20 : Click on the Save button from the top right. Here power automate a task is completed. Now we will create a lead record to check mapping

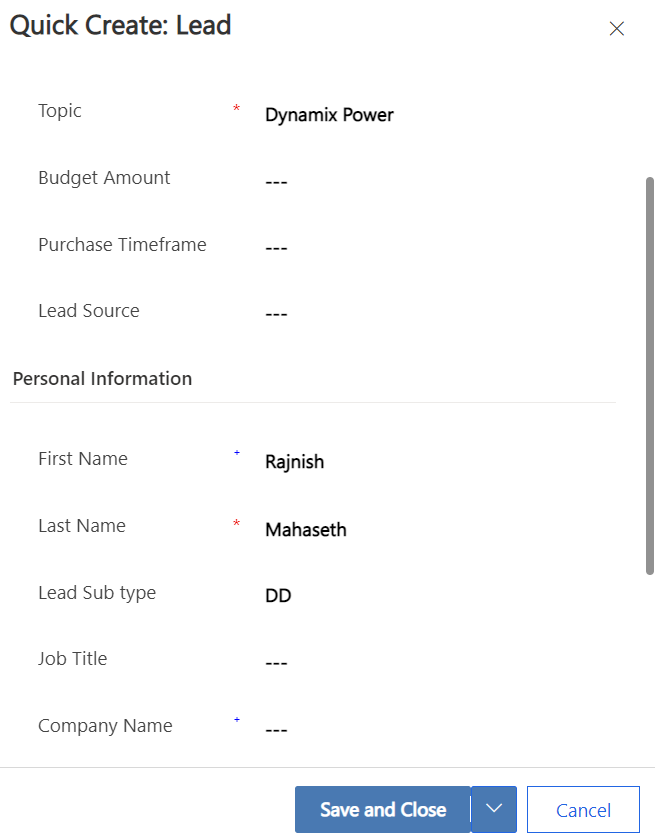
Step 21 : Open CRM and click on leads and create a new lead

Step 22 : Enter the details and click on the save and close button. Select Lead Subtype value(DD is mapped to Orange in opportunity)
Step 23 : Now go to your flow and click on option dots and click on Run history to check whether the power automaton has run successfully or failed.
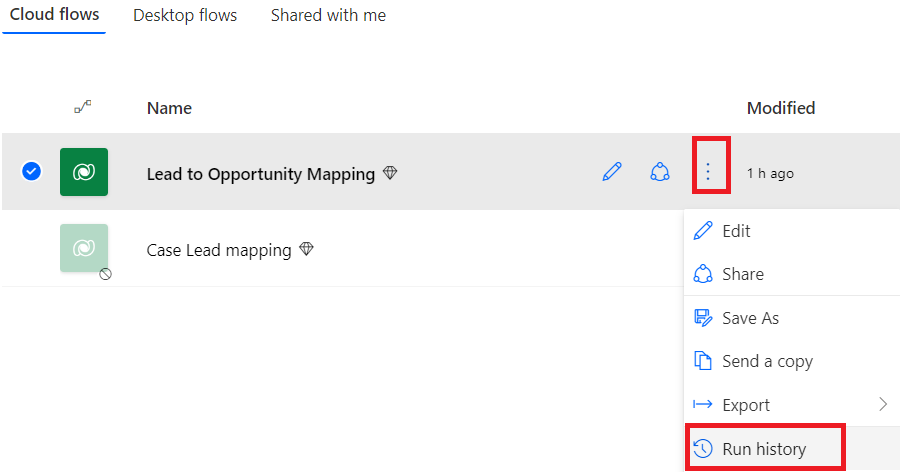
Step 24 : Click on the latest flow and open it

Step 25 : you should be able to see that flow ran successfully (or has failed sometimes if any condition has failed).

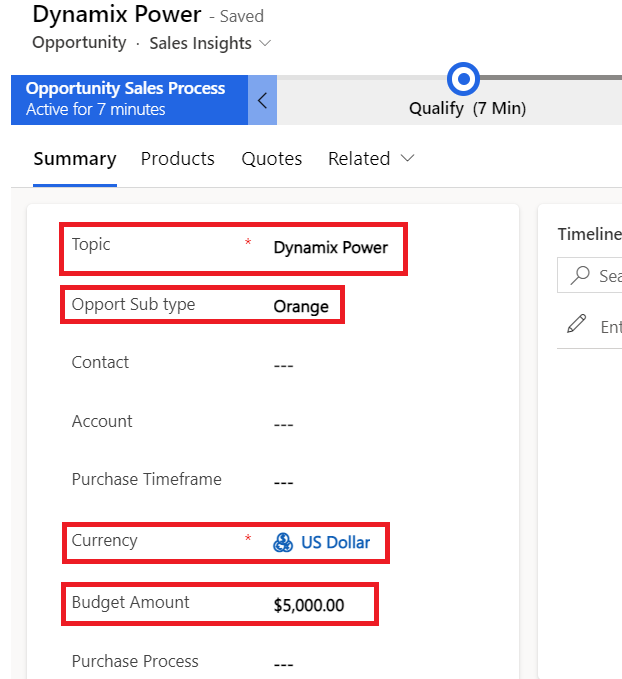
Step 26 : Go to CRM and click on opportunity from the left pane and sort the opportunities based on Type. Check the Topic which you created for Lead(Dynamix Power)

Step 27: You will be able to see the mapped fields from Lead here in this opportunity
You have successfully mapped the field via Power Automate.


No comments:
Post a Comment