Q. How to create Word / Document Templates in Dynamics 365 | Power platform?
In this blog/video, we are going to see how to create a Word or document template in Dynamics 365
Microsoft Word makes it easy to create nice-looking documents for your Dynamics 365 data. You can create templates with a consistent design and style, and share them with others. This means that all the documents you send to customers will have the same professional appearance that represents your organization. When you're ready to generate a document, you can do it with a single click, and the information from Dynamics 365 will automatically fill in the right places in the document.
With Word templates, you can easily create and share your template with others, so all the documents that go out to your customers have a consistent look that matches your organization's branding.
In Dynamics 365, document templates generate standardized documents such as invoices, quotes, purchase orders, reports, or other business documents. These templates provide a consistent format and layout for the generated documents.
There are two types of Word templates:
1. Personal Word Templates: Personal Word templates are specific to individual users and are used for personal or private purposes. Each user manages their own templates, creating personalized documents such as letters or internal memos.
2. Word Templates for Any Contact: Word templates for any Contact are shared across multiple users within the organization. These templates are typically managed by administrators or individuals with appropriate permissions and are used to generate standardized documents, such as letters or contracts, related to contacts.
Here's how you can work with document templates in Dynamics 365. Scroll down to see the steps in detail with snapshots.1. Create a Document Template
2. Configure Template Parameters in MS Word Developer mode
3. Generate Documents from Templates
Advantages of Word templates in Dynamics 365
1. Familiar and User-Friendly:
2. Seamless Integration
3. Consistent Branding and Formatting
4. Dynamic Data Population
Limitations of Word templates in Dynamics 365
While Word templates in Dynamics 365 offer flexibility and convenience for generating documents, there are certain limitations to be aware of:
1. Limited Design Capabilities
2. Compatibility Issues
3. Lack of Dynamic Content
4. Limited Data Filtering & Automation
5. Restricted Collaboration
Below is an example of the word template. We can fill in the details like Name, Address, email, Phone, etc with a single click of a button for any contact by mapping the fields in MS Word.
Steps to Create Word Templates in Dynamics 365
Step 2. Click on ‘Templates’ under Business
Step 3. Click on ‘Document Templates
Step 4. Click on the ‘New' button to create a new email templates
Step 5. Select Word Template, and then select an entity to which the template applies. The template will use data from this entity.
Step 6. The Select Entity dialog box opens. The relationships you select on this screen determine what entities and fields are available later when you define the Word template. Only select the relationships you need to add Dynamics 365 data to the Word template. If there are no relationships then you can ignore it. When you're done choosing relationships, select Download Template.
Step 7. Save the file in your system
Steps to Enable the Developer tab in MS Word
Step 18. Select the template which we created and click on open
Step 19. Click on the Upload button to upload the file
Step 20. As soon as you upload the template, the template details like status, name, type, etc will be visible on the screen. It will be in an activated state by default, you can deactivate or delete it from the command bar buttons
Step 22. Click on the 3 dot option on the command bar and then click on word templates
Step 23. Your uploaded template should be visible under Word Templates (Dynamix Power Contact). Click on the file to download.
Step 24. The file will be exported to Word with all the contact details mapped into the Word document. Download the file, And open it.
Step 25. After opening the template, the mapped fields from the contact should be visible
The above template was a general word template that can be used by anyone in the organization. We have 2 kinds of word templates as below-
1. Personal Word Templates: Personal Word templates are specific to individual users and are used for personal or private purposes. Each user manages their own templates, creating personalized documents such as letters or internal memos.
2. Word Templates for Any Contact: Word templates for any Contact are shared across multiple users within the organization. These templates are typically managed by administrators or individuals with appropriate permissions and are used to generate standardized documents, such as letters or contracts, related to contacts.
Step 26. So to create a personal word template, open any contact > click on the 3 dots option>word templates> upload template.
Now this template will be visible only to you and it will be shown only under the personal word template
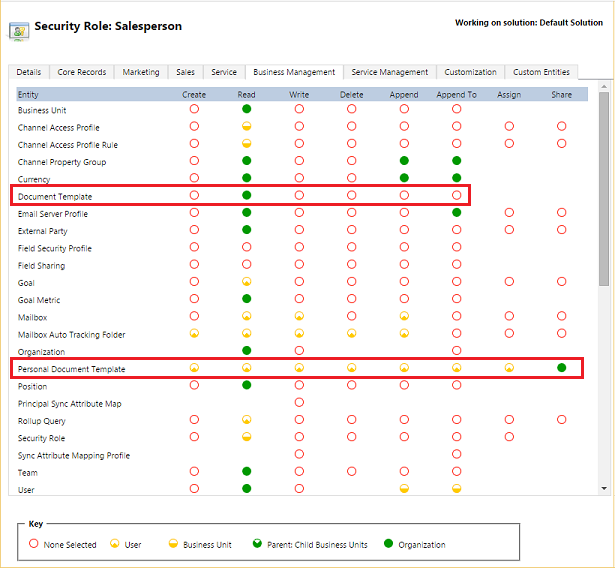
If you wish to grant users access to create templates, you can follow the steps outlined below.
- Click Settings > Security > Security Roles.
- Select a role, and then click the Business Management tab.
- Select Document Template to set access for templates available to the entire organization. Select Personal Document Template for templates shared with individual users.
- Click the circles to adjust the level of access.


No comments:
Post a Comment