Monday, April 29, 2024

Convert Currency/Amount field to Words in Dynamics 365

Convert Currency/Amount field to Words in Dynamics 365

Introduction:

In many business scenarios, displaying currency amounts in words is crucial for clarity and compliance. Dynamics 365 doesn't offer a built-in feature for this conversion. In this blog, we'll walk through the process of implementing a solution to automatically convert currency amounts to words in Dynamics 365 (e.g., 1075 becomes "One Thousand and Seventy Five").

Refer to this video for a detailed implementation guide for converting amount to words-


Requirements: 

  • Access to Dynamics 365 environment with customization privileges.
  • Basic understanding of JavaScript and Dynamics 365 customization.

                        -----Steps------

Step 1Create Custom Fields and place these field on the main form

Create two custom fields:

Amount (Currency) : This field will store the currency amount.

Amount in Words (Single Line of Text) : This field will display the currency amount in words.


Step 2: Write Conversion Logic 

Write JavaScript functions to convert the numeric currency amount to words. Below is the code snippet for the conversion logic:

JavaScript (Download link here)

function convertAmountToWordsDemo() {
    // Get the numeric value from the new_amount field
    var amount = Xrm.Page.getAttribute("new_amount").getValue();

    // Check if the amount is not null or undefined
    if (amount != null && amount !== undefined) {
        // Convert the numeric value to words
        var amountInWords = convertNumberToWords(amount);

        // Set the value in the new_amountinwords field
        Xrm.Page.getAttribute("new_amountinwords").setValue(amountInWords);
    }
}

// Function to convert a numeric value to words
function convertNumberToWords(n) {
    if (n < 0)
        return false;
    
    var singleDigit = ['', 'One', 'Two', 'Three', 'Four', 'Five', 'Six', 'Seven', 'Eight', 'Nine'];
    var doubleDigit = ['Ten', 'Eleven', 'Twelve', 'Thirteen', 'Fourteen', 'Fifteen', 'Sixteen', 'Seventeen', 'Eighteen', 'Nineteen'];
    var belowHundred = ['Twenty', 'Thirty', 'Forty', 'Fifty', 'Sixty', 'Seventy', 'Eighty', 'Ninety'];

    if (n === 0) return 'Zero';

    // Separate the integer and decimal parts
    var integerPart = Math.floor(n);
    var decimalPart = Math.round((n - integerPart) * 100); // Convert decimal to cents

    function translate(n) {
        var word = "";
        if (n < 10) {
            word = singleDigit[n] + '';
        } else if (n < 20) {
            word = doubleDigit[n - 10] + ' ';
        } else if (n < 100) {
            var rem = translate(n % 10);
            word = belowHundred[(n - n % 10) / 10 - 2] + ' ' + rem;
        } else if (n < 1000) {
            var remainder = translate(n % 100);
            word = singleDigit[Math.trunc(n / 100)] + ' Hundred ' + remainder;
        } else if (n < 1000000) {
            var remainder = translate(n % 1000);
            word = translate(Math.trunc(n / 1000)) + ' Thousand ' + remainder;
        } else if (n < 1000000000) {
            var remainder = translate(n % 1000000);
            word = translate(Math.trunc(n / 1000000)) + ' Million ' + remainder;
        } else {
            var remainder = translate(n % 1000000000);
            word = translate(Math.trunc(n / 1000000000)) + ' Billion ' + remainder;
        }
        return word;
    }

    // Create the words for the integer part
    var integerWords = translate(integerPart).trim();

    // Create the words for the decimal part
    var decimalWords = (decimalPart > 0) ? 'and ' + translate(decimalPart).trim() + ' cents' : '';

    // Construct the final result
    var result = (integerWords + ' ' + decimalWords).trim();
    return result;
}

Code Logic

  • The convertAmountToWordsDemo function triggers when needed (e.g., on record save).
  • It retrieves the amount value from the new_amount field.
  • It calls the convertNumberToWords function to convert the numeric value to words.
  • Finally, it sets the converted text in the new_amountinwords field.

The convertNumberToWords function handles the core conversion logic:

  • It defines arrays for representing digits, teens, and tens.
  • It translates the number part by place value (hundreds, thousands, millions, etc.).
  • It handles decimals by converting them to cents and translating them separately.
  • It constructs the final result by combining the integer and decimal words.


Step 3: Attach Script to Currency Field 

Navigate to your entity customization in Dynamics 365.

Go to the "Forms" section depending on where you want the functionality.

Edit the desired form.

Within the form editor, add a new web resource and paste the JavaScript code.

Attach the `convertAmountToWordsDemo` function to the onchange event of the currency field on the form. This ensures that whenever the currency amount changes, the conversion function is triggered.

Save and Publish the form.

Step 4: Test 

Test the solution thoroughly to ensure accurate conversion and proper functionality. Consider scenarios such as different currency amounts, decimal places, and negative values.

Conclusion: 

By following these steps, you can implement a solution to automatically convert currency amounts to words in Dynamics 365. This enhancement improves the clarity of displayed currency amounts and ensures compliance with business requirements.

JavaScript code here


Thursday, April 25, 2024

Enable or Disable the Plugin in Dynamics 365

Enable or Disable the Plugin in Dynamics 365

Sunday, April 21, 2024

Duplicate Detection using Plugin in Dynamics 365 / Power Platform

Duplicate Detection in Power App using Plugin - Dynamics 365 / Power Platform

Introduction:

This blog will show you how to create Plugin in Dynamics 365 to stop users from saving records and display error messages. While you could use Out of the Box Duplicate detection rule but it won't prevent from saving the record. We can also use Duplicate Detection using Keys Click here to see Video.

Scenario: Create a plugin(Pre-Validation) for checking duplicate driving license on case form. Within the Case main form, there exists a text field named driving license. I've developed a plugin designed to restrict users from creating a new case if a duplicate driving license value already exists in any driving license record. Upon providing a driving license value during case creation, the plugin retrieves records from the driving license entity where the driving license attribute matches the entered value.

Refer to this video for a detailed implementation guide for creating Plugin-


What is Plugin?

A plugin is defined as a custom business logic that can be installed in Microsoft Dynamics CRM to make customizations or to enhance the standard behavior of the platform. Plugins help in handling various events and each plugin executes a specific event. In general, the Plug-ins are written in VB or C# can run an asynchronous or synchronous mode.

Before creating the plugin, ensure you have the following prerequisites in place-

  • Visual Studio with .Net Framework 4.6.2
  • Plugin Registration Tool
  • Understanding of Plugin Development:

Plugin code here


JavaScript Code for showing custom message in dialog box-

Create a Visual Studio project for the plug-in

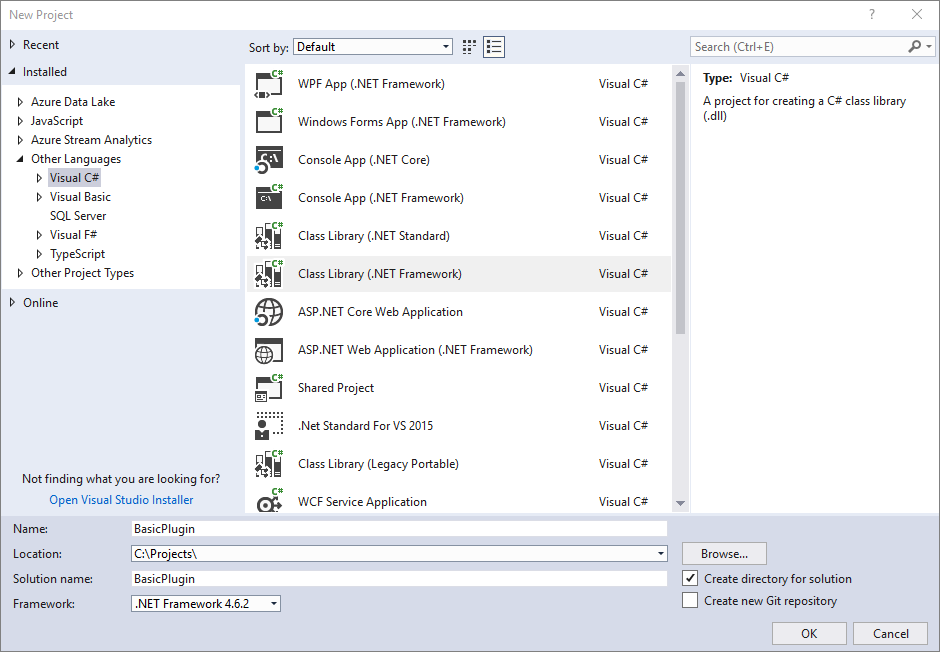
  1. Open Visual Studio and open a new Class Library (.NET Framework) project using .NET Framework 4.6.2

    Open a new class library (.NET Framework) project using .NET Framework 4.6.2.

    The name used for the project is also the name of the assembly. This tutorial uses the name DuplicateDrivingLicencePlugin.

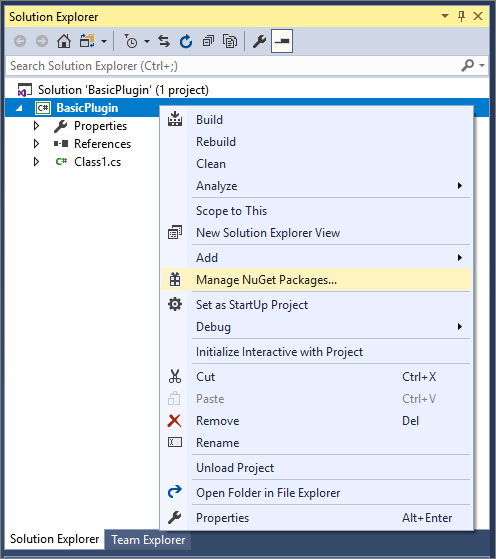
  2. In Solution Explorer, right-click the project and select Manage NuGet Packages… from the context menu.

    Manage NuGet packages.

  3. Select Browse and search for Microsoft.CrmSdk.CoreAssemblies and install the latest version.

    Install Microsoft.CrmSdk.CoreAssemblies NuGet Package.

  4. You must select I Accept in the License Acceptance dialog.
    Note - Adding the Microsoft.CrmSdk.CoreAssemblies NuGet package will include these assemblies in the build folder for your assembly, but you will not upload these assemblies with the assembly that includes your logic. These assemblies are already present in the sandbox runtime.

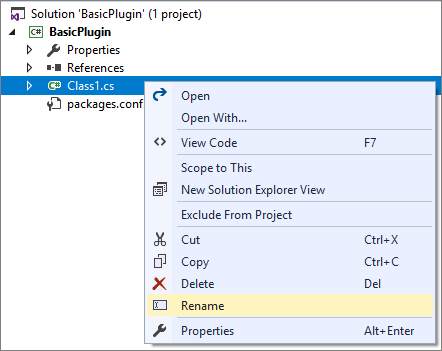
  5. In Solution Explorer, right-click the Class1.cs file and choose Rename in the context menu.

    Rename class.

  6. Rename the Class1.cs file to DuplicateDrivingLicence.cs.

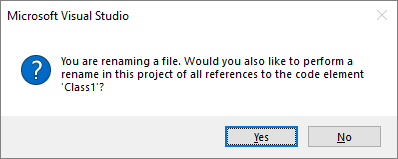
  7. When prompted, allow Visual Studio to rename the class to match the file name.

    Confirm rename dialog.

    Paste below plugin code - 

    using System;
    using Microsoft.Xrm.Sdk;
    using Microsoft.Xrm.Sdk.Query;
    
    namespace DuplicateDrivingLicence
    {
        public class DuplicateDrivingLicencePlugin : IPlugin
        {
            public void Execute(IServiceProvider serviceProvider)
            {
                ITracingService tracingService = (ITracingService)serviceProvider.GetService(typeof(ITracingService));
                IPluginExecutionContext context = (IPluginExecutionContext)serviceProvider.GetService(typeof(IPluginExecutionContext));
                IOrganizationServiceFactory serviceFactory = (IOrganizationServiceFactory)serviceProvider.GetService(typeof(IOrganizationServiceFactory));
                IOrganizationService service = serviceFactory.CreateOrganizationService(context.UserId);
    
                try
                {
                    // Check if the plugin is running in the pre-operation stage and for the intended entity
                    if (context.InputParameters.Contains("Target") && context.InputParameters["Target"] is Entity)
                    {
                        Entity targetEntity = (Entity)context.InputParameters["Target"];
    
                        // Check if the target entity is the "incident" entity and contains the "new_drivinglicence" field
                        if (targetEntity.LogicalName == "incident" && targetEntity.Contains("new_drivinglicence"))
                        {
                            // Retrieve the driving licence value from the case record
                            string drivinglicenceValue = targetEntity.GetAttributeValue<string>("new_drivinglicence");
    
                            // Check for duplicate driving licence records
                            if (IsDuplicateDL(service, drivinglicenceValue))
                            {
                                throw new InvalidPluginExecutionException("Duplicate driving licence value found. Cannot create the case.");
                            }
                        }
                    }
                }
                catch (Exception ex)
                {
                    tracingService.Trace($"Exception: {ex.Message}");
                    throw;
                }
            }
    
            private bool IsDuplicateDL(IOrganizationService service, string drivinglicenceValue)
            {
                // Query to retrieve driving licence records with the provided value
                QueryExpression query = new QueryExpression("new_drivinglicence")
                {
                    ColumnSet = new ColumnSet("new_drivinglicence"),
                    Criteria = new FilterExpression()
                    {
                        Conditions =
                        {
                            new ConditionExpression("new_drivinglicence", ConditionOperator.Equal, drivinglicenceValue)
                        }
                    }
                };
    
                EntityCollection results = service.RetrieveMultiple(query);
    
                // If there are any matching records, it's a duplicate
                return results.Entities.Count > 0;
            }
        }
    }

About the code

The above plugin, 'DuplicateDrivingLicencePlugin', aims to prevent duplicate driving license entries when creating case records in Dynamics 365. 
  • 1. Main Logic: It checks if the plugin is triggered in the pre-operation stage for case records containing the "new_drivinglicence" attribute.
  • 2. If so, it retrieves the driving license value from the case record.
  • 3. It then queries the "new_drivinglicence" entity to check for duplicates using the `IsDuplicateDL` method.
  • 4. The `IsDuplicateDL` method constructs a query to find records with matching driving license values.
  • 5. If duplicates are found, the plugin throws an exception, preventing the creation of the case.
  • 6. Exception handling ensures graceful error management with tracing for debugging purposes.
  • 7. This approach ensures data integrity by validating driving license entries before case creation.

Build plug-in

In Visual Studio, press F6 to build the assembly. Verify that it compiles without error

Sign the plug-in

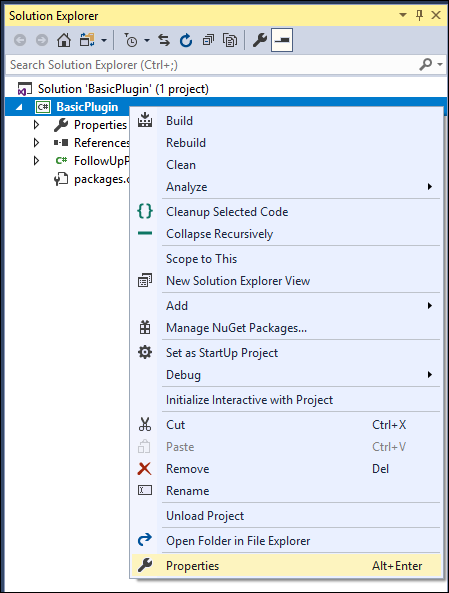
  1. In Solution Explorer, right-click the DuplicateDrivingLicencePlugin project and in the context menu select Properties.

    Open project properties.

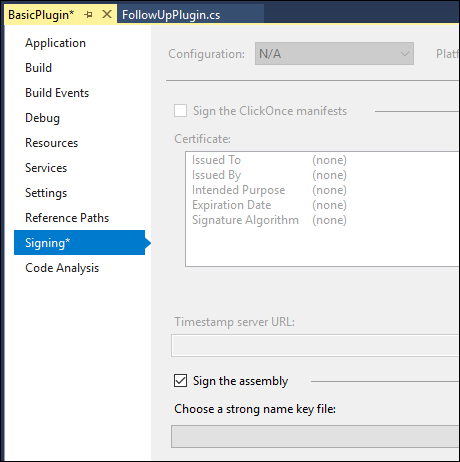
  2. In the project properties, select the Signing tab and select the Sign the assembly checkbox.

    Sign the assembly.

  3. In the Choose a strong name key file: dropdown, select <New…>.

  4. In the Create Strong Name Key dialog, enter a key file name, and deselect the Protect my key file with a password checkbox.

  5. Select OK to close the Create Strong Name Key dialog.

  6. In the project properties Build tab, verify that the Configuration is set to Debug.

  7. Press F6 to build the plug-in again.

  8. Using windows explorer, find the built plug-in at: \bin\Debug\DuplicateDrivingLicencePlugin.dll.

Register plug-in
To register a plug-in, you'll need the Plug-in Registration tool.

Connect using the Plug-in Registration tool

  1. After you have downloaded the Plug-in registration tool, click the PluginRegistration.exe to open it.

  2. Click Create new Connection to connect to your instance.

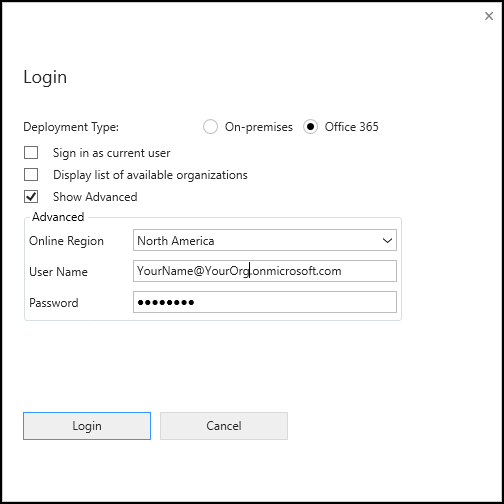
  3. Make sure Office 365 is selected.

  4. If you are connecting using a Microsoft account other than one you are currently using, click Show Advanced and enter your credentials. Otherwise, leave Sign-in as current user selected.

  5. If your Microsoft Account provides access to multiple environments, select Display list of available organizations.

    Logging in with the Plug-in registration tool.

  6. Click Login.

  7. If you selected Display list of available organizations, select the organization you would like to connect to and click Login.

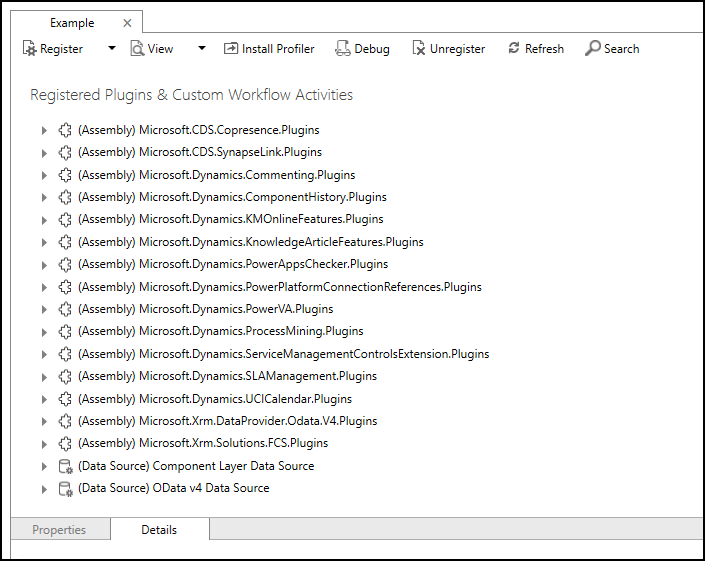
  8. After you are connected, you will see any existing registered plug-ins, custom workflow activities and data providers.

    View existing plug-ins an custom workflow activities.

Register your assembly

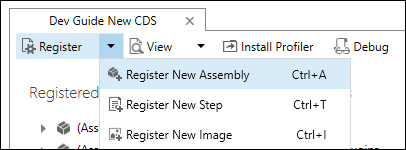
  1. In the Register drop-down, select New Assembly.

    Register new assembly.

  2. In the Register New Assembly dialog, select the ellipses () button and browse to the assembly you built in the previous step.

  3. For Microsoft 365 users, verify that the isolation mode is set to sandbox and the location to store the assembly is Database.

  4. Click Register Selected Plug-ins.

  5. You'll see a Registered Plug-ins confirmation dialog.


  6. Select OK to close the dialog and close the Register New Assembly dialog.

  7. You should now see the (Assembly) DuplicateDrivingLicencePlugin assembly, which you can expand to view the (Plugin) DuplicateDrivingLicencePlugin plugin.


Register a new step

  1. Right-click the (Plugin) DuplicateDrivingLicencePlugin and select Register New Step.


  2. In the Register New Step dialog, set the following fields

    SettingValue
    MessageCreate
    Primary Entityaccount
    Event Pipeline Stage of ExecutionPostOperation
    Execution ModeAsynchronous
    • Select Register New Step to complete the registration and close the Register New Step dialog.

    • You can now see the registered step.


    Test plug-in

    1. Open a your app and create a new case record with existing driving licence

    2. You should get below error while saving record


    Wednesday, April 17, 2024

    Business Rules to show Error Messages in Dynamics 365 / Power Platform

    Business Rules to show Error Messages in Dynamics 365 / Power Platform

    Introduction:

    This blog will show you how to use Business Rules in Dynamics 365 to stop users from saving records and display error messages. While you could use JavaScript or Plugins for this, Business Rules win out because they're easier to use, don't require coding, and are quicker to set up.

    Scenario: We will create a business rule in Dynamics 365 to show an error message if a from date field is greater than To date.

    Refer to this video for a detailed implementation guide for creating business rule-


    What are Business Rules?

    In Dynamics 365, a business rule is a feature that allows you to implement logic on forms without needing to write code. It provides a user-friendly drag-and-drop interface for creating rules that automate specific actions based on certain conditions.

    Here are some key points about business rules in Dynamics 365:

    Functionality: They can perform various actions like setting field values, validating data, showing or hiding fields, and making fields required or optional based on conditions.

    Benefits: Business rules are beneficial because they are:

    •     Easy to use with a drag-and-drop interface
    •     Quick to implement compared to code
    •     Require no coding knowledge for creation or maintenance
    •     Run in real-time, providing immediate feedback on form changes

    Scope: You can define the scope of a business rule to apply to specific forms, all forms for an entity, or even run server-side without requiring a user to be on a form.

    Here's how they work:

    Conditions: Business rules are triggered based on conditions defined by the user. These conditions typically involve comparing field values or checking the state of certain fields.

    Actions: When the conditions are met, business rules execute specific actions. These actions can include setting field values, making fields required or read-only, showing or hiding fields, and even displaying error messages.

    Scope: Business rules can be applied at various levels, including entity level, form level, or field level, allowing for flexibility in implementation.

    By combining conditions and actions, you can do any of the following with business rules:

    • Set field values
    • Clear field values
    • Set field requirement levels
    • Show or hide fields
    • Enable or disable fields
    • Validate data and show error messages
    • Create business recommendations based on business intelligence.

    Advantages of Business Rule:

    No Coding Required: Business rules allow you to implement this logic without writing any code. This is beneficial for users who may not have coding skills but still need to customize Dynamics 365.

    Ease of Maintenance: Business rules are easily manageable through the Dynamics 365 interface. You can modify them without the need for deploying code changes, making maintenance simpler and faster.

    User-Friendly: Configuring a business rule through the Dynamics 365 interface is intuitive and user-friendly. Business analysts or power users can quickly create and modify rules without involving developers.

    Built-in Validation: Dynamics 365 provides built-in support for showing error messages using business rules. When the condition is met, the error message is displayed directly on the form, guiding users and ensuring data integrity.

    Performance: Business rules execute client-side, meaning they run directly in the user's browser. This can result in faster response times compared to server-side logic like plugins, which need to communicate with the Dynamics 365 server.

    Scalability: Business rules are scalable and can handle various conditions and actions without significant performance impact. They're suitable for a wide range of customization scenarios.

    JavaScript/Plugin Disadvantages:

    Coding Required: JavaScript and plugins require writing and deploying code, which can be time-consuming and introduce potential errors.

    Slower Implementation: Development and deployment take longer compared to a simple business rule.

    Maintenance Overhead: If the validation logic changes, you'll need to modify the code and redeploy, increasing maintenance overhead.

    Overall, using a business rule for this scenario provides a simple, efficient, and user-friendly solution that meets your requirement without the need for custom code. It's a great way to leverage Dynamics 365's customization capabilities to enforce business logic effectively.

    Here's how to create a business rule for this scenario

    (Make sure that you have the System Administrator or System Customizer security role or equivalent permissions.)

    1. Go to the entity where your date field resides.
    2. Open the solution and go to your entity where you want to create business rule and click on New Business Rule.


    3. Give your business rule a clear name something like "Validate Date Against Today".

    4. Choose the scope (form or entity level) and when the rule should run (on save).

    5. Click on conditions, give name, create rule and enter proper fields. Click on Apply every time you create an action or condition.


    6. Now, click on components and drag "Show Error Message" from the action tab to a plus sign in the designer.

    7. Under properties of "Show Error Message", lick the Condition component in the designer window, and then set the properties like name and select field on which you want to show error message if condition is not met on the right side of the screen. Click on Apply. 

    8. Go to components, select Condition and drag below the first condition. Here you can more condition like earlier.

    9. Now, click on components and drag "Show Error Message" right to condition.
      Under properties of "Show Error Message", give name and select field on which you want to show error message like above steps. Click on Apply

    10. Click on Save button and then click on Validate
    11. Finally activate the business rule.
    Go to your for or records to test the business rule working.

    Importance of Scope- 
    Understanding the scope levels of Business Rules is essential for determining when they will be triggered. There are three levels of scope when setting up Business Rules in Microsoft Dynamics 365 -

    Specific Form: At the lowest level of scope is the Specific Form setting. Each Main Form in Dynamics 365 can have its own set of Business Rules. These Business Rules will only run on the form they are configured for. This level of scope provides flexibility, allowing organizations to tailor user experiences based on different forms.

    All Forms: The All Forms scope applies a Business Rule to every form within Dynamics 365. However, users must be on a form for the Business Rule to execute. This level of scope offers broader application across various forms while still requiring user interaction for activation.

    Entity: The Entity scope represents the highest level of scope for Business Rules. Business Rules set at the Entity level run on the server side, independent of any specific form. Users do not need to be on a form for these Business Rules to execute. This level of scope is ideal for scenarios where consistent logic needs to be enforced across all interactions with the entity.

    Reference - Microsoft learn

    Tips-

    • If you want to modify an existing business rule, you must deactivate it before you can modify it.
    • To take a snapshot of everything in the Business Rule window, click Snapshot on the action bar. This is useful, for example, if you want to share and get comments on the business rule from a team member.
    • Use the mini-map to navigate quickly to different parts of the process. This is useful when you have a complicated process that scrolls off the screen.

    Followers

    Power Dynamix YouTube Videos