Create Custom API to Delete Contact in Dynamics 365 with XrmToolBox
Introduction:
This blog explores building custom APIs within Power Apps by leveraging plugins. Custom APIs empower developers to expose specific functionalities of Dynamics 365, enabling seamless integration with external systems and services.
Scenario:We will create a Custom API of Entity Binding type with a plugin tailored to delete contact records in Dynamics 365. Following this, we'll set up and associate this Custom API with the registered plugin, and illustrate how to invoke the API using either the XrmToolBox custom API tester or Power Automate Flow.
Refer to this video for a detailed implementation guide for Developing, Configuring and Invoking Custom API
Custom API Binding Types
In Power Apps, custom APIs offer a flexible way to extend the capabilities of your data platform by defining custom messages that can be invoked from various sources. These messages can interact with data or perform custom logic. A key aspect of custom APIs is the concept of binding types, which determine how the API interacts with entities in your Dataverse environment.
Here's a breakdown of the three available binding types and we will focus on the implementation for the Global type:
Global:
Description: This type is most versatile as it doesn't have a specific association with any entity. It's suitable for operations that don't directly work with entity records.
Use Cases:
Performing calculations or manipulations on data that doesn't reside in a particular entity.
Triggering workflows or custom actions that aren't tied to an entity.
Integrating with external services or systems that don't map directly to Dataverse entities.
Entity:
Description: This type binds the custom API to a specific entity (table) in Dataverse. It's designed for operations that accept a single record of that entity as input or return information about a single record.
Use Cases:
Performing operations on a single entity record, such as creating, updating, or deleting a record.
Validating data against entity-specific rules before processing it further.
Retrieving details about a specific entity record.
EntityCollection:
Description: This type also binds to a specific entity, but it's used for operations that involve collections of records from that entity. It can accept a collection of entity records as input or return a collection of records as output.
Use Cases:
Performing bulk operations on multiple entity records, such as creating, updating, or deleting multiple records at once.
Querying and retrieving a collection of entity records based on specific criteria.
Prerequisites
Before starting on the development of the custom API using a plugin, ensure you possess the necessary tools, licenses, and knowledge outlined below.
Power Apps License
XrmToolBox with Custom API Manager and Custom API Tester installed
Power Automate License (Optional to Invoke)
Plugin/C# Development Knowledge
Visual Studio (with .Net Framework 4.6.2 for plugin development)
Plugin Registration Tool
Below is a snapshot from the XrmToolBox Custom API Manager, showcasing an Entity type custom API designed for deleting a contact, featuring input and output response properties.
Creating a Custom API in Custom API Manager
Note: The unique name must commence with the Publisher prefix, such as "new_fieldname." If provided without the prefix, the Custom API cannot be saved and will result in the following error
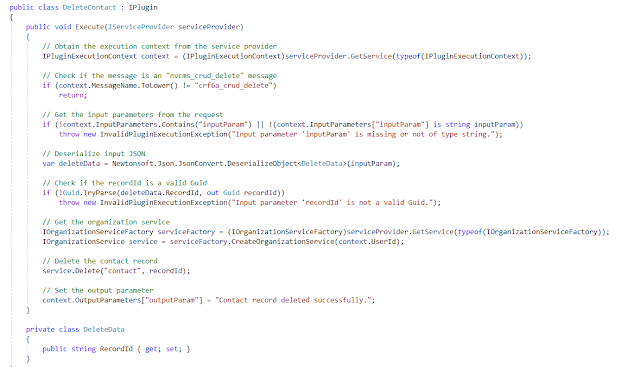
Plugin Code-
Link to download the plugin code for Deleting Contact is - here
Create Custom API to Update Contact in Dynamics 365 with XrmToolBox
Introduction:
This blog explores building custom APIs within Power Apps by leveraging plugins. Custom APIs empower developers to expose specific functionalities of Dynamics 365, enabling seamless integration with external systems and services.
Scenario:We will create a Custom API of Entity Binding type with a plugin tailored to updating contact records in Dynamics 365. Following this, we'll set up and associate this Custom API with the registered plugin, and illustrate how to invoke the API using either the XrmToolBox custom API tester or Power Automate Flow.
Refer to this video for a detailed implementation guide for Developing, Configuring and Invoking Custom API
Custom API Binding Types
In Power Apps, custom APIs offer a flexible way to extend the capabilities of your data platform by defining custom messages that can be invoked from various sources. These messages can interact with data or perform custom logic. A key aspect of custom APIs is the concept of binding types, which determine how the API interacts with entities in your Dataverse environment.
Here's a breakdown of the three available binding types and we will focus on the implementation for the Global type:
Global:
Description: This type is most versatile as it doesn't have a specific association with any entity. It's suitable for operations that don't directly work with entity records.
Use Cases:
Performing calculations or manipulations on data that doesn't reside in a particular entity.
Triggering workflows or custom actions that aren't tied to an entity.
Integrating with external services or systems that don't map directly to Dataverse entities.
Entity:
Description: This type binds the custom API to a specific entity (table) in Dataverse. It's designed for operations that accept a single record of that entity as input or return information about a single record.
Use Cases:
Performing operations on a single entity record, such as creating, updating, or deleting a record.
Validating data against entity-specific rules before processing it further.
Retrieving details about a specific entity record.
EntityCollection:
Description: This type also binds to a specific entity, but it's used for operations that involve collections of records from that entity. It can accept a collection of entity records as input or return a collection of records as output.
Use Cases:
Performing bulk operations on multiple entity records, such as creating, updating, or deleting multiple records at once.
Querying and retrieving a collection of entity records based on specific criteria.
Prerequisites
Before starting on the development of the custom API using a plugin, ensure you possess the necessary tools, licenses, and knowledge outlined below.
Power Apps License
XrmToolBox with Custom API Manager and Custom API Tester installed
Power Automate License (Optional to Invoke)
Plugin/C# Development Knowledge
Visual Studio (with .Net Framework 4.6.2 for plugin development)
Plugin Registration Tool
Below is a snapshot from the XrmToolBox Custom API Manager, showcasing an Entity type custom API designed for updating a contact, featuring input and output response properties.
Creating a Custom API in Custom API Manager
Note: The unique name must commence with the Publisher prefix, such as "new_fieldname." If provided without the prefix, the Custom API cannot be saved and will result in the following error
Plugin Code-
Link to download the plugin code for Updating Contact is - here
Create Custom API to Read Contact in Dynamics 365 with XrmToolBox
Introduction:
This blog explores building custom APIs within Power Apps by leveraging plugins. Custom APIs empower developers to expose specific functionalities of Dynamics 365, enabling seamless integration with external systems and services.
Scenario:We will create a Custom API of Entity Binding type with a plugin tailored to reading contact records in Dynamics 365. Following this, we'll set up and associate this Custom API with the registered plugin, and illustrate how to invoke the API using either the XrmToolBox custom API tester or Power Automate Flow.
Refer to this video for a detailed implementation guide for Developing, Configuring and Invoking Custom API
Custom API Binding Types
In Power Apps, custom APIs offer a flexible way to extend the capabilities of your data platform by defining custom messages that can be invoked from various sources. These messages can interact with data or perform custom logic. A key aspect of custom APIs is the concept of binding types, which determine how the API interacts with entities in your Dataverse environment.
Here's a breakdown of the three available binding types and we will focus on the implementation for the Global type:
Global:
Description: This type is most versatile as it doesn't have a specific association with any entity. It's suitable for operations that don't directly work with entity records.
Use Cases:
Performing calculations or manipulations on data that doesn't reside in a particular entity.
Triggering workflows or custom actions that aren't tied to an entity.
Integrating with external services or systems that don't map directly to Dataverse entities.
Entity:
Description: This type binds the custom API to a specific entity (table) in Dataverse. It's designed for operations that accept a single record of that entity as input or return information about a single record.
Use Cases:
Performing operations on a single entity record, such as creating, updating, or deleting a record.
Validating data against entity-specific rules before processing it further.
Retrieving details about a specific entity record.
EntityCollection:
Description: This type also binds to a specific entity, but it's used for operations that involve collections of records from that entity. It can accept a collection of entity records as input or return a collection of records as output.
Use Cases:
Performing bulk operations on multiple entity records, such as creating, updating, or deleting multiple records at once.
Querying and retrieving a collection of entity records based on specific criteria.
Prerequisites
Before starting on the development of the custom API using a plugin, ensure you possess the necessary tools, licenses, and knowledge outlined below.
Power Apps License
XrmToolBox with Custom API Manager and Custom API Tester installed
Power Automate License (Optional to Invoke)
Plugin/C# Development Knowledge
Visual Studio (with .Net Framework 4.6.2 for plugin development)
Plugin Registration Tool
Below is a snapshot from the XrmToolBox Custom API Manager, showcasing an Entity type custom API designed for reading a contact, featuring input and output response properties.
Creating a Custom API in Custom API Manager
Note: The unique name must commence with the Publisher prefix, such as "new_fieldname." If provided without the prefix, the Custom API cannot be saved and will result in the following error
Plugin Code-
Link to download the plugin code for Reading Contact is -here
Create Custom API to Create Contact in Dynamics 365 with XrmToolBox
Introduction:
This blog explores building custom APIs within Power Apps by leveraging plugins. Custom APIs empower developers to expose specific functionalities of Dynamics 365, enabling seamless integration with external systems and services.
Scenario:We will create a Custom API of Entity Binding type with a plugin tailored to creating contact records in Dynamics 365. Following this, we'll set up and associate this Custom API with the registered plugin, and illustrate how to invoke the API using either the XrmToolBox custom API tester or Power Automate Flow.
Refer to this video for a detailed implementation guide for Developing, Configuring and Invoking Custom API
Custom API Binding Types
In Power Apps, custom APIs offer a flexible way to extend the capabilities of your data platform by defining custom messages that can be invoked from various sources. These messages can interact with data or perform custom logic. A key aspect of custom APIs is the concept of binding types, which determine how the API interacts with entities in your Dataverse environment.
Here's a breakdown of the three available binding types and we will focus on the implementation for the Global type:
Global:
Description: This type is most versatile as it doesn't have a specific association with any entity. It's suitable for operations that don't directly work with entity records.
Use Cases:
Performing calculations or manipulations on data that doesn't reside in a particular entity.
Triggering workflows or custom actions that aren't tied to an entity.
Integrating with external services or systems that don't map directly to Dataverse entities.
Entity:
Description: This type binds the custom API to a specific entity (table) in Dataverse. It's designed for operations that accept a single record of that entity as input or return information about a single record.
Use Cases:
Performing operations on a single entity record, such as creating, updating, or deleting a record.
Validating data against entity-specific rules before processing it further.
Retrieving details about a specific entity record.
EntityCollection:
Description: This type also binds to a specific entity, but it's used for operations that involve collections of records from that entity. It can accept a collection of entity records as input or return a collection of records as output.
Use Cases:
Performing bulk operations on multiple entity records, such as creating, updating, or deleting multiple records at once.
Querying and retrieving a collection of entity records based on specific criteria.
Prerequisites
Before starting on the development of the custom API using a plugin, ensure you possess the necessary tools, licenses, and knowledge outlined below.
Power Apps License
XrmToolBox with Custom API Manager and Custom API Tester installed
Power Automate License (Optional to Invoke)
Plugin/C# Development Knowledge
Visual Studio (with .Net Framework 4.6.2 for plugin development)
Plugin Registration Tool
Below is a snapshot from the XrmToolBox Custom API Manager, showcasing an Entity type custom API designed for creating a contact, featuring input and output response properties.
Creating a Custom API in Custom API Manager
Note: The unique name must commence with the Publisher prefix, such as "new_fieldname." If provided without the prefix, the Custom API cannot be saved and will result in the following error
Plugin Code-
Link to download the plugin code for Creating Contact is -here
Create Custom API, Binding Type - Entity in Power Apps with XrmToolBox
Introduction: This blog explores building custom APIs within Power Apps by leveraging plugins. Custom APIs empower developers to expose specific functionalities of Dynamics 365, enabling seamless integration with external systems and services.
Scenario: We will develop a Custom API of Binding type - Entity with a plugin to retrieve records for any specific entity name from Dynamics 365. Subsequently, we'll establish this Custom API, associate it with the registered plugin, and demonstrate how to invoke the API using either the XrmToolBox custom API tester or Power Automate Flow.
Refer to this video for a detailed implementation guide for Developing, Configuring and Invoking Custom API
Custom API Binding Types
In Power Apps, custom APIs offer a flexible way to extend the capabilities of your data platform by defining custom messages that can be invoked from various sources. These messages can interact with data or perform custom logic. A key aspect of custom APIs is the concept of binding types, which determine how the API interacts with entities in your Dataverse environment.
Here's a breakdown of the three available binding types and we will focus on the implementation for the Entity type:
Global:
Description: This type is most versatile as it doesn't have a specific association with any entity. It's suitable for operations that don't directly work with entity records.
Use Cases:
Performing calculations or manipulations on data that doesn't reside in a particular entity.
Triggering workflows or custom actions that aren't tied to an entity.
Integrating with external services or systems that don't map directly to Dataverse entities.
Entity:
Description: This type binds the custom API to a specific entity (table) in Dataverse. It's designed for operations that accept a single record of that entity as input or return information about a single record.
Use Cases:
Performing operations on a single entity record, such as creating, updating, or deleting a record.
Validating data against entity-specific rules before processing it further.
Retrieving details about a specific entity record.
EntityCollection:
Description: This type also binds to a specific entity, but it's used for operations that involve collections of records from that entity. It can accept a collection of entity records as input or return a collection of records as output.
Use Cases:
Performing bulk operations on multiple entity records, such as creating, updating, or deleting multiple records at once.
Querying and retrieving a collection of entity records based on specific criteria.
Prerequisites
Before starting on the development of the custom API using a plugin, ensure you possess the necessary tools, licenses, and knowledge outlined below.
Power Apps License
XrmToolBox with Custom API Manager and Custom API Tester installed
Power Automate License (Optional to Invoke)
Plugin/C# Development Knowledge
Visual Studio (with .Net Framework 4.6.2 for plugin development)
Plugin Registration Tool
Below is a snapshot from XrmToolBox Custom API Manager of an Entity type custom API with input and output response properties:
Creating a Custom API in Custom API Manager
Note: The unique name must commence with the Publisher prefix, such as "new_fieldname." If provided without the prefix, the Custom API cannot be saved and will result in the following error Plugin Code-
Link to download the plugin code for Entity Type - here
Create Custom API, Binding Type - Entity Collection in Power Apps with XrmToolBox
Introduction:
This blog explores building custom APIs within Power Apps by leveraging plugins. Custom APIs empower developers to expose specific functionalities of Dynamics 365, enabling seamless integration with external systems and services. Scenario: We will develop a Custom API of Binding type - Entity Collection with a plugin to retrieve records for any entity specific name from Dynamics 365. Subsequently, we'll establish this Custom API, associate it with the registered plugin, and demonstrate how to invoke the API using either the XrmToolBox custom API tester or Power Automate Flow.
Refer to this video for a detailed implementation guide for Developing, Configuring and Invoking Custom API
Custom API Binding Types
In Power Apps, custom APIs offer a flexible way to extend the capabilities of your data platform by defining custom messages that can be invoked from various sources. These messages can interact with data or perform custom logic. A key aspect of custom APIs is the concept of binding types, which determine how the API interacts with entities in your Dataverse environment.
Here's a breakdown of the three available binding types and we will focus on the implementation for the Entity Collection type:
Global:
Description: This type is most versatile as it doesn't have a specific association with any entity. It's suitable for operations that don't directly work with entity records.
Use Cases:
Performing calculations or manipulations on data that doesn't reside in a particular entity.
Triggering workflows or custom actions that aren't tied to an entity.
Integrating with external services or systems that don't map directly to Dataverse entities.
Entity:
Description: This type binds the custom API to a specific entity (table) in Dataverse. It's designed for operations that accept a single record of that entity as input or return information about a single record.
Use Cases:
Performing operations on a single entity record, such as creating, updating, or deleting a record.
Validating data against entity-specific rules before processing it further.
Retrieving details about a specific entity record.
EntityCollection:
Description: This type also binds to a specific entity, but it's used for operations that involve collections of records from that entity. It can accept a collection of entity records as input or return a collection of records as output.
Use Cases:
Performing bulk operations on multiple entity records, such as creating, updating, or deleting multiple records at once.
Querying and retrieving a collection of entity records based on specific criteria.
Prerequisites
Before starting on the development of the custom API using a plugin, ensure you possess the necessary tools, licenses, and knowledge outlined below.
Power Apps License
XrmToolBox with Custom API Manager and Custom API Tester installed
Power Automate License (Optional to Invoke)
Plugin/C# Development Knowledge
Visual Studio (with .Net Framework 4.6.2 for plugin development)
Plugin Registration Tool
Below is a snapshot from XrmToolBox Custom API Manager of an Entity Collection type custom API with input and output response properties:
Creating a Custom API in Custom API Manager
Note: The unique name must commence with the Publisher prefix, such as "new_fieldname." If provided without the prefix, the Custom API cannot be saved and will result in the following error
Link to download the plugin code for Entity Collection Type - here
Power Automate Configuration-
Plugin Code-
Output Snapshot after Invoking the API in Power Automate -
Create Custom API, Binding Type - Global in Power Apps with XrmToolBox
Introduction: This blog explores building custom APIs within Power Apps by leveraging plugins. Custom APIs empower developers to expose specific functionalities of Dynamics 365, enabling seamless integration with external systems and services.
Scenario: We will develop a Custom API of Binding type - Global with a plugin to retrieve records for any entity name from Dynamics 365. Subsequently, we'll establish this Custom API, associate it with the registered plugin, and demonstrate how to invoke the API using either the XrmToolBox custom API tester or Power Automate Flow.
Refer to this video for a detailed implementation guide for Developing, Configuring and Invoking Custom API
Custom API Binding Types
In Power Apps, custom APIs offer a flexible way to extend the capabilities of your data platform by defining custom messages that can be invoked from various sources. These messages can interact with data or perform custom logic. A key aspect of custom APIs is the concept of binding types, which determine how the API interacts with entities in your Dataverse environment.
Here's a breakdown of the three available binding types and we will focus on the implementation for the Global type:
Global:
Description: This type is most versatile as it doesn't have a specific association with any entity. It's suitable for operations that don't directly work with entity records.
Use Cases:
Performing calculations or manipulations on data that doesn't reside in a particular entity.
Triggering workflows or custom actions that aren't tied to an entity.
Integrating with external services or systems that don't map directly to Dataverse entities.
Entity:
Description: This type binds the custom API to a specific entity (table) in Dataverse. It's designed for operations that accept a single record of that entity as input or return information about a single record.
Use Cases:
Performing operations on a single entity record, such as creating, updating, or deleting a record.
Validating data against entity-specific rules before processing it further.
Retrieving details about a specific entity record.
EntityCollection:
Description: This type also binds to a specific entity, but it's used for operations that involve collections of records from that entity. It can accept a collection of entity records as input or return a collection of records as output.
Use Cases:
Performing bulk operations on multiple entity records, such as creating, updating, or deleting multiple records at once.
Querying and retrieving a collection of entity records based on specific criteria.
Prerequisites
Before starting on the development of the custom API using a plugin, ensure you possess the necessary tools, licenses, and knowledge outlined below.
Power Apps License
XrmToolBox with Custom API Manager and Custom API Tester installed
Power Automate License (Optional to Invoke)
Plugin/C# Development Knowledge
Visual Studio (with .Net Framework 4.6.2 for plugin development)
Plugin Registration Tool
Below is a snapshot from XrmToolBox Custom API Manager of an Global type custom API with input and output response properties:
Creating a Custom API in Custom API Manager
Note: The unique name must commence with the Publisher prefix, such as "new_fieldname." If provided without the prefix, the Custom API cannot be saved and will result in the following error
Plugin Code-
Link to download the plugin code for Global Type - here
Output Snapshot after Invoking the API in XrmToolBox -
Signing In Plugin Assembly Matters - Plugin Registration Tool
In the Dynamics 365 and Power Platform ecosystem, the Plugin Registration Tool is a crucial component for developers and administrators. It facilitates the registration of custom plugins, workflows, and other code components in your environment. However, a common pitfall is attempting to register a plugin assembly without signing in, leading to authentication errors.
The Scenario:
Let's explore what happens when you try to register a plugin assembly without signing in. When using the Plugin Registration Tool, it requires users to authenticate with valid credentials to establish a secure connection to the target environment. Without proper authentication, attempting to register a plugin assembly will likely result in an error preventing the operation from proceeding.
The Error :
The error message encountered in such scenarios typically points to a specific issue: "Assemblies containing plugins must be strongly signed. Sign the Assembly using a Key File." This error signifies that the assembly lacks a strong name signature, a necessary security measure for custom code within the Dynamics 365 and Power Platform.
What is a Strong Name?
A strong name consists of the assembly's simple text name, version number, culture information, and a public key and digital signature. It ensures the uniqueness and integrity of the assembly, preventing tampering or unauthorized modifications.
How to Resolve:
To address this issue and proceed with the registration, you must sign the assembly using a key file. This involves generating a key pair (public and private keys) and associating the public key with your assembly. By doing so, you create a strong-named assembly, satisfying the security requirements for plugin registration.
Signing the Assembly in Visual Studio:
Prerequisites: Visual Studio: Ensure you have a compatible version of Visual Studio installed for your project type (.NET Framework, .NET Core, etc.).
Launch Visual Studio and open the project containing your plugin.
Steps:
1. Open Project Properties:
- In Solution Explorer, right-click on your project node and select "Properties."
2. Navigate to Signing Tab:
- In the Project Properties window, locate the "Signing" tab.
3. Enable Signing:
- Check the "Sign the assembly" checkbox.
4. Choose Signing Method:
- You have two options for specifying the strong name key:
- Existing Key File:
- If you have a pre-existing strong name key file, click the "Browse" button and navigate to its location. Select the file and click "Open."
- Create a new key file:
- Choose this option if you don't have an existing key file. Click the "Create" button.
- In the "Create a new strong name key file" dialog, enter a desired name for the key file (e.g., `MyPlugin.snk`).
- Optionally, select the "Protect my key file with a password" checkbox if you want to add an extra layer of security. Enter a strong password and confirm it. Click "OK."
Save Changes:
5. Click "OK" to save the changes to your project properties.
Rebuild Your Project:
6. Rebuild your project to apply the changes. This ensures that your assembly is signed with the specified key.
7. You can now register the plugin assembly in Plugin Registration Tool and it should not show any error message. It should show successful message as below-
Conclusion:
Understanding the nuances of authentication and strong-naming assemblies is vital when working with the Plugin Registration Tool in Dynamics 365 and Power Platform. Always ensure that you sign in with valid credentials to establish a secure connection, and if you encounter the mentioned error, take the necessary steps to sign your assembly using a key file.
By addressing these authentication and strong-naming requirements, you can seamlessly register your plugin assemblies and ensure a secure and reliable deployment within the Dynamics 365 and Power Platform environments.
A Comprehensive Guide to Building Custom APIs in Power Apps with Plugins
Introduction:
This blog explores building custom APIs within Power Apps by leveraging plugins. Custom APIs empower developers to expose specific functionalities of Dynamics 365, enabling seamless integration with external systems and services. Scenario - We will develop a plugin to retrieve all case records from Dynamics 365. Subsequently, we'll establish a Custom API, associate it with the registered plugin, and invoke the API using Power Automate Flow.
Refer to this video for a detailed implementation guide for Developing, Configuring and Invoking Custom API
Output Snapshot -
Understanding Custom APIs
A custom API (Application Programming Interface) is a way for developers to create their own interfaces that expose specific functionalities of a system or service. These custom APIs can then be used by other applications to interact with the original system in a controlled and secure manner. A "Custom API" is a tool that lets developers make their own Web APIs on the platform. This enables integration with external systems, services, or custom functionality within Dynamics 365. It allows developers to create their own API messages to handle complex business logic and integrate with external systems
Methods for Custom API Creation in Power Apps
There are several approaches to creating custom APIs in Power Apps:
1. Power Apps: This method utilizes forms for data entry. It eliminates the need for separate tools but requires creating individual records for each custom API component.
2. Plugin Registration Tool: This user-friendly GUI tool streamlines the plugin development process.
3. Code-based Approach: With a grasp of the data model, developers can utilize tools like Postman to swiftly create custom APIs. Alternatively, they can build a custom interface for API creation.
4. Solution Files: For those employing Application Lifecycle Management (ALM) tools, custom API definitions can be created or modified using XML files within solution packages managed through source code repositories. These APIs are established upon importing the generated solution.
5. XrmToolBox- Custom API Manager - Install Custom API Manager and Custom API Tester to create and invoke the API using XrmToolBox
Prerequisites
Before starting on the development of the custom API using a plugin, ensure you possess the necessary tools, licenses, and knowledge outlined below.
Power Apps License
Power Automate License
Plugin/C# Development Knowledge
Visual Studio (with .Net Framework 4.6.2 for plugin development)
Plugin Registration Tool
Creating a Custom API in Power Apps
There are two options when creating a custom API: utilizing a new solution or leveraging an existing one. Here, we'll delve into the Power Apps method:
1. Navigate to your solution and select "New" > "More" > "Other" > "Custom API."
2. Provide details like Display Name, Name, Unique Name, Binding Type, and other relevant fields. This mirrors the process with the Plugin Registration Tool, just with a different interface.
Note: The unique name must commence with the Publisher prefix, such as "new_fieldname." If provided without the prefix, the Custom API cannot be saved and will result in the following error
3. Develop a plugin assembly and register it using the Plugin Registration Tool. You can reuse a previously created plugin assembly here.
4. Upon registering the assembly, establish the Plugin Type value for the custom API. This functions as a lookup property; locate the Plugin Type corresponding to the type generated during assembly registration.
5. Choose your plugin assembly in the Plugin Type field and click "Save."
Your form should look something like this:
Defining Request and Response Properties
Custom APIs can incorporate request and response parameters. Here, we'll explore both:
Defining Request Properties (Optional)
While a custom API can function without parameters, you can create as many as your logic requires to transmit essential data. We can add Request and Response parameter for this API but we are not sending any request here so this part is optional to create Request parameter
1. In your solution, click New > More > Other > Custom API Request Parameter from the drop-down.
2. Edit the fields to set the properties of your custom API Request Parameter. For more information see CustomAPIRequestParameter Table Columns
3. Click Save. Your form should look something like this:
Defining Response Properties
Custom APIs can incorporate request and response parameters. Here, we'll focus on response properties:
1. Within your solution, navigate to "New" > "More" > "Other" > "Custom API Response Property."
2. Configure the properties of your response property by providing details like Display Name, Name, Unique Name, Type (e.g., String), and so on.
3. Click Save. Your form should look something like this:
Building and Registering a Plugin
Now, we'll delve into creating and registering the plugin assembly:
1. Launch Visual Studio and establish a project using the .NET Framework 4.6.2 Class Library template.
2. Integrate the required Microsoft.Xrm.Sdk assemblies and write your code to fetch cases using a Linq query (consider incorporating filter criteria for an optimized response).
3. Sign in to the plugin assembly and build the project.
4. Utilize the Plugin Registration Tool to register this plugin assembly.
5. Following registration, open the previously created Custom API and designate the registered plugin and assembly.
6. Access the solution within Dynamics and examine the API details for verification.
Link to download the plugin code (String Response) - here Link to download the plugin code (JSON Response) - here
Plugin code and registering - Snapshot-
Invoking the Custom API with Power Automate
Here's how to leverage the custom API within a Power Automate flow:
1. Navigate to the flow page and initiate a new instant flow with a manual trigger.
2. Incorporate a new step and choose "Perform an Outbound action" from Microsoft Dataverse.
3. Input or select the unique name of the custom API created earlier in the "Action Name" field.
4. Manually test the flow and examine the response within the run history.
5. The second step of the flow should display the case records retrieved by the plugin. You can customize the response to show only the desired fields by implementing a filter within the plugin code.
Flow Structure below-
Result after the flow ran Successfully-
FAQs:
Q1: Can I create a custom API without using a plugin?
A1: Yes, Power Apps provides a code-based approach, allowing developers to swiftly create custom APIs using tools like Postman.
Q2: How can I optimize my plugin code for better performance?
A2: Consider applying filter criteria in your LINQ queries and optimizing your code for efficiency.
Q3: Are there any limitations to the number of request parameters in a custom API?
A3: While there's no strict limit, it's recommended to keep the number reasonable for better readability and maintenance.
Next Steps:
Stay tuned for the next part, where we'll delve into Building Custom APIs in Plugin Registration Tool with Plugins and Building Custom APIs with Solution Files.
Next part - Create a custom API using the plug-in registration tool
Next part - Create a custom API with solution files