Sunday, January 21, 2024

Enabling/Disabling Button in Sub-grid based on field Value

Enabling/Disabling Button in Sub-grid based on field Value in Dynamics 365

Introduction

In Dynamics 365, there are often scenarios where you need to control the visibility of a button based on certain conditions. In this blog post, we will explore a common requirement: showing or hiding a button dynamically based on the value of a dropdown field. We will cover two approaches to achieve this, one using the Ribbon Workbench and the other utilizing the form scripting directly.


Refer to this video for a detailed guide on the previous setup steps for the form and Ribbon Workbench. Learn how to display buttons based on record selection in Ribbon Workbench and explore the process of unlinking entities (Account and Contact) on a button click within a sub-grid in Dynamics 365.
  1. Show Button based on records selection in Ribbon Work Bench 
  2. Unlink Entities -Account and contact on Button Click in Sub-grid

Ribbon Workbench Approach

The Challenge

Let's say we have a button that we want to show or hide based on the value of a dropdown field named "Account Status."

We can create a JavaScripot Webresource with a function, enableUnlinkButton, that takes executionContext as a parameter. This function will retrieve the form context using executionContext.getFormContext() and check the value of the "Account Status" field. (Not the right way for Ribbon Workbench Approach function ) Click here to download the code file

enableUnlinkButton(executionContext) { //Remove Debugger, this is only for testing purpose debugger; console.log("functioninvoked"); try { // Get the form context var formContext = executionContext.getFormContext(); var accountStatus = formContext.getAttribute("cr9f0_accountstatus1").getValue(); // Log the values to the console console.log("accountStatus value:", accountStatus); if (accountStatus != 459430002) { return true; } else{ return false; } } catch (error) { console.error("Error checking fields:", error); } }
Note -when this above function enableUnlinkButton(executionContext) is used within a Ribbon Workbench enable rule, it encounters an error: "TypeError: Cannot read properties of undefined (reading 'getFormContext')". This is because executionContext isn't available in the same way within the Ribbon Workbench context.) Scroll down to see the solution for this.

Configuration in Ribbon Workbench

  1. Select your custom button using the Ribbon Workbench.
  2. Associate the enableUnlinkButton function with the button's command.
  3. Use the CustomRule property of the button to specify the function.

Configuration in Ribbon Workbench involves the following steps:
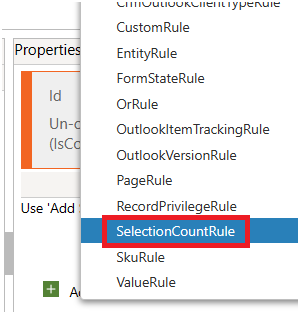
1. Open Ribbon Workbench and access the Enable Rule section.


2. Create a new Enable Rule and click "Add Step."

3. Choose "Custom Rule."


4. Add the function name and corresponding JavaScript in the Custom rule.
Set Default Result to true and Invert Result to false.
This configuration ensures that the button will be enabled (true) when the conditions specified in the JavaScript function (i.e., accountStatus!== 459430002) are met. If the conditions are not met, the button will be disabled (false). The Invert Result is set to false to keep the logical flow consistent.


5. After setting up the rule, link it to your button command. Make sure your button always has a command attached, and you can manage all your enable/display rules inside this command.

5.Publish the solution

After completing these steps, your button should be visible in the account form under the contact subgrid. However, the logic is not yet added to the form. Follow the steps below:

7. Go to your form customization and add the previously created JavaScript to form properties.
8. Click "Add," search for your web resource, and add it.


9. Verify that the web resource is visible under form libraries. 


10. Publish the form
Now, the button is properly attached to the form and web resource.

Let's check its functionality to ensure it is working as intended.

Debugging:
Open the account form and activate developer mode by pressing the function + F12 key. In the developer mode sources, click on the next step in the debugger. You may encounter an error stating that the execution context is undefined, and none of the values are being fetched, it's likely due to the fact that executionContext isn't readily available in the Ribbon Workbench context.

To address this, utilize the "crm parameter primary control" in Ribbon Workbench and pass it directly into the form to retrieve the required field values. This adjustment ensures the seamless interaction of the Ribbon Workbench with the form, resolving the issue with the execution context being unavailable.

Understanding the executionContext Nuance

The enableUnlinkButton(executionContext) function works effectively when called directly on form load. It utilizes executionContext.getFormContext() to access the form's context and field values.
However, when this same function is used within a Ribbon Workbench enable rule, it encounters an error: "TypeError: Cannot read properties of undefined (reading 'getFormContext')". This is because executionContext isn't available in the same way within the Ribbon Workbench context.


Introducing primaryControl to the Rescue We introduce the enableUnlinkButton(primaryControl) function. It accepts the primaryControl parameter, passed from the Ribbon Workbench using a crm parameter. This function directly uses primaryControl to access the form context and retrieve the Account Status field value, successfully enabling or disabling the button as intended. 1. In Ribbon Workbench, navigate to the Custom Rule, click on "Add parameter," and choose CRM parameter.


2. Select "Primary Control" from the available options.

3. Ensure that it is placed within the same enable rule beneath your library, as demonstrated below.
4. Publish the solution to apply the changes.

The Reason for Using enableUnlinkButton(primaryControl)

The code function enableUnlinkButton(executionContext) displays "accountStatus value = 459430002" on form load. However, it will throw an error when the same function is accessed through Ribbon Workbench enable rule. So, to address this issue, we remove executionContext and add the CRM parameter in Ribbon Workbench. We then pass primaryControl to the function.
Modify the Javascript and publish it Click here to download the code file
function enableUnlinkButton(primaryControl) { console.log("functioninvoked"); debugger; try { var formContext = primaryControl; // Get the form context var accountStatus = primaryControl.getAttribute("cr9f0_accountstatus1").getValue(); // Log the values to the console console.log("accountStatus value:", accountStatus); if (accountStatus !== 459430002) { return true; } else{ return false; } } catch (error) { console.error("Error checking fields:", error); } } Debugging
Open the account form and activate developer mode by pressing the function + F12 key. In the developer mode sources, click on the next step in the debugger. You may esee that now the formContect and field value is fetched correctly

Call this function within appropriate events to dynamically enable or disable the button:
  • On deposit status change: accountStatusaddOnChange(enableUnlinkButton);

Conclusion

In this blog post, we explored two approaches to dynamically enabling or disabling a button based on the value of a dropdown field in Dynamics 365. The Ribbon Workbench approach is suitable for scenarios where customization is done through the Ribbon Workbench, while the Form Context approach is more direct and can be used when scripting directly in the form designer.

Remember to choose the approach that best fits your specific scenario and development workflow. Feel free to experiment and adapt these solutions to meet your unique requirements. Happy coding!

Related blog-
  1. Show Button based on records selection in Ribbon Work Bench 
  2. Unlink Entities -Account and contact on Button Click in Sub-grid

Developer Mode in Microsoft Word & Mapping Fields from Dynamics 365

 Developer Mode in Microsoft Word:

Watch the video for a visual walkthrough of the implementation.

Definition: Developer Mode in Microsoft Word allows users to access advanced functionalities and features for creating and editing documents. It is particularly useful for users who want to work with form controls, XML mapping, and other advanced tools.

Usage: Activating Developer Mode enables users to insert and customize form controls, add and manage macros, and work with XML mapping. It is commonly utilized by those who need to create or modify documents with more advanced and customizable features.

Mapping Fields from Dynamics 365:

Definition: In the context of Dynamics 365 or other CRM systems, mapping fields refers to associating and linking data fields between entities or modules. This ensures that information is appropriately synchronized and shared across different parts of the system.

Usage: Mapping fields in Dynamics 365 is crucial for maintaining data consistency and coherence. For example, when creating records, mapping fields helps in transferring data from one entity to another automatically. This is especially valuable for avoiding manual data entry errors and ensuring accurate and updated information throughout the system.

If the Developer tab isn't displayed by default,  you can add it to the ribbon.
To enable Developer Mode in Word:

  • Go to the "File" tab.


  • Select "Options" at the bottom of the left pane.


  • In the Word Options dialog box, choose "Customize Ribbon."
  • In the right pane, check the "Developer" option.


  • Click "OK" to apply the changes.
    You should be able to see the Developer option in ribbon /command bar


Thursday, January 18, 2024

Unlink Entities -Account and contact on Button Click in Sub-grid | Dynamics 365

Unlinking Contacts from Accounts on A button Click: A Step-by-Step Guide in Dynamics 365

Hello everyone, and happy New Year! In this blog post, we will explore the process of working with the account form in Dynamics 365. Specifically, we'll delve into the creation of a custom button that unlinks related contacts from the account. This involves utilizing the Ribbon Workbench, configuring JavaScript, and ensuring a seamless user experience.

Part 1 video below-

Part 2 video below-


Ribbon Workbench Configuration

Watch the videos provided to observe the practical implementation. Follow the step-by-step instructions outlined in the videos for a hands-on understanding-
  • Step 1: Install Ribbon WorkBench
  • Step 2: Creating a New Solution
  • Step 3: Adding Buttons to the Form
  • Step 4: Handling Multiple Selections
  • Step 5: JavaScript Configuration
  • Step 6: Debugging and Testing

JavaScript Code for above implementation-

function deselectContact(selectedItemIds) {

    // Check if any records are selected

    if (selectedItemIds.length > 0) {

        // Ask for confirmation before proceeding

        var confirmDialog = confirm("Are you sure you want to deselect the selected contact(s)?");   

        if (confirmDialog) {

            // Loop through selected records and perform the delink operation

            selectedItemIds.forEach(function (contactId) {

                // Log the current Contact ID to the console

                console.log("Deselecting Contact ID: " + contactId);

                // Construct the Web API endpoint to update the Contact record (replace version according to your Dynamics 365 version)

                var endpoint = "/api/data/v9.2/contact(" + contactId.replace("{", "").replace("}", "") + ")";   

                // Prepare the data to update the 'accountid' field to null

                var data = {

                    "accountid@odata.bind": null

                };

                // Perform the Web API update request

                Xrm.WebApi.online.updateRecord("contact", contactId, data).then(

                    function success(result) {

                        // Log success message to the console

                        console.log("Contact record deselected successfully.");

                        // Refresh the Account form and subgrid to reflect the changes

                        Xrm.Page.data.refresh(true);

                        Xrm.Page.getControl("Subgrid_new_1").refresh();

                        // Show success message

                        alert("Contact record(s) have been successfully deselected.");

                    },

                    function error(error) {

                        // Log the error message and details to the console

                        console.log("Error deselecting Contact record:", error.message, error);

                        // You may want to handle the error in a way that helps diagnose the issue

                    }

                );

            });

        } else {

            // User canceled the operation

            console.log("Deselection operation canceled by the user.");

        }

    } else {

        // No records selected, display a message or perform other actions as needed

        console.log("No records selected to deselect.");

    }

}


Thursday, January 4, 2024

Show Button based on records selection in Ribbon Work Bench

If you have a button in subgrid or home grid in Dynamics 365 that you only want to show when at least one record is selected (and say max 50 records) , you can use a feature called Enable Rule in Ribbon Workbench. 

Here's how:
1. Open your solution in Ribbon Workbench.
2. Create a new Enable Rule and choose 'SelectionCountRule.'
3. Set the minimum count to 1 and the maximum count to your preference (e.g., 50).
4. Apply the rule to the 'Selected Entity,' and set Default to True and InvertResult to False.
After setting up the rule, link it to your button command. Make sure your button always has a command attached, and you can manage all your display rules inside this command.


The steps with snapshots are provided below for your easy reference.

1. Open Ribbon Workbench and navigate to Enable Rule.


2. Create a new Enable Rule and click on "Add Step."
3. Choose "SelectionCountRule" from the options.

4. Specify the minimum and maximum count values (e.g., show the button when at least one record is selected, and a maximum of 50).
Set the rule to apply to "Selected Entity" with Default set to True and InvertResult to False.


5. After configuring the Enable Rule, go to the button command to associate the enableRule with the button's command.
6. Click on "Add" to include your enable rule in this command.


7. Select your enable rule within the command settings.

Finally, publish the solution to apply the changes.


Retrieve Header Fields on Forms in Dynamics 365

To obtain a field from the header section of any form using JavaScript, the key is to append "header_" before the actual field name. For instance, if you want to retrieve the 'status' field (with the schema name 'statuscode') and the 'name' field from the case form, which are located in the header section, you should use "header_statuscode" and "header_name" respectively.
The following examples illustrate how to achieve this:

Javascript cdoe samples-

// Retrieving fields from the header section on the form

function getHeaderField(executionContext) {

  var formContext = executionContext.getFormContext();

  var status = formContext.getAttribute("header_statuscode").getValue();

  // Other example - hiding the 'header_fieldname' control

  Xrm.Page.getControl("header_fieldname").setVisible(false);

}


// Retrieving fields from form sections or tabs

function getField(executionContext) {

  var formContext = executionContext.getFormContext();

  var status = formContext.getAttribute("statuscode").getValue();


  // Other example - hiding the 'fieldname' control

  Xrm.Page.getControl("fieldname").setVisible(false);

}

Followers

Power Dynamix YouTube Videos